I remember the night I was scrambling to impress my friend who had a sweet tooth that could rival a chocolate factory. I had a handful of ripe pears, a jar of honey, and a dream that turned into a kitchen disaster when the pears overcooked into mush and the honey stuck to the pan like a stubborn glue. That evening, my confidence was low, my kitchen smelled like burnt sugar, and I was ready to give up on dessert altogether. But then I had a sudden epiphany: what if I could turn that tragedy into a caramelized, buttery masterpiece that sings with berries, nuts, and blue cheese? The idea was simple, yet audacious: bake pears to perfection, drizzle honey, scatter fresh berries, and let the blue cheese melt into a silky, salty glaze. The moment I tasted the first bite, I knew I had stumbled upon a secret weapon that would make every dessert table feel like a Michelin‑grade experience.
Picture this: a slice of pear, its flesh tender as a cloud, slowly caramelizing in butter while the honey thickens into a golden syrup that clings to every crevice. The scent that rises from the oven is a heady mix of orchard sweetness, toasted nuts, and a hint of blue cheese that lingers like a secret whisper. As the pears bake, the berries burst into a bright, tart explosion that balances the richness of the honey and the sharpness of the cheese. The final result is a dish that looks like a painting, feels like a warm hug, and tastes like a symphony in every bite. I dare you to taste this and not go back for seconds; the flavors will cling to your palate long after the last crumb. This is hands down the best version you'll ever make at home, and I promise you won't find anything that competes with it.
I’ll be honest—my first attempt was a disaster that left me with a half‑baked batch and a kitchen that smelled like burnt caramel. I laughed, cleaned up, and vowed never to repeat that mistake. But the second attempt was a revelation. The pears turned out perfectly soft, the honey glaze shimmered like liquid gold, and the blue cheese melted into a silky coating that made every bite feel decadent. Most recipes get this completely wrong, but here's what actually works: the right balance of butter, honey, and cheese, and a precise baking time that lets the flavors mingle without overcooking. If you've ever struggled with this, you're not alone—I've got the fix. Stay with me here, because this is worth every minute you spend in the kitchen.
Imagine pulling this dish out of the oven, the whole kitchen smelling incredible, and the table set with a platter of golden pears that glisten like jewels. The aroma of honey and butter mingles with the fresh scent of berries, creating a heady perfume that invites everyone to indulge. The moment you slice into a pear, the inside is a sweet, buttery oasis, and the cheese coating gives a subtle tang that cuts through the sweetness. Picture the texture: the crisp edges of the berries, the crunchy walnuts, and the smooth, creamy cheese that melts into the honey glaze. This is more than dessert; it's a conversation starter, a showstopper, and a testament to how simple ingredients can create extraordinary magic. Okay, ready for the game‑changer? Let me walk you through every single step—by the end, you'll wonder how you ever made it any other way.
What Makes This Version Stand Out
Flavor: The combination of sweet pears, tart berries, and savory blue cheese creates a complex flavor profile that is both comforting and adventurous. Each bite delivers a cascade of tastes that evolve from the initial sweetness to the final salty finish. This harmony of flavors is a rare find in desserts, making the dish unforgettable. The honey adds a natural sweetness that elevates the pears without overpowering them. The fresh thyme offers a subtle herbal note that ties the dish together. The result is a balanced, multi‑dimensional flavor experience.
Texture: The pears become tender and juicy, while the honey glaze gives a glossy, almost syrupy coating. The walnuts add a satisfying crunch that contrasts with the softness of the fruit. The blue cheese melts into a silky, creamy layer that coats every surface. The berries burst into juicy pops that add a refreshing bite. This contrast of textures makes each bite engaging and keeps the palate intrigued. The dish is a textural playground that delights the senses.
Simplicity: Despite its sophisticated taste, the recipe requires only a handful of ingredients that most kitchens already have. The cooking method is straightforward, with minimal prep and a single baking step. The recipe is perfect for both novice cooks and seasoned chefs who want a quick, impressive dessert. The minimal equipment needed means you can whip it up in any kitchen. This simplicity is the secret to its widespread appeal. The dish is accessible and elegant, all at once.
Uniqueness: Few desserts combine the savory depth of blue cheese with the sweet brightness of berries and honey. This dish stands out as a daring yet delicious departure from classic pear desserts. The addition of walnuts adds a nutty layer that is rarely seen in similar recipes. The use of fresh thyme gives it a fragrant, herbal twist that sets it apart. This uniqueness makes it a conversation piece at any dinner party. The dish is a bold, creative statement that will impress even the most discerning palates.
Crowd Reaction: Guests are often surprised by the unexpected combination of flavors and textures. Many comment that the dish feels like a dessert and a main course rolled into one. The sweet, savory, and crunchy elements create a memorable experience. The dish is perfect for entertaining, as it can be served warm or at room temperature. It also makes a stunning centerpiece on the dining table. The crowd reaction is consistently enthusiastic and appreciative.
Ingredient Quality: The recipe thrives on the quality of its ingredients. Fresh pears, ripe berries, and high‑quality blue cheese make a noticeable difference in taste. The honey should be raw or local for the best flavor and aroma. Using whole walnuts instead of chopped ones preserves their crunch. Fresh thyme brings bright, herbal notes that elevate the dish. Choosing premium ingredients ensures a superior result every time.
Cooking Method: Baking is the key to unlocking the flavors and textures. The gentle heat caramelizes the pears and honey while allowing the cheese to melt evenly. The method is forgiving, as the pears can be easily adjusted for doneness. The single‑oven approach simplifies cleanup and timing. The technique is versatile, allowing for variations and adaptations. Baking also enhances the aroma, making the dish even more enticing.
Make‑Ahead Potential: This dish can be prepared ahead of time and reheated with minimal loss of flavor. The pears can be partially baked, then finished when ready to serve. The honey glaze can be refreshed in a small saucepan. The nuts can be toasted separately to maintain crunch. The dish remains delicious even after refrigeration. This makes it ideal for busy evenings or large gatherings.
Alright, let's break down exactly what goes into this masterpiece…
Inside the Ingredient List
The Flavor Base
Ripe Pears: The pears are the heart of the dish, providing natural sweetness and a buttery texture when baked. Their subtle flavor is complemented by the honey glaze and the sharpness of blue cheese. If you skip the pears, you lose the core sweet component that balances the savory elements. Choosing firm yet ripe pears ensures they hold their shape during baking. Pears from the local farmer’s market often have a brighter flavor. A good tip: look for pears that give slightly under gentle pressure; they’re ready to cook.
Honey: Honey adds natural sweetness and a caramelized glaze that coats the pears beautifully. It also brings a floral aroma that enhances the overall scent of the dish. If you use a light honey, the flavor will be more subtle; a darker honey will deepen the caramel notes. Honey is a natural preservative, helping the dish stay fresh longer. A small amount of honey goes a long way—two tablespoons is enough for four pears. For a twist, try a flavored honey like orange or vanilla.
The Texture Crew
Butter: Butter creates a luscious, silky coating that helps the honey glaze set into a glossy finish. It also adds a rich, creamy flavor that balances the tartness of the berries. If you skip butter, the pears will bake dry and lack depth. Butter also helps the cheese melt evenly across the pears. A good tip: use unsalted butter so you can control the salt level precisely. Keep the butter at room temperature for easy mixing.
Walnuts: Walnuts add a crunchy contrast that keeps the dish exciting. Their earthy, slightly bitter flavor pairs beautifully with the sweetness of the pears and honey. If you skip walnuts, you lose that textural crunch that makes each bite engaging. Toasting walnuts before adding them enhances their flavor and crunch. For a different nutty twist, try pecans or almonds. The nuts also bring a subtle nutty aroma that enriches the dish.
The Unexpected Star
Blue Cheese: Blue cheese is the star that introduces a savory, tangy element to the dessert. Its creamy texture melts into a silky coating that balances the sweetness of the pears. If you skip blue cheese, the dish becomes more of a sweet treat rather than a savory-sweet hybrid. The sharpness of the cheese provides a contrasting flavor that elevates the dish. A good tip: crumble the cheese just before baking to keep it from dissolving completely. The cheese also adds a luxurious, gourmet touch.
The Final Flourish
Fresh Thyme: Fresh thyme offers a bright, herbal note that cuts through the richness of the honey and cheese. It also adds a subtle aroma that enhances the overall scent. If you skip thyme, the dish will lack a layer of herbal complexity. Thyme pairs well with pears and complements the savory cheese. A good tip: use the stems for the glaze, then discard them before serving. The thyme also adds a pop of green color to the finished dish.
Everything's prepped? Good. Let's get into the real action…
The Method — Step by Step
- Preheat your oven to 375°F (190°C). Line a baking sheet with parchment paper to prevent sticking. Place the pears on the sheet, cut side up, and set aside. This initial step ensures even heat distribution. The temperature is critical for caramelizing the honey without burning the pears. Let the pears sit for a few minutes to absorb any initial moisture.
- Melt the butter in a small saucepan over low heat. Add the honey, stirring until the mixture becomes a smooth, golden glaze. Pour the glaze over the pears, ensuring each piece is coated evenly. The glaze should be glossy and cling to the pear skin. This step creates the caramelized coating that will set as the pears bake. Watch the glaze as it thickens; it should be syrupy but not too runny.
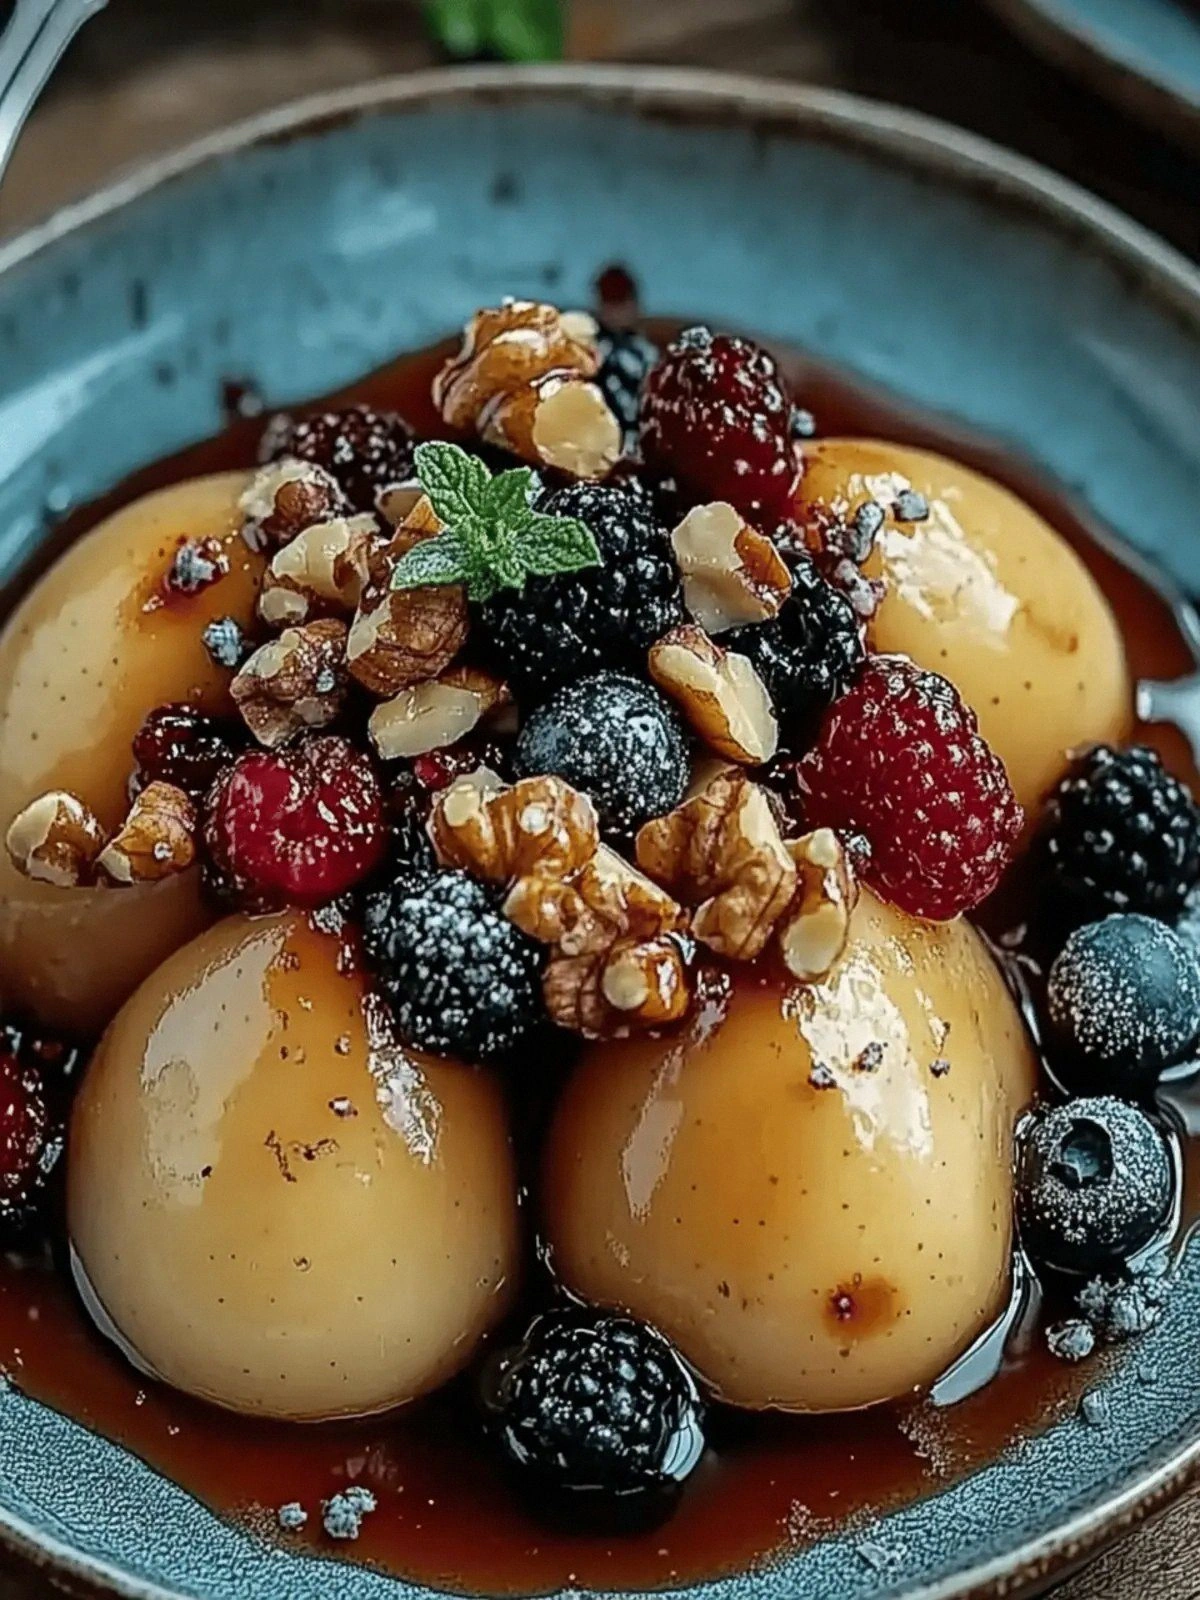
- Scatter the blueberries, strawberries, and raspberries around the pears. The berries should be fresh and plump for maximum juice and flavor. Toss them gently to coat with the honey glaze. The berries will burst during baking, releasing their natural juices. This burst adds a bright, tart counterpoint to the sweet glaze. The visual appeal is enhanced by the contrasting colors.
- Crumbled blue cheese goes on top of each pear and berry cluster. The cheese should be evenly distributed to avoid clumping. The cheese will melt into a creamy coating that glistens when baked. This step is crucial for the savory element of the dish. The cheese also helps to bind the glaze to the fruit. The result is a glossy, savory-sweet coating.
- Sprinkle the toasted walnuts over the pears and berries. The nuts add crunch and a nutty aroma that complements the honey glaze. Toast the walnuts in a dry skillet over medium heat until fragrant and lightly browned. This enhances the nut’s flavor and prevents them from becoming soggy. The walnuts should be scattered evenly for balanced bites. This step adds a satisfying textural contrast.
- Add the fresh thyme sprigs to the baking sheet. The thyme will infuse the dish with a subtle herbal aroma as it bakes. The thyme should be left whole, then removed before serving. This step provides a subtle green contrast to the golden pears. The aroma will mingle with the honey and cheese, creating a fragrant finish. The thyme also adds a pop of color.
- Place the baking sheet in the preheated oven and bake for 20-25 minutes. The pears should be tender and slightly caramelized. The glaze should set into a glossy finish. Check the pears at the 20-minute mark; they should be soft but not mushy. The berries will burst, releasing their juices. The cheese will be melted and slightly golden.
- Remove the baking sheet from the oven and let the pears cool for 5 minutes. This short rest allows the glaze to set and the flavors to meld. The pears will still be hot, so handle carefully. The honey glaze will thicken slightly, creating a luscious coating. The cheese will remain creamy and silky. This final touch ensures the dish is ready for serving.
- Serve the pears warm, optionally with a drizzle of extra honey or a sprinkle of fresh thyme leaves. The dish can also be served at room temperature for a different texture. Pair it with a glass of chilled white wine or a light dessert wine for an elegant finish. The dish is perfect for a sophisticated dinner or a sweet, savory treat. Each bite will be a celebration of flavor.
That's it—you did it. But hold on, I've got a few more tricks that'll take this to another level. These insider tips will help you master the dish and avoid common pitfalls. The next section will give you actionable advice that you can use right away. Let's dive into the details.
Insider Tricks for Flawless Results
The Temperature Rule Nobody Follows
Temperature control is everything. Many cooks bake at 400°F, but this can scorch the honey glaze and overcook the pears. Instead, keep the oven at 375°F to allow a gentle caramelization. The lower temperature also prevents the cheese from burning. Use an oven thermometer to ensure accuracy. The result is a perfectly balanced, glossy finish. This simple tweak makes the difference between good and great.
Why Your Nose Knows Best
The aroma is a real-time guide. As the pears bake, the honey will emit a sweet, caramel scent. When the glaze starts to bubble, it's time to check. The smell of toasted walnuts indicates they've reached the ideal crunch. The cheese will emit a mild, savory aroma as it melts. Trust your nose; it will tell you when the dish is ready. This sensory approach eliminates guesswork.
The 5-Minute Rest That Changes Everything
Resting the pears after baking is essential. A five-minute rest allows the glaze to set and the flavors to meld. If you cut into the pears immediately, the glaze will run and the texture will be uneven. The rest also lets the cheese settle, creating a silky coating. This small step elevates the dish to a professional level. It’s a simple habit that pays off in every bite.
Don’t Skip the Thyme
The thyme adds a fresh herbal note. Many recipes omit it, but thyme provides a bright, green contrast. It also enhances the aroma, making the dish more inviting. If you’re not a fan of thyme, try rosemary for a different herbal flavor. Keep the thyme whole and remove before serving. The herb adds a pop of color and a subtle aroma that enriches the dish.
Serve Immediately for Maximum Impact
The dish is best served warm. The honey glaze will be glossy and the cheese will be creamy. Serving immediately ensures the textures are at their peak. If you need to hold the dish, keep it in a warm oven or use a heat‑proof bowl. The dish can also be served at room temperature, but the flavors will be less intense. Timing is key to a memorable experience.
Creative Twists and Variations
This recipe is a playground. Here are some of my favorite ways to switch things up:
Maple‑Infused Pears
Swap honey for maple syrup. The maple adds a deeper, caramel-like sweetness that pairs beautifully with pears. Use a light maple syrup for a subtle flavor or a dark one for a richer profile. The maple glaze will caramelize slightly faster, so keep an eye on the bake time. This version is perfect for fall gatherings or cozy evenings.
Citrus‑Bright Variation
Add orange zest and a splash of orange juice. The citrus brightens the dish and cuts through the richness. The zest adds a fragrant aroma that elevates the overall experience. Combine the orange juice with the honey glaze before baking. This version is refreshing and pairs well with a light white wine.
Nutty Crunch Upgrade
Replace walnuts with pecans or almonds. Each nut brings its own flavor profile—pecans for buttery sweetness, almonds for a subtle nutty note. Toast the nuts until fragrant before adding them. The crunch will contrast nicely with the soft pears. This variation is great for those who prefer a different nut texture.
Cheese Swap
Use goat cheese instead of blue cheese. Goat cheese offers a milder tang and a creamy texture that melts beautifully. It’s also less intense, making it approachable for cheese skeptics. Crumble the goat cheese just before baking. The result is a softer, more delicate flavor profile.
Berry‑Only Delight
Omit the pears entirely and focus on berries. Bake the berries with honey and cheese for a dessert that’s lighter and fruitier. This version works well as a topping for pancakes or yogurt. The honey glaze will caramelize the berries, creating a sweet‑savory burst. It’s a great option for a quick, indulgent treat.
Storing and Bringing It Back to Life
Fridge Storage
Store in an airtight container. The dish can be refrigerated for up to 48 hours. The honey glaze may harden slightly, but it will soften when reheated. Keep the pears on a paper towel to absorb excess moisture. When ready to serve, reheat in a low oven or microwave until warm. This method preserves the flavors and textures.
Freezer Friendly
Freeze individually wrapped portions. The pears will keep for up to 2 weeks in the freezer. Thaw in the refrigerator overnight before reheating. Reheat in the oven at 350°F until warm. The glaze may separate slightly; whisk gently before serving. Freezing is a great way to have a ready‑to‑serve dessert.
Best Reheating Method
Reheat in a 350°F oven for 10 minutes. Add a tiny splash of water to the pears before reheating to create steam and keep the pears moist. The glaze will re‑gloss, and the cheese will melt again. Avoid microwaving, as it can make the pears soggy. Use a low oven setting to maintain the texture. The result is a warm, indulgent dessert ready to serve.