Picture this: I’m standing in my cramped kitchen, the timer on the oven just pinged, and I’m staring at a pan of soggy, over‑cooked chickpea patties that look like they belong in a science experiment gone wrong. The smell? A sad, burnt‑onion whisper that made my nose twitch in protest. I was half‑heartedly daring my roommate to try one, and she laughed, “If you can’t make them crunchy, I’ll just order pizza.” That moment, that tiny spark of culinary humiliation, turned into an obsession. I promised myself I’d create a nugget that would make even the most skeptical pizza lover rethink their life choices.
Fast forward a week later, after a marathon of trial, error, and a few tears (mostly from laughing at my own kitchen catastrophes), I finally cracked the code. The secret? A perfect marriage of chickpeas and finely diced vegetables, a breadcrumb coating that crisps like a fresh‑baked croissant, and a seasoning blend that dances on the tongue with just the right amount of heat. The moment those nuggets hit the pan, the sizzle was like a tiny fireworks show, and the aroma that rose was an intoxicating blend of cumin, garlic, and a whisper of chili that made my stomach do a happy jig. I dared you to taste this and not go back for seconds, because trust me, you won’t be able to.
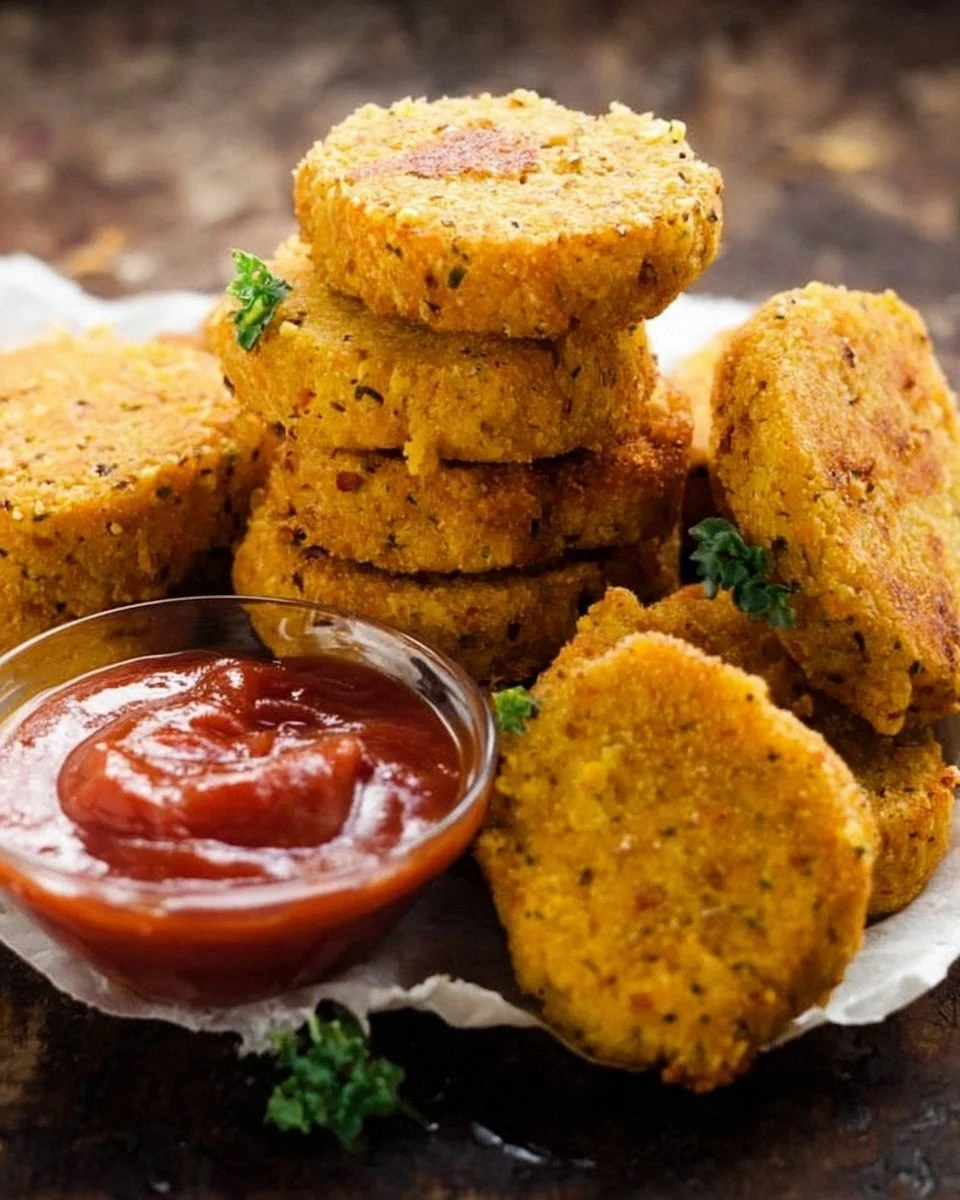
Most recipes out there treat chickpea nuggets like a bland, mushy after‑thought, missing the crucial step of drying the mashed chickpeas and adding a crunchy breadcrumb crust. Here’s what actually works: a quick rinse, a thorough mash, a gentle squeeze to eliminate excess moisture, and a gentle hand when folding in the veggies so you keep that bright, fresh snap. I’ll be honest — I ate half the batch before anyone else got to try it, and that’s a confession I’m not ashamed of. The texture? Imagine biting into a golden‑brown exterior that shatters like thin ice, revealing a soft, herb‑infused interior that feels like a warm hug for your palate.
And now, the game‑changer: I’m about to reveal a technique that most home cooks overlook — a light drizzle of olive oil combined with a quick flash‑fry before finishing in the oven. This double‑cook method locks in moisture while giving you that irresistible crunch without drowning the nuggets in oil. Picture yourself pulling these out of the oven, the whole kitchen smelling incredible, the golden nuggets glistening like tiny treasure chests. Let me walk you through every single step — by the end, you’ll wonder how you ever made it any other way.
What Makes This Version Stand Out
- Flavor Explosion: The cumin and garlic powder create a warm, earthy base that’s amplified by a pinch of chili, delivering a subtle kick that lingers pleasantly.
- Texture Triumph: A crunchy breadcrumb exterior meets a tender, moist interior thanks to the perfect chickpea‑to‑vegetable ratio.
- Simplicity: Fewer than ten ingredients, most of which you likely already have, means you can whip these up on a weeknight without a trip to the specialty store.
- Unique Twist: The double‑cook method (pan‑sear then oven‑finish) ensures a golden crust without the greasiness that plagues many baked nuggets.
- Crowd‑Pleaser: Even the most skeptical meat‑eaters admit these nuggets are “the best veggie thing they’ve ever tasted.”
- Ingredient Quality: Using a good quality canned chickpea and fresh, colorful vegetables makes a noticeable difference in flavor and nutrition.
- Make‑Ahead Magic: You can form and freeze the nuggets ahead of time, then bake straight from the freezer for a quick snack.
- Versatile Serving: Perfect as an appetizer, a main‑course paired with a salad, or even as a protein‑packed addition to a grain bowl.
Inside the Ingredient List
The Flavor Base
First up, the garlic powder and cumin. Garlic powder brings a mellow, aromatic depth that doesn’t overpower the delicate chickpea flavor, while cumin adds an earthy, slightly smoky undertone that feels like a warm hug on a chilly evening. If you skip these, you’ll end up with a bland, one‑dimensional bite that could easily be mistaken for plain mashed beans. Want to experiment? Swap cumin for smoked paprika for a richer, smoky profile, but remember to reduce the chili powder a touch to keep the heat balanced.
The Texture Crew
The breadcrumbs are the unsung heroes here. Whole‑wheat breadcrumbs not only give you that satisfying crunch, they also add a subtle nutty flavor and a boost of fiber that makes these nuggets more filling. Skipping the breadcrumbs or using panko will change the texture dramatically — you’ll lose that cohesive bite and end up with a crumbly mess. For a gluten‑free version, swap in almond flour or crushed rice crackers; just be mindful that the coating might be a tad softer.
The Unexpected Star
Mixed vegetables—think carrot, zucchini, and bell pepper—bring color, moisture, and a sweet‑savory balance that brightens the overall flavor. The veggies also contribute natural sugars that caramelize during the pan‑sear, adding a whisper of sweetness that perfectly counters the chili’s heat. If you’re missing any of these, feel free to substitute with finely diced spinach or even sweet corn, but keep the total volume at about one cup to maintain structural integrity.
The Final Flourish
Olive oil is the finishing touch that ties everything together. A light drizzle before the pan‑sear ensures the breadcrumbs adhere and develop that golden‑brown sheen. Using too much oil will drown the nuggets, while too little will cause them to stick. Opt for a high‑quality extra‑virgin olive oil for a peppery finish, or go with a neutral oil like grapeseed if you want the spices to shine without interference.
Everything's prepped? Good. Let's get into the real action...
The Method — Step by Step
Start by draining and rinsing the chickpeas thoroughly. I dare you to rinse them under cold water for at least 30 seconds — you’ll hear the gentle splash that signals you’re about to remove that canned metallic aftertaste. Transfer the chickpeas to a large mixing bowl and mash them with a potato masher or fork until you achieve a coarse, slightly chunky texture; you want some bite left for body. Once mashed, spread the mixture onto a clean kitchen towel and press gently to squeeze out any excess liquid; this step is crucial for a crisp crust later.
Next, whisk the egg (or prepared flaxseed egg) in a small bowl until it’s frothy. This binder is the glue that holds the nuggets together, and the flaxseed version adds a subtle nutty note while keeping the dish vegan.
Kitchen Hack: If using a flaxseed egg, let it sit for 5 minutes after mixing; this allows it to thicken and mimic the binding power of a real egg.Now, gently fold in the finely chopped mixed vegetables, onions, garlic powder, cumin, and chili powder. The vegetables should be uniformly small so they integrate seamlessly without creating large pockets of moisture. Sprinkle in a pinch of salt and pepper, then give the mixture a final stir until everything is evenly coated. At this stage, the mixture should feel slightly sticky but manageable; if it feels too wet, add a tablespoon of breadcrumbs to absorb excess moisture.
Take about a half‑cup of the breadcrumb mixture and place it on a shallow plate. Using your hands, scoop out a golf‑ball‑sized portion of the chickpea blend, roll it into a ball, then gently flatten it into a nugget shape about ½‑inch thick. Press each nugget into the breadcrumb plate, ensuring an even coating on all sides. This double‑coating step (first in the egg, then in breadcrumbs) creates that satisfying crunch you’re after.
Heat a large non‑stick skillet over medium‑high heat and drizzle in two tablespoons of olive oil. When the oil shimmers (you’ll see tiny ripples across the surface), carefully lay the nuggets in a single layer, leaving a little space between each. Listen for that immediate sizzle — that’s the sound of flavor forming a golden crust. Cook for 2‑3 minutes per side, or until each side turns a deep amber and you can see the breadcrumbs starting to crisp.
Watch Out: Resist the urge to overcrowd the pan; steaming will occur instead of searing, leading to soggy nuggets.Once both sides are beautifully browned, preheat your oven to 400°F (200°C). Transfer the seared nuggets onto a parchment‑lined baking sheet, arranging them in a single layer. Drizzle a thin veil of olive oil over the top — just enough to give them a glossy finish without drowning them. Slide the sheet into the oven and bake for 12‑15 minutes, or until the interior is heated through and the exterior reaches a crisp, golden perfection. This final bake locks in moisture while perfecting the crunch factor.
While the nuggets are baking, prepare a quick dipping sauce: combine plain Greek yogurt (or a plant‑based alternative), a squeeze of lemon juice, a dash of smoked paprika, and a sprinkle of fresh chopped herbs like parsley or cilantro. Stir until smooth, then taste and adjust salt as needed. This sauce adds a creamy tang that cuts through the richness of the nuggets, creating a harmonious bite.
When the timer dings, pull the tray out and let the nuggets rest for two minutes. This brief pause allows the crust to set, preventing it from crumbling when you pick them up. Serve them hot, arranged on a platter with the yogurt dip in a small bowl, and garnish with a handful of microgreens for that restaurant‑style finish.
That’s it — you did it. But hold on, I’ve got a few more tricks that’ll take this to another level. From a quick sprinkle of flaky sea salt to a dash of smoked chipotle for an extra smoky punch, these finishing touches can elevate your nuggets from “good” to “legendary.” Stay with me here — this is worth it.
Insider Tricks for Flawless Results
The Temperature Rule Nobody Follows
Never, ever cook these nuggets on low heat. Starting at medium‑high ensures the breadcrumbs instantly form a crust, sealing in moisture. I once tried a gentle simmer because I was “being careful,” and the nuggets turned into soggy patties that fell apart on the plate. The rule of thumb: the hotter the pan, the better the crunch.
Why Your Nose Knows Best
When the nuggets are in the oven, trust your sense of smell more than the timer. A toasty, nutty aroma means the breadcrumbs have caramelized perfectly. If you start to smell a burnt, acrid scent, pull them out immediately — over‑cooking can turn that delightful crust into a bitter ash.
The 5‑Minute Rest That Changes Everything
After baking, let the nuggets rest on a cooling rack for five minutes. This short pause allows the interior to finish steaming gently, preventing the crust from cracking when you bite in. Skipping this step is the fastest way to end up with crumbs everywhere and a soggy bite.
Egg‑Free Binding Magic
If you’re going vegan, the flaxseed egg is your secret weapon. Mix one tablespoon of ground flaxseed with 2.5 tablespoons of water, let it sit, and you’ll have a gelatinous binder that mimics the elasticity of a real egg. It also adds a subtle, nutty flavor that complements the cumin beautifully.
Breadcrumb Boost
For an extra‑crunchier exterior, toast your breadcrumbs lightly in a dry pan with a pinch of smoked paprika before using them. This adds an extra layer of flavor and a deeper golden hue. I’ve tried this on a whim, and the results were so good I now do it for every batch.
Creative Twists and Variations
This recipe is a playground. Here are some of my favorite ways to switch things up:
Spicy Sriracha Glaze
After baking, brush the nuggets with a mixture of sriracha, honey (or agave for vegan), and a splash of soy sauce. Return to the oven for two minutes. The result is a sticky, sweet‑heat coating that pairs perfectly with a cool cucumber dip.
Cheesy Parmesan Crust
Mix grated Parmesan into the breadcrumb coating for a cheesy, umami‑rich crust. This variation is a hit with kids who love cheese, and it adds a subtle salty crunch that elevates the overall flavor profile.
Herb‑Infused Veggie Medley
Swap the standard mixed veggies for a blend of finely chopped kale, fresh basil, and sun‑dried tomatoes. The herbs bring a fresh, aromatic lift, while the sun‑dried tomatoes add a burst of tangy sweetness.
Middle‑Eastern Flair
Add a teaspoon of ground coriander and a pinch of sumac to the spice mix, then serve the nuggets with a tahini‑lemon drizzle. This version feels like a mini‑mezze platter and pairs wonderfully with a side of tabbouleh.
Breakfast Bomb
Serve the nuggets atop a stack of fluffy scrambled tofu or eggs, drizzle with avocado oil, and sprinkle with chives. The savory nuggets become a protein‑packed breakfast that keeps you full all morning.
Storing and Bringing It Back to Life
Fridge Storage
Place cooled nuggets in an airtight container lined with a paper towel to absorb excess moisture. They’ll stay fresh for up to four days. When you’re ready to eat, reheat in a preheated 375°F oven for 8‑10 minutes, or pop them in a skillet with a splash of olive oil.
Freezer Friendly
Arrange unbaked nuggets on a parchment sheet, freeze until solid, then transfer to a zip‑top freezer bag. They’ll keep for three months. To cook from frozen, add an extra five minutes to the oven time and skip the initial pan‑sear — the oven will handle both crisping and heating.
Best Reheating Method
The secret to resurrecting that crunch is a quick flash‑fry. Heat a thin layer of olive oil in a skillet over medium‑high, add the nuggets, and cook for 2‑3 minutes per side. For an even easier route, a blast of hot air in a convection oven (425°F) works wonders, especially if you add a tiny splash of water to the pan before covering — the steam revives the interior while the hot air re‑crisp the crust.