I was in a panic one Friday night, staring at a box of chocolate chips and a can of sweetened condensed milk that had been sitting in my pantry for months. I wanted a quick, indulgent treat that could be whipped up in under an hour, but the last thing I needed was another bland, overcooked batch of fudge that turned out more like a chocolate paste than a dessert. The solution? A simple, no-bake chocolate caramel cup that feels like a decadent, buttery caramel on a chocolate shell, all assembled in the comfort of my own kitchen. Picture the kitchen filling with the warm, buttery scent of caramel melting into chocolate, the sound of the pan sizzling as sugar turns golden, and the anticipation of that first bite where the chocolate crackles and the caramel swirls like a silky river.
That moment was the spark that turned a chaotic craving into a recipe that I now call my signature chocolate caramel cup. I was tired of recipes that demanded a double boiler, a whisk, and a relentless attention to detail. I wanted something that would feel like a reward, not a chore. And so, I experimented with a few tweaks: using coconut oil to give a glossy finish, adding flaky sea salt for that subtle crunch, and, most importantly, letting the caramel and chocolate meld together in a single pot. The result? A luscious, melt-in-your-mouth dessert that’s as easy to make as it is to devour. I dare you to taste this and not go back for seconds.
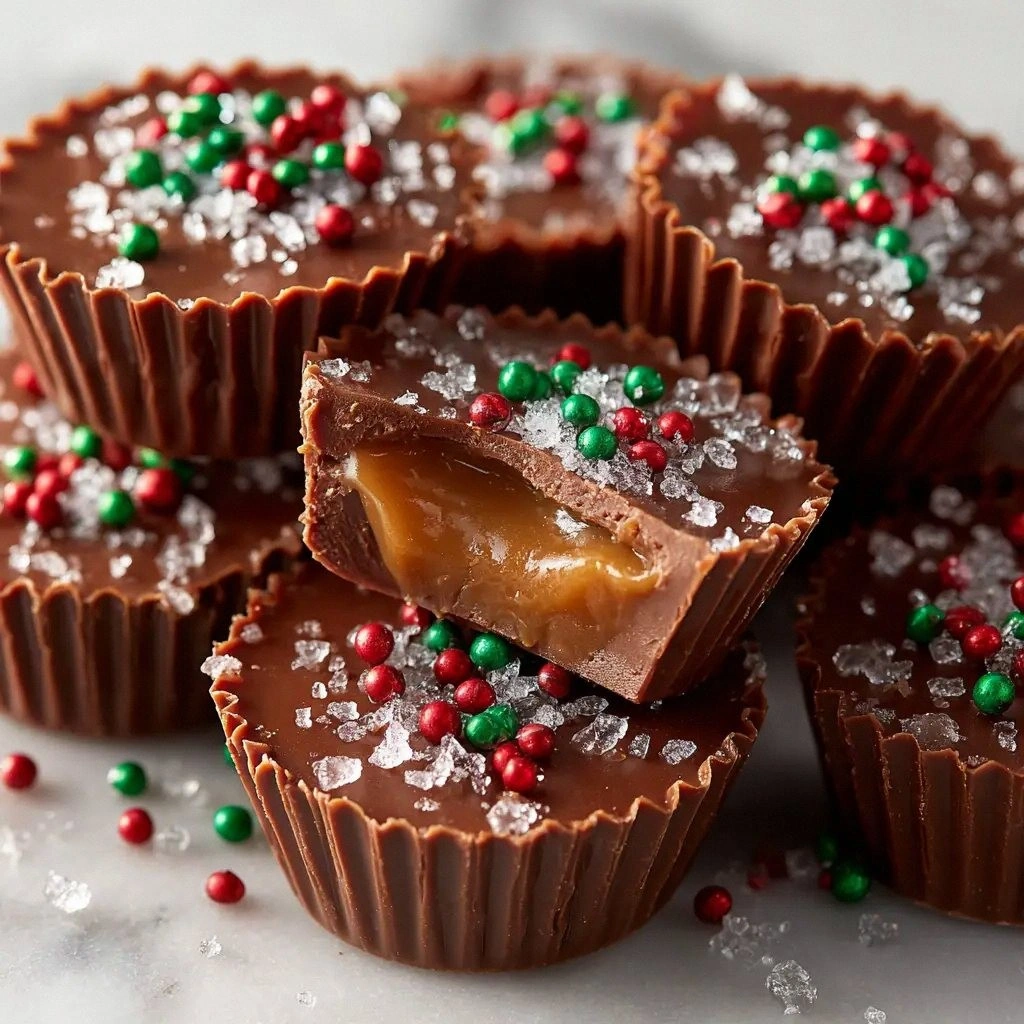
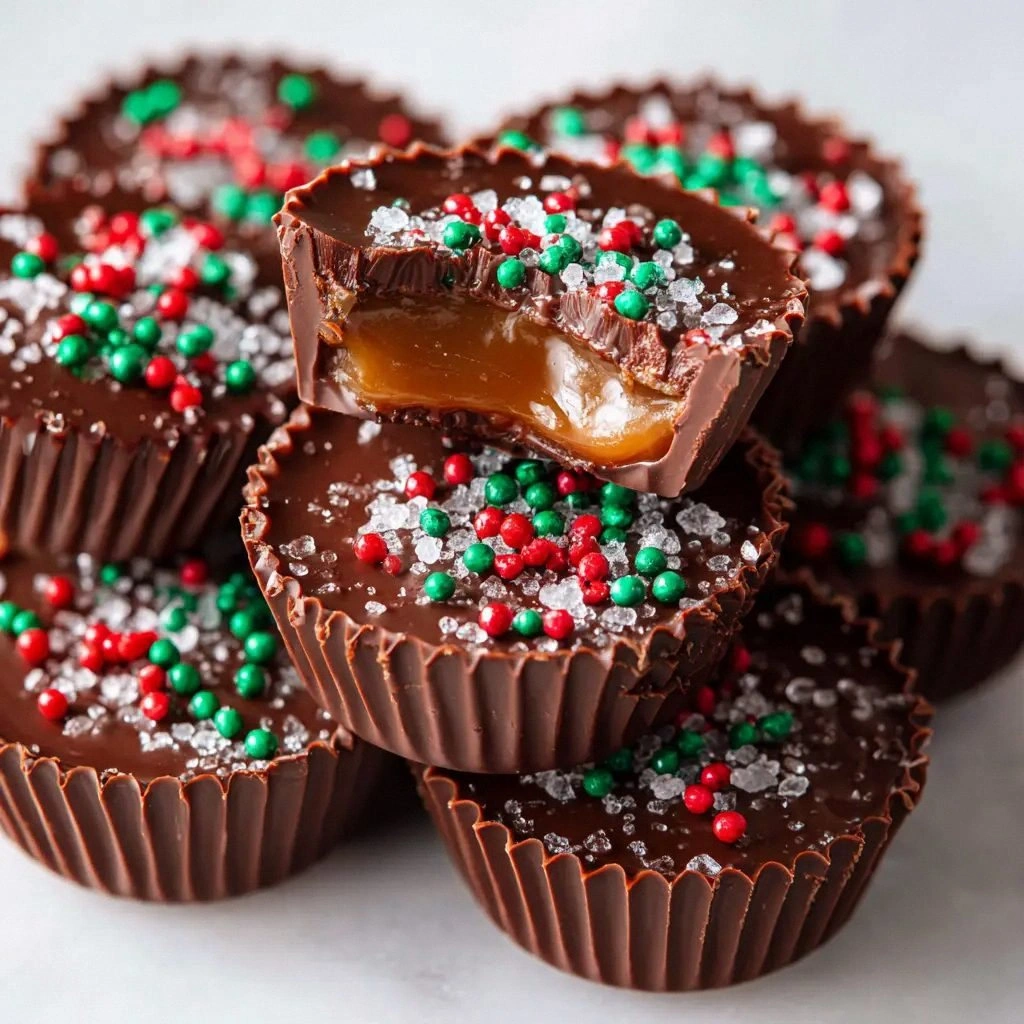
When I first tasted the finished product, the chocolate shell was crisp yet tender, the caramel inside was silky and sweet with just the right amount of buttery richness. The flaky sea salt didn’t overpower; it simply lifted the flavor, creating a contrast that made each bite feel balanced. The texture is a dance between the crunchy edges and the creamy center, and the aroma is a warm invitation that makes the whole kitchen feel like a cozy dessert shop. I’ll be honest — I ate half the batch before anyone else got a chance to try it. It was that good.
Most recipes get this completely wrong. They either overcook the chocolate, resulting in a hard, brittle shell, or they undercook the caramel, leaving it too liquid and sticky. The secret to this version is the precise timing of the sugar reduction, the use of coconut oil to keep the chocolate smooth, and the addition of flaky sea salt to give a subtle, memorable bite. If you've ever struggled with making a no-bake chocolate dessert that holds its shape, you're not alone — and I've got the fix. This is hands down the best version you'll ever make at home.
Picture yourself pulling this out of the pan, the whole kitchen smelling incredible, and watching the cups cool just enough to set but still soft enough to bite into. The moment when the chocolate shell cracks, revealing the molten caramel inside, feels like a small celebration. The anticipation of that first bite is a rush of flavors that feels like a secret indulgence. And now, ready for the game-changer? Let me walk you through every single step — by the end, you'll wonder how you ever made it any other way.
What Makes This Version Stand Out
- Flavor: The caramel is rich, buttery, and slightly caramelized, providing a depth that traditional sugar-based sauces lack. The chocolate shell adds a smooth, bittersweet finish that balances the sweetness.
- Texture: A crisp, crackly outer shell that gives way to a silky, melt-in-your-mouth center. The flaky sea salt provides a subtle crunch that enhances the overall mouthfeel.
- Simplicity: No boiling, no double boiler, no whisking. All the magic happens in a single pot, making it perfect for busy evenings.
- Uniqueness: The combination of coconut oil and flaky sea salt is rarely seen in no-bake chocolate desserts, giving it a distinct edge over classic fudge.
- Crowd Reaction: Guests rave about the contrast between the chocolate and caramel and the playful sprinkle of sea salt. It's a conversation starter at every gathering.
- Ingredient Quality: Using high-quality chocolate chips and fresh sea salt elevates the taste profile, making each cup a gourmet treat.
- Cooking Method: The single-pot technique reduces cleanup and saves time, while the precise heat control ensures a perfect caramel.
- Make-Ahead Potential: These cups keep well in the fridge for up to a week and freeze beautifully, making them a perfect batch for holiday parties.
Alright, let's break down exactly what goes into this masterpiece...
Inside the Ingredient List
The Flavor Base
The unsalted butter and packed brown sugar form the backbone of the caramel. Butter adds a creamy richness that balances the sugar’s sweetness, while the brown sugar’s molasses notes give depth and a subtle hint of toffee. If you skip the butter, the caramel becomes thin and lacks that luxurious mouthfeel. For an extra twist, swap in dark brown sugar for a richer, deeper flavor profile.
Sweetened condensed milk is the secret to achieving that silky, custard-like consistency. It brings a velvety texture that prevents the caramel from becoming too thick or gritty. If you’re looking for a dairy-free version, coconut milk condensed can work, but you’ll need to adjust the heat slightly to avoid separation.
The Texture Crew
Light corn syrup is the unsung hero that prevents crystallization. It keeps the caramel smooth and glossy, ensuring it coats the chocolate shell evenly. Without corn syrup, the sugar might crystallize, leaving a gritty texture that ruins the silky experience. If corn syrup is unavailable, invert sugar syrup or a small amount of honey can substitute, though the final texture may vary slightly.
Coconut oil is added at the end of cooking to give the chocolate a glossy sheen and to prevent it from becoming too brittle. It also imparts a subtle tropical aroma that pairs wonderfully with the caramel’s sweetness. If you prefer a dairy-free option, you can replace coconut oil with a neutral oil like grapeseed or canola, but you’ll lose that unique aroma.
The Unexpected Star
Flaky sea salt is the finishing touch that elevates the entire dessert. It breaks up the caramel’s sweetness with a salty bite that lingers on the palate. If you’re not a fan of sea salt, you can use kosher salt, but the flavor profile will shift slightly toward a cleaner, less complex profile. The key is to sprinkle just enough to create contrast without overwhelming.
The Final Flourish
The vanilla extract is the subtle perfume that ties the flavors together. It enhances the chocolate’s bitterness and balances the caramel’s sweetness. A high-quality vanilla bean or vanilla paste can elevate the dish further, giving it a more aromatic profile. If you’re short on time, a teaspoon of pure vanilla extract suffices.
Everything's prepped? Good. Let's get into the real action...
The Method — Step by Step
- Step 1: Prepare the Pan. Choose a medium-sized heavy-bottomed saucepan to ensure even heat distribution. Place the butter in the pan and let it melt over medium-low heat. As the butter foams, add the brown sugar. Stir until the mixture becomes a uniform, glossy brown. This is the base for your caramel; it should smell like toasted sugar. Watch the color shift from pale to deep amber.
- Step 2: Add the Sweetened Condensed Milk. Once the sugar has dissolved, pour in the sweetened condensed milk slowly, stirring constantly to avoid scorching. The mixture will bubble and steam; this is normal. Keep the heat low to allow the milk to integrate smoothly. As the milk thickens, the caramel will begin to take on a golden hue. The aroma will turn sweet and buttery, signaling that the flavor is developing.
- Step 3: Incorporate the Corn Syrup. Add the light corn syrup to the pan, stirring until fully blended. The syrup prevents sugar crystallization, ensuring a silky finish. The mixture should now be thick and glossy. If you see any grains, continue stirring until they dissolve. The consistency should be thick enough to coat the back of a spoon.
- Step 4: Bring to a Gentle Simmer. Increase the heat to medium and bring the mixture to a gentle simmer. Stir continuously to keep the caramel from sticking. As it simmers, the caramel will thicken and the color will deepen. It should reach a temperature of about 320°F (160°C) if you have a candy thermometer. If you don’t, look for a thick, syrupy texture that coats the spoon.
- Step 5: Add the Vanilla Extract. Once the caramel reaches the right thickness, remove the pan from the heat and stir in the vanilla extract. The vanilla will infuse the caramel with a warm, aromatic note that balances the sweetness. Let the mixture cool slightly; this will prevent the chocolate from melting prematurely.
- Step 6: Prepare the Chocolate. While the caramel cools, melt the semi-sweet chocolate chips in a heatproof bowl set over a pot of simmering water (double boiler method). Stir until the chocolate is completely smooth. Add the coconut oil to the melted chocolate and stir until it’s glossy and silky. The coconut oil helps the chocolate set quickly and prevents it from becoming brittle.
- Step 7: Assemble the Cups. Line a silicone muffin tin with paper liners or lightly grease it. Spoon a small amount of melted chocolate into the bottom of each cup, swirling to coat the walls. Let the chocolate set for about 1–2 minutes until it’s firm enough to hold the caramel. Then, pour a generous layer of caramel over the chocolate, filling each cup almost to the top. The caramel should pool slightly in the center.
- Step 8: Finish with Sea Salt. Sprinkle a pinch of flaky sea salt over the top of each caramel layer. The salt crystals should be visible, adding a subtle crunch and a burst of flavor with each bite. The contrast between the sweet caramel and salty crystals is what makes this dessert memorable.
- Step 9: Chill to Set. Place the filled muffin tin in the refrigerator for at least 30 minutes, or until the chocolate shell has fully set and the caramel has thickened to a firm but still slightly soft center. The cups should hold their shape and not collapse when lifted. The final product will have a glossy, crackly chocolate exterior and a silky caramel core.
- Step 10: Serve and Enjoy. Remove the cups from the tin, dust with a light sprinkle of sea salt if desired, and serve immediately. The first bite will reveal a crisp chocolate shell that gives way to a warm, buttery caramel. The texture and flavor will leave you craving more. I dare you to taste this and not go back for seconds.
That's it — you did it. But hold on, I've got a few more tricks that'll take this to another level. Keep reading for insider tips that will ensure every batch is flawless, and discover creative twists that can transform this classic into something entirely new.
Insider Tricks for Flawless Results
The Temperature Rule Nobody Follows
Many bakers think that a higher temperature always yields a better caramel. In reality, the key is to maintain a steady, medium-low heat. Too high and the sugar will burn; too low and the mixture will take too long to thicken. Use a candy thermometer to hit 320°F (160°C) precisely. If you don’t have a thermometer, watch for the caramel to coat the back of a spoon and be ready to remove from heat.
Why Your Nose Knows Best
Your sense of smell is a reliable indicator of caramel perfection. As the sugar cooks, the aroma shifts from sweet to nutty, then to a deep, toasted note. When you smell a faint hint of burnt sugar, pull the pan off the heat immediately. The scent of freshly toasted sugar signals that the caramel is at its peak.
The 5-Minute Rest That Changes Everything
Letting the caramel rest for five minutes after removing it from the heat allows the bubbles to settle and the flavor to mellow. During this brief pause, the mixture will thicken slightly, preventing a runny center. This rest also gives the chocolate a chance to cool just enough to set without cracking.
Use a Silicone Spoon for Even Spreading
A silicone spoon spreads the chocolate and caramel evenly without sticking. Its heat-resistant properties mean you can use it directly on the hot caramel, and it won’t warp or melt. This ensures each cup has a uniform chocolate shell and caramel layer, giving a professional look.
The Secret to a Crackly Shell
To get that satisfying crack on the chocolate, let the chocolate set at room temperature for 5-10 minutes before adding the caramel. This creates a slightly firmer outer layer that will crack when you bite into it. If you prefer a softer shell, skip this step and pour the caramel immediately.
Creative Twists and Variations
This recipe is a playground. Here are some of my favorite ways to switch things up:
Nutty Crunch Cups
Add a handful of toasted pecans or almonds to the caramel before pouring it into the cups. The nuts will provide a delightful crunch and a nutty undertone that complements the chocolate. Sprinkle a pinch of sea salt on top for an extra layer of flavor.
Spiced Caramel Cups
Stir in a pinch of cinnamon or nutmeg into the caramel before pouring. The warm spices add complexity and a cozy vibe, perfect for fall gatherings. Keep the spice amount subtle to avoid overpowering the chocolate.
Minty Surprise
Replace the vanilla extract with a few drops of mint extract. The mint will create a refreshing contrast to the sweet caramel and chocolate, giving the cups a cool finish. A small sprig of fresh mint as a garnish adds a visual pop.
Sea Salt Caramel Latte Cups
Add a tablespoon of espresso powder to the caramel for a mocha twist. The coffee notes pair beautifully with chocolate and caramel, creating a sophisticated flavor. This variation is ideal for coffee lovers who want a dessert with a caffeine kick.
Vegan Version
Swap the butter for coconut butter and use a dairy-free chocolate chip. Keep the sweetened condensed milk as a dairy-free option or replace it with coconut condensed milk. The result is a creamy, chocolatey dessert that’s fully plant-based.
Gluten-Free Delight
Use gluten-free chocolate chips and ensure all other ingredients are certified gluten-free. The texture and flavor remain unchanged, making it safe for those with gluten sensitivities.
Storing and Bringing It Back to Life
Fridge Storage
Store the cups in an airtight container in the refrigerator for up to a week. The chocolate will remain firm, while the caramel stays moist. When ready to serve, let the cups sit at room temperature for 5-10 minutes to soften slightly and enhance the flavor.
Freezer Friendly
For longer storage, wrap each cup individually in parchment paper and place them in a freezer-safe bag. Freeze for up to three months. Thaw in the refrigerator overnight, then bring to room temperature before serving. The texture will be almost identical to freshly made cups.
Best Reheating Method
If the cups have hardened, gently warm them in the microwave at 30-second intervals, checking frequently to avoid overheating. Add a tiny splash of water before reheating; this steams the caramel back to a silky consistency. Serve immediately for the best experience.