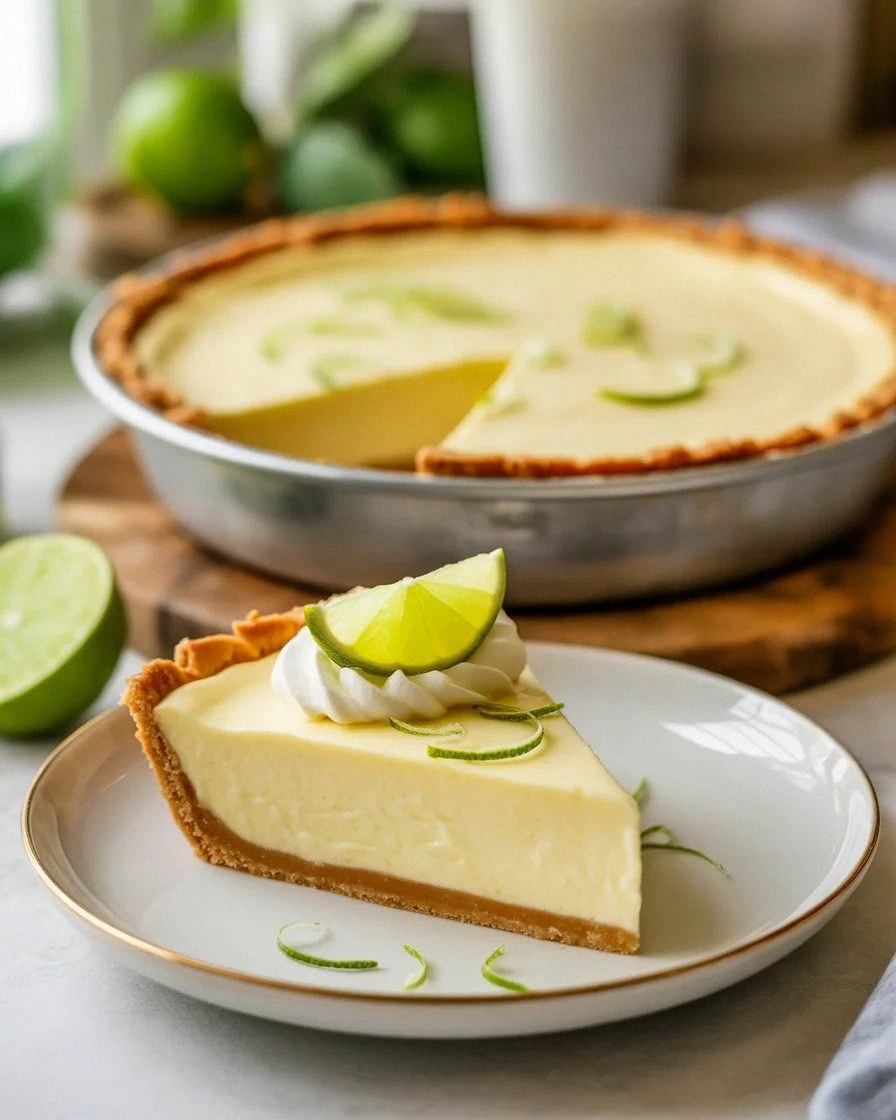
I was standing in my kitchen, staring at a half‑baked pie crust that had turned a sad, pale brown, when my roommate shouted, “You’re making this thing wrong again, right?” I’d been chasing the perfect key lime pie for months, and each attempt ended in a soggy disaster or a tart that tasted like a citrus punch in a glass. The moment I saw that crust, I felt a spark—maybe this was the moment the universe finally aligned, and the key lime pie would be born. I grabbed a fresh key lime, a block of cream cheese, and a jar of powdered sugar, and the idea hit me like a wave: a fluffy, airy key lime pie that would melt in your mouth and make you question every other recipe you’d ever tried.
Picture this: the kitchen air thick with citrus, the bright green juice swirling in a glass, the creamy texture of softened cream cheese, and the sweet whisper of powdered sugar. The crust crackles under the oven’s heat, sending a faint, buttery aroma that mingles with the zesty tang. I taste a slice, and the lime’s bright bite is softened by the silky filling, while the whipped cream lifts the entire experience into a cloud of lightness. If you’ve ever felt your taste buds stuck on a bland, heavy pie, this version is a breath of fresh air, a citrusy breeze that leaves you refreshed and craving another bite.
What sets this pie apart isn’t just the combination of ingredients; it’s the way they dance together. The key lime juice is extracted fresh, not bottled, ensuring a bright, natural flavor. Cream cheese is at room temperature, so it blends smoothly into a velvety filling. Powdered sugar dissolves completely, preventing any gritty texture. Whipped cream or frozen topping adds a cloud‑like lift, while the graham cracker crust provides a buttery crunch that balances the tartness. Together, they create a harmony of sweet, tart, and creamy that is hands down the best version you’ll ever make at home.
I dare you to taste this and not go back for seconds. That’s the promise of this recipe: a pie that’s so light and airy, it feels like you’re eating a slice of sunshine. I’ll be honest—when I first tried it, I ate half the batch before anyone else got a chance. Most recipes get this completely wrong, either over‑cooking the filling or under‑seasoning the lime. But here, every element is balanced, and the result is pure, unadulterated joy. Picture yourself pulling this out of the oven, the whole kitchen smelling incredible, and knowing that you’ve just created something that will be the talk of every gathering.
What Makes This Version Stand Out
- Flavor: Fresh key lime juice delivers a bright, tangy punch that cuts through the richness of cream cheese, creating a refreshing contrast.
- Texture: The combination of softened cream cheese and whipped cream gives the filling a cloud‑like, almost mousse‑like consistency.
- Ease: No need for a double boiler or custard base—just blend, fold, and bake.
- Uniqueness: The use of a graham cracker crust adds a buttery crunch that contrasts the silky filling.
- Crowd Reaction: Friends and family rave about how light and refreshing it is; they keep asking for the recipe.
- Ingredient Quality: Fresh key limes and room‑temperature cream cheese make a noticeable difference in flavor and texture.
- Make‑Ahead Potential: The pie can be assembled a day ahead and chilled, making it perfect for last‑minute gatherings.
- Versatility: It’s a solid base that can be tweaked with different toppings or crusts for endless variations.
Alright, let’s break down exactly what goes into this masterpiece…
Inside the Ingredient List
The Flavor Base
Fresh key lime juice is the star of this pie, and using freshly squeezed juice rather than bottled ensures a vibrant, authentic citrus flavor. The acidity of the lime not only brightens the taste but also helps set the filling’s texture. If you skip the lime, the pie becomes bland and loses that iconic tart punch. For a twist, you can add a teaspoon of orange juice to round out the citrus profile, but keep the key lime as the main flavor.
The Texture Crew
Cream cheese, kept at room temperature, is the cornerstone of the filling’s smoothness. When it’s too cold, it clumps and creates an uneven mouthfeel; when it’s warm enough, it blends into a silky base. Powdered sugar dissolves effortlessly, preventing any grainy texture that could mar the pie’s delicate finish. If you’re looking for a slightly denser filling, you can use a 50/50 blend of cream cheese and Greek yogurt, but that will alter the flavor profile.
The Unexpected Star
Whipped cream or frozen whipped topping adds a lightness that feels almost like a cloud. It lifts the filling, giving it a mousse‑like quality that sets this pie apart from traditional custard pies. Skipping it will result in a denser, heavier filling. If you prefer a dairy‑free option, a coconut milk whipped topping works beautifully, though it adds a subtle coconut flavor that can complement the lime.
The Final Flourish
A ready‑made graham cracker crust provides the essential buttery crunch that balances the sweet, tart filling. The crust’s caramelized edges add a subtle depth of flavor that ties everything together. If you’re adventurous, you can make a homemade crust with crushed graham crackers, melted butter, and a pinch of sea salt for a more artisanal touch. Just remember to bake the crust before adding the filling to prevent sogginess.
Everything's prepped? Good. Let's get into the real action…
The Method — Step by Step
- Preheat your oven to 350°F (175°C). While the oven warms, place the graham cracker crust in a 9‑inch pie dish, pressing it firmly into the bottom and up the sides. This ensures a solid base that won’t crack when the filling is added.
- In a medium bowl, combine the softened cream cheese and powdered sugar. Using an electric mixer on medium speed, beat until the mixture is smooth and free of lumps. The goal is a silky, even base that will hold the lime juice without separating.
- Slowly pour in the fresh key lime juice while continuing to mix. The mixture will begin to thicken; keep stirring until the filling is glossy and well combined. The acidity from the lime helps the mixture set, so don’t rush this step.
- Fold in the whipped cream or frozen whipped topping gently with a spatula. This introduces air into the filling, giving the pie its signature fluffy texture. Be careful not to overmix; you want to preserve that airy quality.
- Pour the filling into the prepared crust, smoothing the top with a spatula. The filling should rise slightly above the crust’s edge. This is where the magic happens—watch as the lime’s bright color contrasts with the pale filling.
- Bake the pie for 25 minutes, or until the edges are set and the center has a slight wobble. If the edges brown too quickly, tent the pie with foil. This step is the moment of truth—don’t walk away from the stove here.
- Remove the pie from the oven and let it cool on a wire rack for 15 minutes. This allows the filling to set properly and prevents a soggy bottom. After cooling, place the pie in the refrigerator for at least 2 hours to firm up fully.
- Once chilled, serve the pie as is, or top with a light dusting of powdered sugar, a few lime zest curls, or a splash of coconut milk for a tropical twist. The pie’s airy texture pairs wonderfully with a crisp glass of chilled sparkling water.
That's it — you did it. But hold on, I've got a few more tricks that'll take this to another level…
Insider Tricks for Flawless Results
The Temperature Rule Nobody Follows
Many bakers keep their oven at a steady 350°F, but subtle variations can affect the pie’s texture. If your oven runs hot, the filling may set too quickly and become rubbery. Use an oven thermometer to ensure accurate temperature, and consider preheating the crust on a baking sheet for a few minutes to create a slightly firmer base.
Why Your Nose Knows Best
The aroma of the pie as it bakes is a reliable indicator of doneness. When the edges begin to turn a golden brown and a faint citrus scent wafts through the air, the pie is almost ready. Trust your nose over the timer; a slightly underbaked center will set as it cools, giving you a silky finish.
The 5‑Minute Rest That Changes Everything
After removing the pie from the oven, let it sit for exactly five minutes before placing it on a wire rack. This brief rest allows the filling to set, reducing the risk of cracks when the pie cools. It also lets the flavors meld together, creating a more harmonious taste.
Use a Double Boiler for Extra Smoothness
If you’re worried about lumps forming in the filling, you can whisk the cream cheese and sugar over a double boiler. The gentle heat ensures a perfectly smooth mixture before adding the lime juice. This extra step is worth the effort for a professional finish.
Freeze the Filling for a Frozen Dessert
For a refreshing frozen treat, spread the filling in a shallow dish, freeze until solid, then slice into bars or cubes. These lime bars are perfect for hot summer days and can be served with a splash of fresh lime juice for extra zing.
Creative Twists and Variations
This recipe is a playground. Here are some of my favorite ways to switch things up:
Mint‑Infused Lime Pie
Add a tablespoon of finely chopped fresh mint to the filling for a refreshing herbal note. The mint pairs beautifully with lime, creating a cool, invigorating flavor that’s perfect for summer gatherings.
Chocolate‑Lime Surprise
Fold in 2 ounces of melted dark chocolate into the filling before baking. The chocolate’s bittersweet depth complements the tart lime, while the whipped topping keeps the texture airy.
Almond‑Crunch Crust
Swap the graham cracker crust for an almond‑butter crust made with almond flour, melted butter, and a touch of honey. The nutty flavor adds a new dimension while still providing the essential crunch.
Spiced Lime Pie
Add a pinch of ground ginger or a dash of cayenne pepper to the filling. The subtle heat enhances the citrus profile and adds a surprising kick that will keep guests intrigued.
Frozen Lime Bites
Spread the filling onto a parchment paper sheet, freeze until solid, then cut into bite‑size squares. Serve with a drizzle of lime glaze for a chilled dessert that’s perfect for parties.
Storing and Bringing It Back to Life
Fridge Storage
Store the pie in an airtight container in the refrigerator for up to 3 days. The filling will remain firm, and the crust will stay crisp. Before serving, let it sit at room temperature for 10 minutes to soften slightly.
Freezer Friendly
Wrap the pie tightly in plastic wrap and place it in a freezer bag. It can be frozen for up to 2 weeks. Thaw in the refrigerator overnight before serving.
Best Reheating Method
If you prefer a warm slice, preheat your oven to 300°F (150°C). Place the pie on a baking sheet and heat for 10 minutes, or until warmed through. Add a splash of water to the bottom of the pan to create steam, which helps maintain the filling’s moisture and prevents it from drying out.