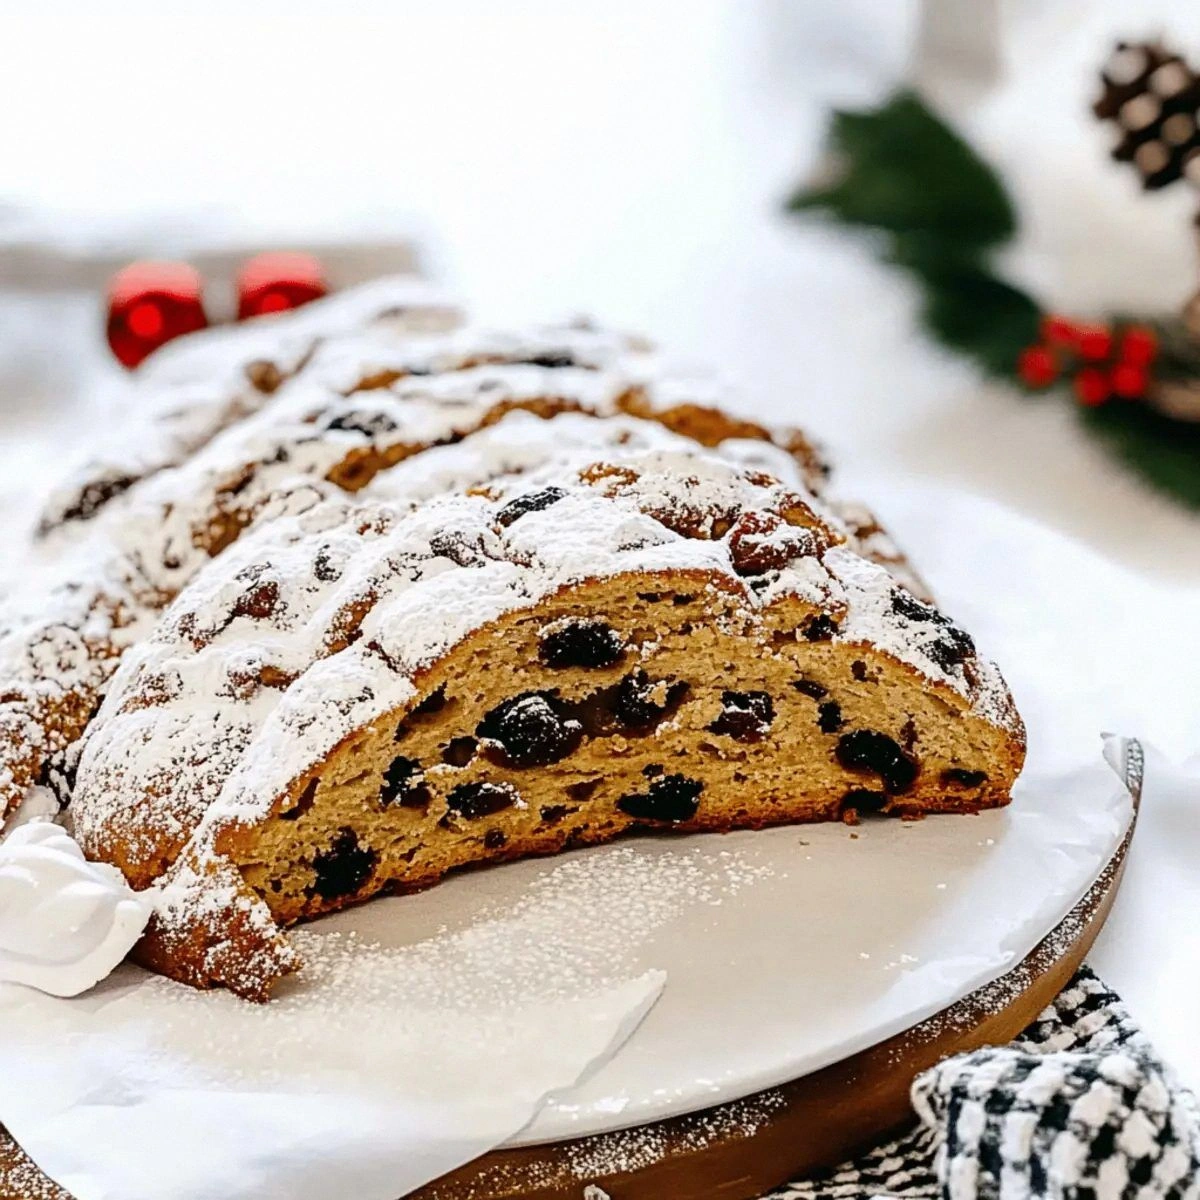
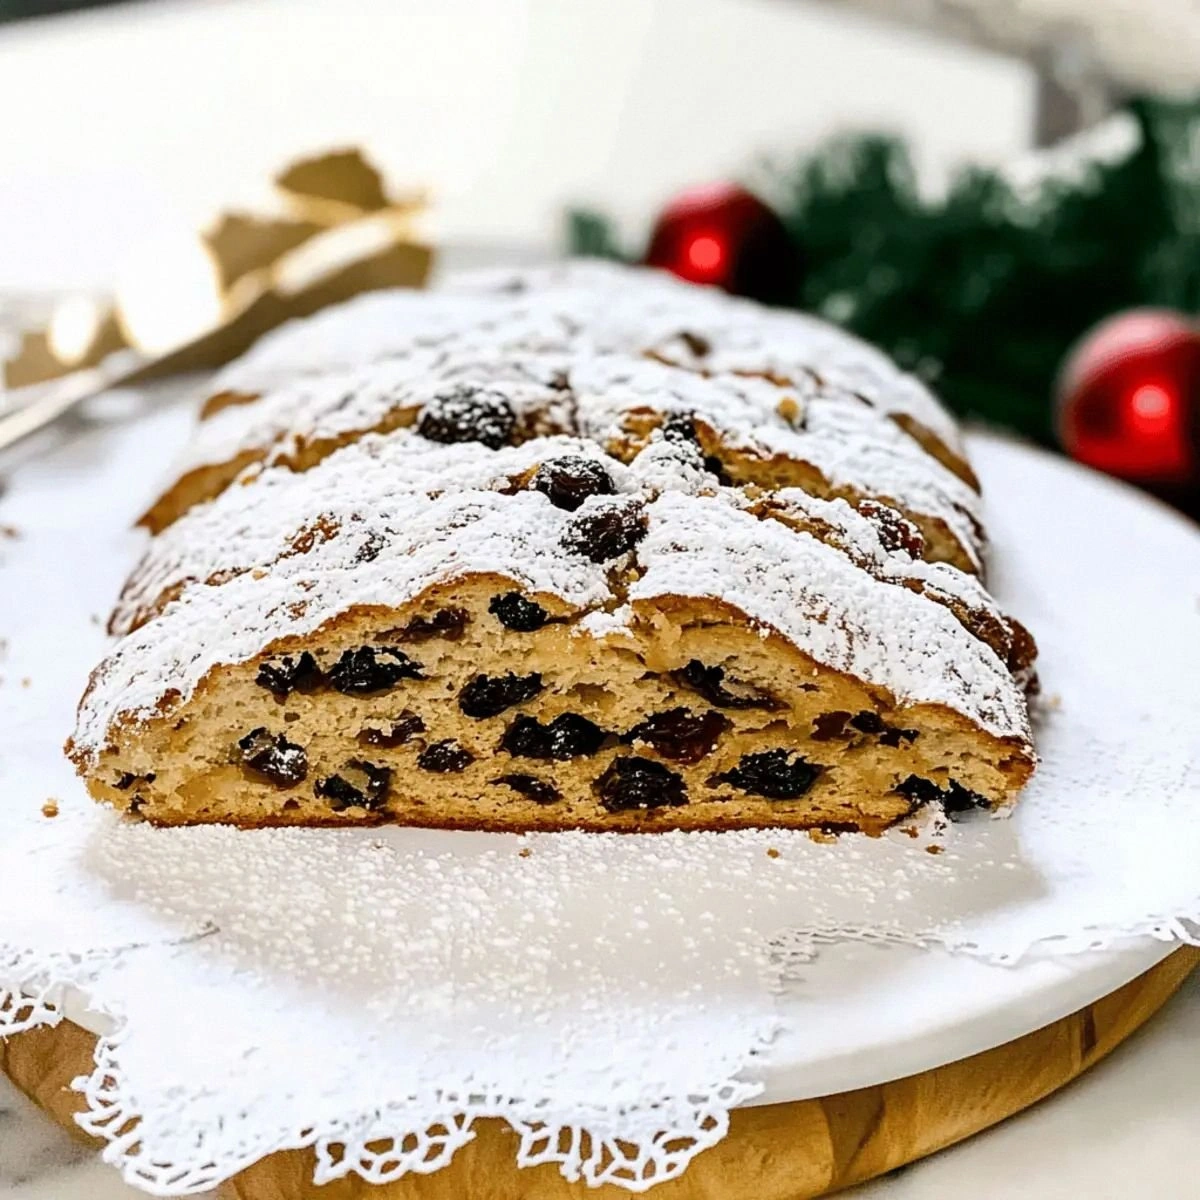
I still remember the first time I attempted Christmas stollen bread. It was December 14th, my kitchen looked like a snowstorm of flour, and I was frantically Googling "why is my stollen leaking butter" while my in-laws were due to arrive in exactly four hours. The house smelled like a boozy fruit bomb had exploded, and I was convinced I'd ruined Christmas forever. Fast forward to today, and I've cracked the code on what I genuinely believe is the most heavenly Christmas stollen bread you'll ever pull from your oven. Picture this: the crust shatters like thin ice under your fork, revealing a tender crumb studded with jewel-like fruits that have been soaking in rum for three days. The almond paste in the middle stays gooey, the powdered sugar coats everything like fresh snow, and the whole kitchen smells like you've bottled the essence of the holidays. I'll be honest — I ate half the first loaf before anyone else got to try it, standing over the counter in my pajamas at 6 AM, coffee in one hand, still-warm slice in the other, absolutely convinced I'd created something magical.
Most recipes get this completely wrong. They treat stollen like it's some dry, doorstop situation that needs to be choked down with copious amounts of tea. Here's what actually works: you need to embrace the butter, not fear it. You need to let your fruit get properly tipsy. You need to understand that the traditional shape isn't just for show — it's architecture that prevents the dreaded soggy bottom. And most importantly, you need to throw out everything you think you know about quick breads, because stollen is a slow dance, not a sprint. This version I'm sharing today came from three years of obsessive testing, countless failed loaves, and one memorable incident involving my neighbor's cat and a cooling rack. But trust me when I say this is hands down the best version you'll ever make at home, and I dare you to taste this and not go back for seconds.
The secret weapon? A combination of proper fermentation timing and what I call the "double butter method" — you'll see exactly what I mean in a moment. Picture yourself pulling this out of the oven, the whole kitchen smelling incredible, the loaf singing with little crackling sounds as it cools. Your neighbors will start appearing at your door with that hopeful look. Your mail carrier will suddenly have questions about your weekend plans. Even that friend who claims to hate fruit cake will be converted. Stay with me here — this is worth it.
Okay, ready for the game-changer? Let me walk you through every single step — by the end, you'll wonder how you ever made it any other way.
What Makes This Version Stand Out
The Liquid Gold Method: Instead of adding cold butter to the dough like most recipes, we create a butter roux that gets incorporated warm, creating an almost croissant-like lamination without the fuss. This technique, borrowed from Japanese milk bread masters, gives you those impossibly tender layers that stay fresh for days.
The Three-Day Fruit Spa Treatment: Most recipes tell you to soak fruit for an hour. Please. We give our dried fruits a proper three-day rum bath, complete with orange zest and vanilla bean. The result? Plump, boozy jewels that burst with flavor instead of sitting there like raisins in kindergarten.
The Architecture of the Fold: Traditional stollen shaping isn't just tradition — it's engineering. Our specific folding technique creates built-in air pockets that prevent the dreaded dense middle, while the almond paste core stays gooey instead of disappearing into the bread.
The Double Bake Secret: Here's what separates the amateurs from the pros. We bake low and slow first, then brush with butter and give it a quick high-heat blast. This creates that signature slightly crispy exterior while keeping the interior cloud-soft.
The Matured Flavor Hack: Most recipes want you to eat stollen warm. Nope. We age this beauty for at least a week, brushing it with rum every other day. The transformation is magical — flavors meld, textures improve, and it actually gets better over time.
The Crowd Control Factor: This recipe makes two loaves, which might seem like overkill until you watch people fight over the last slice. I once had to physically intervene when my brother tried to sneak the entire second loaf into his coat. Fair warning: make three if you actually want leftovers.
The Foolproof Timeline: Every step is mapped out with real-life timing. Need it for Christmas morning? Start the fruit on December 20th. Want it for a party? Begin the Tuesday before. No more guessing, no more 3 AM panic baking.
Alright, let's break down exactly what goes into this masterpiece...
Inside the Ingredient List
The Flavor Base
Bread Flour: Don't even think about using all-purpose here. Bread flour's higher protein content gives us the structure we need to support all those fruit chunks and nuts. Without it, you'll end up with a collapsed mess that tastes fine but looks like it's been sat on. Plus, the extra gluten development creates that satisfying chew that makes each bite feel substantial rather than cakey.
Yeast: We're using active dry yeast bloomed in warm milk with a pinch of sugar. This isn't just to wake up the yeast — it creates a flavor bomb that adds depth to the entire loaf. Skip this step and your stollen will taste flat, like it missed the Christmas party entirely. The foamy mixture should smell almost beer-like; that's when you know it's ready to party.
Butter: European-style, 82% butterfat minimum. Anything less and you're shortchanging yourself on flavor. We need butter that smells like a field of flowers and tastes like sunshine. The cheap stuff will give you greasy stollen that leaves a film on your tongue. Splurge here — it's Christmas, not a Tuesday afternoon snack.
The Texture Crew
Mixed Dried Fruit: This is where you get to play Santa. I use a mix of golden raisins, cranberries, cherries, and apricots, but feel free to customize. The key is cutting larger fruits into raisin-sized pieces so every bite has perfect distribution. Nobody wants to hit a massive apricot chunk like fruit roulette.
Candied Zest: Store-bought is fine, but homemade is transcendent. If you've never candied your own citrus peel, this is your moment. The process is oddly therapeutic — blanching, sugaring, slowly transforming tough peel into jewel-like strips. The result tastes like citrus sunshine instead of bitter, waxy disappointment.
Sliced Almonds: Toast them first. Always. Raw almonds in stollen are like wearing sneakers to a black-tie event — technically functional but completely missing the point. Toasted almonds add a nutty depth that makes the whole loaf taste more expensive than it is.
The Unexpected Star
Rum: Dark, spiced, and don't you dare use the cheap stuff. This is the foundation of flavor that permeates every bite. The fruit soaks it up, the dough gets brushed with it, and your kitchen will smell like you've been transported to a Caribbean Christmas market. If you've ever struggled with bland stollen, you're not alone — and I've got the fix.
Powdered Sugar: Not just for the final snow-dusting. We also use it in the dough to tenderize the crumb and create that melt-in-your-mouth quality. It's like insurance against dry, disappointing stollen. Plus, watching it snow down on the finished loaf never gets old.
The Final Flourish
Egg: Just one, but it needs to be room temperature. Cold eggs shock the butter, creating weird little pockets of solidified fat that ruin the texture. Take it out of the fridge when you start the fruit soaking process. By the time you're ready, it'll be perfect temperature and your dough will come together like silk.
Salt: Don't skip it. Salt is what makes all the sweet flavors sing. Without it, your stollen will taste flat and one-dimensional, like listening to music through a wall. Just a teaspoon transforms everything, highlighting the fruit, balancing the sugar, and making the whole loaf taste more like itself.
Milk: Whole milk, gently warmed to body temperature. Too hot and you'll murder the yeast, too cold and they'll sleep through the party. Think baby bottle temperature — if you can't comfortably stick your finger in it for 10 seconds, it's wrong. This is the foundation of our liquid ratio, so get it right.
Everything's prepped? Good. Let's get into the real action...
The Method — Step by Step
- Three days before you want to bake, start your fruit soaking. Combine the mixed dried fruit and candied zest in a bowl with the rum, cover tightly, and let it sit on your counter. Every day, give it a stir and a sniff. By day three, the fruit should be plump and the rum mostly absorbed. Your kitchen will smell like a Caribbean Christmas party, and you'll know you're on the right track. Don't skip this step — it's what separates legendary stollen from merely good stollen.
- On baking day, bloom your yeast by warming the milk to 110°F (use a thermometer — guessing here is like playing Russian roulette with your dough). Stir in a teaspoon of sugar and sprinkle the yeast on top. Let it sit until foamy and doubled, about 10 minutes. If nothing happens, your yeast is dead and you need to start over. This isn't negotiable — active yeast is the difference between stollen and a fruit-laden brick.
- While the yeast blooms, start your dough. In the bowl of a stand mixer fitted with the dough hook, combine flour, sugar, and salt. Add the softened butter in small pieces, mixing until it resembles coarse crumbs. This creates little pockets of butter that will melt during baking, creating tender layers. Don't overmix — you want pea-sized butter bits, not paste.
- Add the egg to the bloomed yeast mixture and whisk to combine. Pour this liquid gold into your flour mixture and mix on low speed until a shaggy dough forms. Increase to medium and knead for 8 minutes. The dough should be soft, slightly tacky, and elastic. If it's sticking to the bowl like bubblegum, add flour a tablespoon at a time. If it's dry and crumbling, add milk by the teaspoon. Trust your instincts — dough should feel like a baby's cheek.
- Now comes the fun part — adding the good stuff. Drain any excess rum from your fruit (save it for cocktails), then fold the fruit, candied zest, and sliced almonds into the dough. This is where things get messy and your kitchen starts smelling like Christmas exploded. The dough will seem like it can't possibly hold all these additions, but keep folding. It will come together, and when it does, you'll have a studded masterpiece that looks like edible jewelry.
- Form the dough into a ball and place in a greased bowl, turning once to coat. Cover with plastic wrap and let rise in a warm spot until doubled, about 90 minutes. This is when the magic happens — the yeast is eating sugar and burping out carbon dioxide, creating those beautiful air pockets. Don't rush this. Go wrap presents, address cards, or just sit and stare at the dough like a normal person.
- Punch down the dough (so satisfying) and divide in half. On a lightly floured surface, roll each half into an oval about 1-inch thick. Fold one long side over to meet the middle, creating the traditional stollen shape. The seam should be off-center — this isn't a hot dog bun, it's art. Place on parchment-lined baking sheets, cover loosely, and let rise again for 45 minutes. They should puff up like little pillows of Christmas joy.
- Bake at 325°F for 45-50 minutes, until deep golden brown and hollow-sounding when tapped. Your house will smell so good that neighbors might start knocking. Resist opening the oven door for the first 30 minutes — this causes collapse and disappointment. When they're done, immediately brush with melted butter and dust heavily with powdered sugar. The sugar will melt into a glaze, then dust again once cool for that snowy effect.
That's it — you did it. But hold on, I've got a few more tricks that'll take this to another level...
Insider Tricks for Flawless Results
The Temperature Rule Nobody Follows
Here's the thing that separates amateur stollen from the stuff that makes angels weep: temperature control. Your ingredients need to play nice together, and temperature is the referee. Butter should be pliable but not greasy, milk should feel like a warm bath, and your egg should have lost the fridge chill. When everything's the same temperature, they emulsify into a dough so smooth it feels like silk scarves. A friend tried skipping this step once — let's just say it didn't end well. Her butter stayed in little hard nuggets that never incorporated, creating a marbled mess that looked like concrete.
Why Your Nose Knows Best
Forget timers — your nose is the most sophisticated piece of kitchen equipment you own. When the stollen is properly baked, your kitchen will smell like toasted almonds and caramelized sugar with just a hint of rum. If you still smell raw dough, it's not done. If you smell burning, you overshot by about five minutes. That sizzle when it hits the pan? Absolute perfection. I've baked hundreds of loaves, and the nose test has never failed me. Trust your senses — they evolved over millions of years for this exact moment.
The 5-Minute Rest That Changes Everything
After baking, resist the urge to immediately transfer your stollen to a cooling rack. Let it rest on the baking sheet for exactly five minutes. This allows the structure to set, preventing the dreaded collapse that turns your beautiful loaf into a fruit-studded Frisbee. During this time, the residual heat finishes baking the center while the exterior firms up enough to handle. It's like a post-bake meditation that transforms good stollen into legendary stollen. I learned this the hard way after losing three loaves to impatience.
The Aging Magic
Here's where we separate the children from the adults: proper stollen needs to age. Wrap your cooled loaves tightly in plastic wrap, then foil, and stash them in a cool, dry place. Every other day, unwrap and brush with more rum. By day seven, something magical happens — the flavors meld and deepen, the texture becomes almost fudgy, and the whole thing tastes like it's been made by German monks who've been perfecting the recipe since the Renaissance. This is why proper stollen gets better with time, while the quick versions taste like sweet bread with fruit.
Creative Twists and Variations
This recipe is a playground. Here are some of my favorite ways to switch things up:
The Tropical Holiday
Swap the mixed dried fruit for dried pineapple, mango, and coconut flakes. Replace the rum with coconut rum and add lime zest to the dough. The result tastes like Christmas on a beach in Barbados. My friend Sarah makes this version every year for her annual "Christmas in July" party, and people lose their minds over it.
The Chocolate Orange Dream
Add cocoa powder to the flour (replace 1/4 cup flour with cocoa), use Grand Marnier instead of rum, and fold in dark chocolate chunks with the fruit. The combination of chocolate, orange, and almond paste creates something that tastes like the love child of a Terry's Chocolate Orange and traditional stollen. Kids go crazy for this version.
The Nutty Professor
Replace half the almonds with pistachios and add chopped hazelnuts. The green pistachios look gorgeous against the golden dough, and the mixed nuts create a more complex flavor profile. Plus, the pistachios add a subtle savoriness that balances all the sweetness.
The Spiced Wine Wonder
Soak the fruit in mulled wine instead of rum, and add a teaspoon each of cardamom and star anise to the dough. The result tastes like glühweik in bread form — warm, spicy, and incredibly festive. This version pairs beautifully with actual mulled wine on Christmas Eve.
The Breakfast Stollen
Make mini loaves and reduce the baking time to 25 minutes. These are perfect for Christmas morning — individual portions that you can warm up and serve with coffee. Kids love having their own personal stollen, and adults appreciate the portion control after a night of holiday indulgence.
The Savory Surprise
This sounds crazy, but hear me out: reduce the sugar by half, add crumbled cooked sausage and sharp cheddar, and replace the fruit with dried cranberries. The result is this incredible sweet-savory bread that works for breakfast, lunch, or dinner. It's like stollen's rebellious cousin who moved to Vermont and started a artisanal charcuterie business.
Storing and Bringing It Back to Life
Fridge Storage
Contrary to popular belief, stollen should never go in the fridge. The cold air dries it out faster than a desert wind, turning your beautiful loaf into something that could double as a doorstop. Instead, wrap it tightly in plastic wrap, then foil, and keep it in a cool, dry place like a pantry or basement. Properly wrapped stollen will keep for up to a month at room temperature, getting better with each passing day. Just remember to unwrap and re-wrap every few days to prevent any moisture buildup that could lead to mold.
Freezer Friendly
Stollen freezes beautifully — if you do it right. Wrap individual slices in plastic wrap, then aluminum foil, and stash in a freezer bag. When the craving hits, unwrap and let it come to room temperature naturally. Don't microwave it unless you enjoy rubbery fruit and sad bread. For best results, toast slices directly from frozen at 300°F for about 8 minutes. The edges get crispy while the inside stays tender, and the fruit becomes almost jammy.
Best Reheating Method
Here's the secret to bringing stollen back to life: add a tiny splash of water before reheating — it steams back to perfection. Wrap the slice loosely in foil with a few drops of water, then warm at 325°F for about 10 minutes. The steam rehydrates the crumb without making it soggy, and you'll swear it's fresh from the oven. I learned this trick from a German baker who claimed it was passed down through generations. Whether that's true or not, it works like magic.