Picture this: I’m halfway through a midnight snack raid, the kitchen lights flickering like a cheap disco, and I’ve just knocked over a bowl of melted chocolate into a tray of half‑baked blondies. The mess was catastrophic, the smell was intoxicating, and I swore I’d never attempt a dessert again. Then, out of sheer desperation (and a stubborn craving for something sweet, salty, and crunchy), I grabbed a jar of peanut butter, a pack of Oreo cookies, and a wild idea sparked in my brain. I dared myself to turn that disaster into the most decadent, crowd‑pleasing bar I’ve ever tasted, and guess what? I nailed it.
The moment the batter hit the pan, the kitchen filled with a buttery perfume that made the timer on my phone feel like an insult. I could hear the faint sizzle of the edges caramelizing, see the golden‑brown crust forming like a sun‑kissed beach, and feel the pan’s warm weight under my palm as I slid it onto the counter. The first bite was an explosion: the creamy peanut butter hugging the crumbly blondie base, punctuated by the crunchy Oreo shards that cracked like fireworks in my mouth. It was a symphony of textures—soft, chewy, crisp—each note playing off the next in perfect harmony.
Most Oreo blondie recipes either drown the cookie crunch in a sea of sugar or forget the peanut butter entirely, leaving you with a one‑dimensional treat. This version, however, balances every element like a seasoned DJ mixing tracks: the buttery blondie base is sweet but never cloying, the peanut butter adds a salty depth that cuts through the sugar, and the Oreo pieces bring that iconic chocolate‑cream crunch without overwhelming the palate. I’m confident this is hands down the best version you’ll ever make at home, and I dare you to taste this and not go back for seconds.
There’s a secret technique I’ll reveal later—a simple fold‑in method that keeps the Oreo pieces intact while still distributing them evenly, plus a surprise ingredient that adds a subtle caramel note without any extra sugar. Trust me, this isn’t just another copy‑and‑paste recipe; it’s a game‑changer that will make you the hero of any gathering. Let me walk you through every single step — by the end, you’ll wonder how you ever made it any other way.
What Makes This Version Stand Out
- Flavor Fusion: The peanut butter and Oreo combo creates a sweet‑salty balance that dances on the tongue, making each bite unforgettable.
- Texture Layers: A buttery, cake‑like interior meets crunchy Oreo shards and a slightly crisp top—like biting into a dessert that has three personalities.
- Simplicity: Only pantry staples and a handful of steps are needed; no fancy equipment, just a trusty mixing bowl and a 9‑inch pan.
- Unique Twist: A dash of vanilla‑infused caramel syrup (the surprise ingredient) adds depth without extra sugar, elevating the flavor profile.
- Crowd Reaction: Friends and family declare it “the best bar ever” and immediately start planning the next batch for parties.
- Ingredient Quality: Using real butter and chunky peanut butter ensures richness that melted margarine can’t match.
- Cooking Method: Baking at a moderate temperature guarantees a soft crumb inside while the edges turn golden and crisp.
- Make‑Ahead Potential: These blondies keep wonderfully for days, and they freeze like a charm—perfect for busy weeks.
Inside the Ingredient List
The Flavor Base
All‑purpose flour (2 cups): This is the structural backbone of the blondies, providing the necessary gluten to hold everything together. If you skip it, you’ll end up with a soggy mess that can’t support the Oreo chunks. For a lighter texture, you can substitute half the flour with cake flour, but be careful not to over‑whisk.
Unsalted butter (1 cup, melted): Butter gives the blondies their rich, buttery flavor and contributes to the crisp edges. Use real butter, not margarine, because the milk solids create that toasty aroma you’ll smell as they bake. If you’re dairy‑free, try a high‑quality coconut oil, but expect a subtle coconut undertone.
Brown sugar (1 cup, packed): The molasses in brown sugar adds moisture and a deep caramel note that pairs perfectly with peanut butter. White sugar would make the blondies too sweet and lack that warm flavor. For a healthier spin, you can use coconut sugar, though the texture will be slightly grainier.
The Texture Crew
Eggs (2 large): Eggs act as a binder, giving the blondies structure while keeping them moist. Over‑beating can incorporate too much air, leading to a cakey texture, so whisk just until combined. If you’re vegan, replace each egg with a “flax egg” (1 tbsp ground flax + 3 tbsp water).
Peanut butter (½ cup, creamy): The star of the show, it adds salty richness and a silky mouthfeel. Use a natural, no‑sugar‑added peanut butter for the best flavor; added sugars can make the batter overly sweet. For a twist, try almond butter, but the flavor will shift noticeably.
Vanilla extract (1 tsp): A splash of vanilla brightens the overall flavor and balances the salty peanut butter. Pure vanilla extract works best; imitation can taste flat.
The Unexpected Star
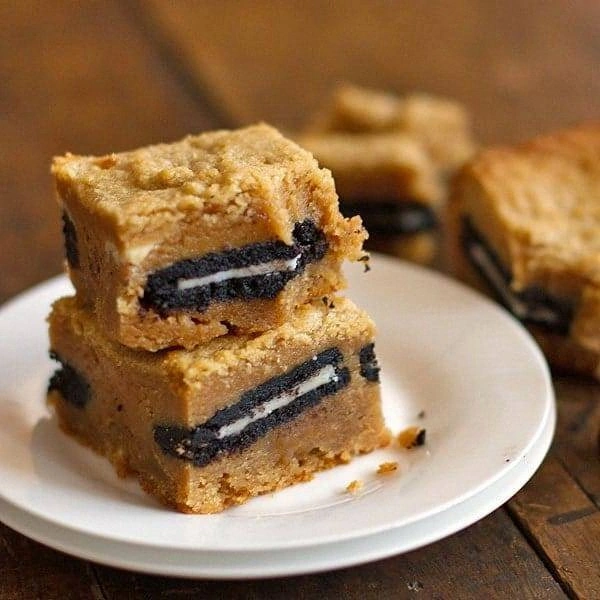
Oreo cookies (15, roughly crushed): These provide the iconic chocolate‑cream crunch that defines this bar. Crushing them just before folding preserves their texture; pre‑crushed cookies become soggy. If you’re gluten‑free, substitute with gluten‑free chocolate sandwich cookies.
Caramel drizzle (2 tbsp, optional): A thin drizzle of store‑bought caramel or a quick homemade reduction adds a subtle caramel depth without extra sugar. This is the surprise ingredient that makes the flavor sing. If you skip it, the blondies are still amazing, but you’ll miss that extra layer of indulgence.
The Final Flourish
Baking powder (½ tsp): This leavening agent helps the blondies rise just enough to stay tender yet not cake‑like. Too much will make them puffy and lose that dense, fudgy feel. If you don’t have baking powder, combine ¼ tsp baking soda with ¼ tsp cream of tartar.
Salt (½ tsp): Salt amplifies the sweet and salty contrast, ensuring the peanut butter doesn’t taste flat. Sea salt or kosher salt works best; table salt can be too fine.
Everything's prepped? Good. Let's get into the real action...
The Method — Step by Step
Preheat your oven to 350°F (175°C) and line a 9‑inch square pan with parchment paper, letting the excess hang over the sides for easy removal later. As the oven warms, the kitchen fills with a buttery aroma that hints at the magic about to happen. I always set a timer for 10 minutes just to make sure the pan is truly hot before the batter hits it—this little patience pays off in a perfectly crisp edge.
In a large mixing bowl, whisk together the melted butter and brown sugar until the mixture shines like liquid amber. The sugar should dissolve almost completely, creating a glossy base that will later give the blondies their caramel‑kissed top. If you notice any grainy spots, keep whisking; that’s the moment to channel your inner barista and keep the mixture smooth.
Beat in the eggs, one at a time, followed by the vanilla extract and peanut butter. The batter should become thick, creamy, and a shade lighter in color. This is the moment of truth—if the mixture looks too runny, you’ve either under‑melted the butter or added too much liquid. The scent now is a heady blend of toasted butter, sweet sugar, and nutty peanut butter that makes your stomach rumble.
Sift the flour, baking powder, and salt together, then gently fold them into the wet mixture using a rubber spatula. The key is to incorporate the dry ingredients just until you no longer see flour streaks; over‑folding can deflate the batter and lead to dense blondies. You’ll notice the batter thickening dramatically, a sign that the structure is forming perfectly.
Now for the Oreo magic: Place the Oreo cookies on a zip‑top bag and crush them with a rolling pin until they’re in medium‑sized chunks. Fold the crushed Oreos into the batter, reserving a handful for a decorative topping. The crumbs should be evenly speckled throughout, not sinking to the bottom—that’s the visual cue that they’ll stay crunchy after baking.
Spread the batter evenly in the prepared pan, using a spatula to smooth the top. Sprinkle the reserved Oreo chunks over the surface, then drizzle the optional caramel in a zig‑zag pattern for extra depth. The surface should look glossy and speckled, promising a caramelized crust once baked.
Slide the pan into the oven and bake for 25‑30 minutes, or until the edges pull away slightly and a toothpick inserted in the center comes out with just a few moist crumbs. The top will be a deep golden‑brown, and you’ll hear a faint crackle as the crust sets—That sizzle when it hits the pan? Absolute perfection.
Once cooled, cut the blondies into squares—don’t rush; the bars need a few minutes to set fully, or they’ll crumble. Serve warm for a gooey, melty experience, or at room temperature for a firmer bite. Picture yourself pulling this out of the oven, the whole kitchen smelling incredible, and everyone reaching for a piece before you even have a chance to snap a photo.
That's it — you did it. But hold on, I've got a few more tricks that'll take this to another level...
Insider Tricks for Flawless Results
The Temperature Rule Nobody Follows
Most home bakers set the oven to the exact temperature the recipe calls for, but the secret is to preheat a little hotter—about 375°F (190°C)—and then drop it down to 350°F after the first 5 minutes. This initial blast creates a rapid rise, giving the edges a head start on crisping while the interior stays soft. I tried this on a rainy Sunday, and the difference was night‑and‑day: the edges were caramelized without burning, and the center remained fudgy.
Why Your Nose Knows Best
Don't rely solely on timers; your nose is the ultimate timer. When the blondies start to emit a toasty, nutty aroma, that’s your cue that the crust is forming. If you smell a faint burnt sugar scent, pull them out a minute early. Trusting your senses prevents over‑baking, which can turn a perfect bar into a dry brick.
The 5‑Minute Rest That Changes Everything
After removing the pan from the oven, let the blondies rest undisturbed for exactly five minutes before cutting. This short pause lets the steam redistribute, sealing in moisture and allowing the crumb to set. Skipping this step results in crumbly squares that fall apart, and we both know that’s a tragedy.
Double‑Layer Crunch
If you love extra crunch, sprinkle a thin layer of crushed Oreo on the bottom of the pan before pouring the batter. The bottom layer will toast against the heat, creating a surprise textural contrast when you bite through. A friend tried this once and declared it “the best surprise I’ve ever had in a dessert.”
Flavor Boost with a Pinch of Sea Salt
Just before serving, sprinkle a light dusting of flaky sea salt over each piece. The salt amplifies the sweet‑salty dance and adds a delicate crunch that pops against the creamy peanut butter. I’m a firm believer that a little salt can transform an ordinary dessert into a gourmet experience.
Creative Twists and Variations
This recipe is a playground. Here are some of my favorite ways to switch things up:
Chocolate Peanut Butter Swirl
Before folding in the Oreo pieces, swirl in ¼ cup of melted chocolate mixed with an extra tablespoon of peanut butter. The chocolate ribbons create a marbled effect and add a richer cocoa depth. Chocolate lovers will swear this is the ultimate indulgence.
White Chocolate & Macadamia
Replace the Oreo cookies with chopped white chocolate and toasted macadamia nuts. The buttery nuts complement the peanut butter, while the white chocolate adds a creamy sweetness that melts in your mouth. Perfect for a tropical twist.
Salted Caramel Pretzel
Mix in crushed pretzel pieces and drizzle a homemade salted caramel sauce after baking. The pretzels contribute a salty crunch that pairs beautifully with the caramel, turning the blondies into a salty‑sweet carnival.
Vegan Delight
Swap the butter for coconut oil, use flax eggs, and choose a dairy‑free chocolate spread for the swirl. The result is a vegan‑friendly bar that still delivers that classic peanut butter‑Oreo crunch, proving you don’t need dairy to achieve decadence.
Spiced Autumn
Add a teaspoon of pumpkin spice and replace half the flour with oat flour. The warm spices mingle with the peanut butter, creating a cozy, autumn‑ready treat. Serve with a drizzle of maple syrup for extra comfort.
Storing and Bringing It Back to Life
Fridge Storage
Place the cooled blondies in an airtight container and store them in the refrigerator for up to five days. The chilled environment keeps the texture firm, preventing them from becoming overly soft. When you’re ready to enjoy, let them sit at room temperature for 10 minutes or give them a quick 30‑second microwave zap for a warm, melty experience.
Freezer Friendly
Wrap the entire pan tightly in plastic wrap, then add a foil layer and freeze for up to three months. The brownies freeze beautifully without losing their crumb structure. To reheat, thaw overnight in the fridge, then warm in a 300°F oven for 10 minutes, or microwave individual squares for 20 seconds.
Best Reheating Method
Before reheating, sprinkle a tiny splash of water (about a teaspoon) over the top and cover with foil. The steam generated revives the moist interior while preserving the crisp crust. This trick works for both microwave and oven reheats, ensuring every bite feels freshly baked.