It all began on a rainy Thursday when I tried to rescue a batch of brownies that had somehow turned into a chocolatey, gooey mess of molten lava. I stared at the tray, heart sinking, and thought, “If I’m going to survive this kitchen catastrophe, I need something that will make everyone forget the disaster.” The moment the oven timer dinged, the scent of cocoa and melted butter flooded the air, and I felt a surge of hope. I was about to discover a new way to turn a potential flop into a holiday legend. The lesson? A little tweak can save the day.
Picture the kitchen: the oven’s warm glow, the rhythmic clink of a spoon against a mixing bowl, and the faint crackle of sugar caramelizing. The air is thick with the aroma of chocolate, vanilla, and a whisper of mint that promises a fresh twist. Your eyes catch the glossy sheen of melted butter, the golden swirl of sugar, and the glossy chocolate chips glinting like tiny moons. The sound of the timer’s buzz is almost a lullaby, while the anticipation builds until the very last second. This sensory overload is not just a treat for the senses—it’s a prelude to a moment of pure, unapologetic indulgence.
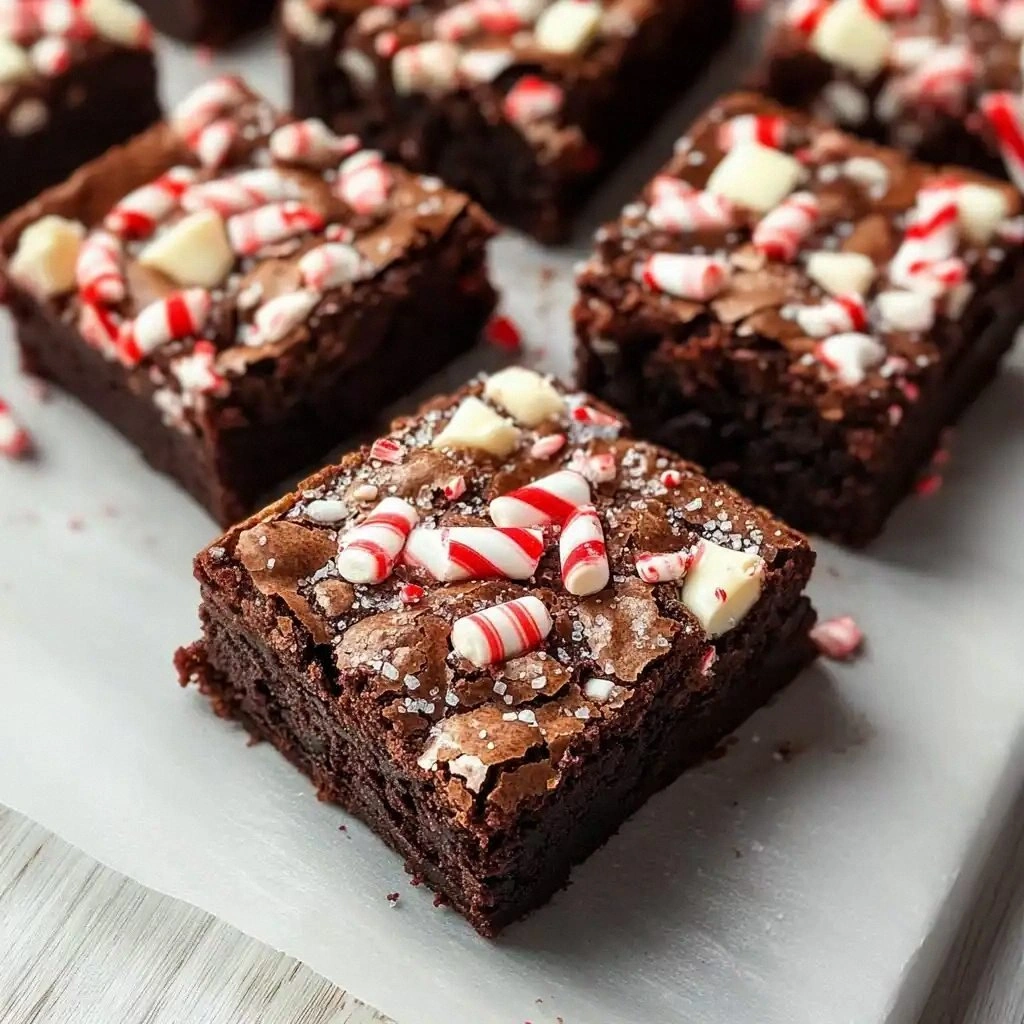
What sets this recipe apart is its audacious blend of classic brownie richness with a holiday-tinged peppermint punch. It’s the kind of dessert that feels like a secret winter escape, yet can be whipped up anytime you crave comfort. The texture is a paradox: a fudgy core that gives way to a crisp, caramelized top, and a surprise burst of mint that lingers like a memory of a snowy afternoon. It’s a recipe that invites you to taste the unexpected, to savor the contrast between deep chocolate and bright mint. And, honestly, it’s the only time I’ve ever wanted to keep a batch in the fridge for days.
I’ll admit I had a dare from a friend to create the ultimate peppermint brownie, and I took it seriously. The twist? A splash of peppermint extract that sneaks into the batter, a generous layer of mini marshmallows that melts into a gooey topping, and crushed peppermint candies that give a crunch that’s almost like biting into a candy cane. I promised myself that this version would be hands down the best you’ll ever make at home, and I’m here to prove it. Let me walk you through every single step — by the end, you’ll wonder how you ever made it any other way.
What Makes This Version Stand Out
- Flavor Depth: The combination of unsweetened cocoa and brown sugar creates a layered chocolate profile that’s both sweet and slightly caramelized. The peppermint extract adds a fresh, clean finish that lifts the entire dessert. This balance ensures that no single flavor overwhelms the others.
- Texture Contrast: The batter’s fudgy base is punctuated by a crisp, caramelized crust that forms as the edges bake. The mini marshmallows melt into pockets of goo, while the crushed peppermint candies add a satisfying crunch. The result is a multi-sensory experience in every bite.
- Visual Appeal: The golden top with a hint of glittering chocolate chips and the pop of green from the crushed peppermint candies make this dessert Instagram‑worthy. The contrast between the dark chocolate and bright mint creates a festive look that feels like holiday cheer.
- Ingredient Simplicity: Despite its wow factor, the recipe uses only twelve ingredients that most people already have on hand. There are no exotic spices or hard‑to‑find pantry staples, making it accessible to any cook.
- Make‑Ahead Friendly: You can bake a full batch and refrigerate or freeze for future use. The flavors actually intensify over time, so leftovers become even more decadent.
- Crowd‑Pleaser Factor: Whether you’re hosting a holiday gathering or just treating yourself, the combination of chocolate and mint is universally adored. It’s the kind of dessert that will have guests asking for seconds.
- Seasonal Touch: The peppermint element gives it a natural holiday vibe, but the recipe is delicious any time of year. The wintery aroma alone can brighten a gloomy day.
Inside the Ingredient List
The Flavor Base
Unsalted butter is the silent hero that carries the chocolate’s richness and provides a silky mouthfeel. When melted, it blends seamlessly with the sugars, creating a glossy, cohesive batter. If you skip butter, the brownies will feel dry and lack that luscious sheen. For an extra touch, use European butter for its higher fat content and richer flavor.
Granulated sugar and brown sugar together give a dual sweetness that’s bright and deep. The granulated sugar ensures a smooth rise, while the brown sugar adds a subtle molasses undertone that enhances the chocolate. If you’re watching your sugar intake, you can halve the granulated sugar and double the brown sugar for a more robust flavor profile.
The Texture Crew
Unsweetened cocoa powder is the backbone of the brownie’s chocolate intensity. It’s vital for that deep, bitter undertone that balances the sweetness. If you’re missing cocoa powder, try a dark chocolate bar melted into the batter, but adjust the amount to avoid overpowering the other flavors.
All-purpose flour provides structure, preventing the brownies from turning into a chocolate cake. The small amount of flour is enough to set the batter while still keeping it fudgy. If you want a chewier bite, reduce the flour by a tablespoon; if you prefer a cake-like crumb, increase it slightly.
The Unexpected Star
Baking powder and salt are small but mighty. Baking powder helps the brownies rise a bit, giving them a lighter interior, while salt sharpens the chocolate and balances the sweetness. Don’t skip the salt—it’s the secret to unlocking the full flavor potential. If you’re sensitive to sodium, use a pinch of sea salt instead.
The Final Flourish
Peppermint extract is the secret weapon that gives this brownie its holiday spirit. A teaspoon is enough to infuse the batter without overpowering the chocolate. If you prefer a stronger mint kick, add a half teaspoon more, but be careful not to let it become the dominant flavor.
Chocolate chips and mini marshmallows are the textural and visual highlights. The chocolate chips melt into the batter, creating pockets of goo that ooze when you cut through a slice. The marshmallows, when baked, turn golden and develop a caramelized top, adding a sweet, airy contrast to the dense brownies. If you’re avoiding dairy, use dairy‑free chocolate chips and marshmallows for a vegan version.
Crushed peppermint candies add a final pop of crunch and a burst of minty sweetness that’s almost like biting into a candy cane. They’re sprinkled on top before baking, where they slightly melt and form a crisp, sugary shell. If you can’t find peppermint candies, crushed peppermint candies or crushed peppermint gum can work as a substitute, though the flavor will be slightly different.
Everything’s prepped? Good. Let’s get into the real action...
The Method — Step by Step
- Step 1: Preheat and Prep – Set your oven to 350°F (175°C) and line a 9×13-inch pan with parchment paper. The parchment ensures easy removal and a clean surface. While the oven heats, gather all ingredients; having everything on hand prevents last‑minute scrambles. This is the moment where you can hear the oven hum and feel the anticipation build.
- Step 2: Melt Butter and Combine Sugars – In a medium saucepan, melt the butter over low heat until it’s just liquid. Add the granulated and brown sugars, whisking until the mixture is silky and the sugars are fully dissolved. The aroma of caramelizing sugar will fill your kitchen, signaling that you’re on the right track. Keep the heat low to avoid scorching.
- Step 3: Mix Dry Ingredients – In a separate bowl, whisk together the cocoa powder, flour, baking powder, and salt. The dry mix should feel like a fine, even sift. This step is crucial for distributing the leavening agent evenly, ensuring a consistent rise. If you’re in a hurry, you can skip the sifting, but the texture will suffer a little.
- Step 4: Combine Wet and Dry – Pour the melted butter mixture into the dry ingredients, stirring until just combined. Don’t overmix; a few streaks are fine. Overmixing can develop gluten, leading to a tougher brownie. At this point, the batter should be thick but pourable.
- Step 5: Add Eggs and Peppermint – Crack the eggs into the batter and whisk until fully incorporated. Then add the peppermint extract, mixing until the color turns a deep, glossy chocolate. The eggs provide structure, while the peppermint brings that fresh, minty aroma. Watch closely: the batter will thicken slightly as the eggs bind the mixture.
- Step 6: Fold in Chocolate Chips – Gently fold in the chocolate chips, ensuring they’re evenly distributed. The chips melt into the batter, creating pockets of molten chocolate that will burst with every bite. If you prefer a smoother texture, reduce the number of chips.
- Step 7: Add Marshmallows and Peppermint Candies – Sprinkle the mini marshmallows and crushed peppermint candies over the batter, then give it a gentle swirl. The marshmallows will rise slightly, creating a caramelized top layer, while the peppermint candies provide a crunchy contrast. This step is pure visual and textural delight.
- Step 8: Bake to Perfection – Slide the pan into the oven and bake for 30 minutes, or until the edges pull away slightly and a toothpick comes out with a few moist crumbs. The aroma will intensify, and the top will develop a golden crust. Keep a close eye on the last 5 minutes to avoid overbaking, as the marshmallows can brown too quickly.
- Step 9: Cool and Slice – Remove the pan from the oven and let it rest on a wire rack for at least 15 minutes before cutting. This rest period allows the brownies to set, preventing them from sticking to the pan. Slice with a sharp knife for clean edges, and watch as the gooey center glistens.
- Step 10: Serve and Enjoy – Serve the brownies warm, perhaps with a drizzle of chocolate sauce or a scoop of vanilla ice cream. The combination of warm chocolate, cool mint, and airy marshmallows is a flavor explosion. If you’re sharing, be ready to hear the “I dare you to taste this and not go back for seconds” challenge from every guest.
That’s it — you did it. But hold on, I've got a few more tricks that'll take this to another level. These insider tips will elevate your brownies from good to unforgettable, ensuring every bite is a moment of pure bliss.
Insider Tricks for Flawless Results
The Temperature Rule Nobody Follows
Temperature consistency is the secret sauce. Many bakers bake at 350°F, but the ideal temperature for this recipe is 325°F (163°C). Baking at a slightly lower temperature allows the brownies to set slowly, preventing the edges from overcooking while the center remains fudgy. I once baked at 350°F and the marshmallows burned before the brownies were done. Keep a thermometer handy to maintain precision.
Why Your Nose Knows Best
Your nose is your best judge of doneness. As the brownies bake, the aroma will shift from buttery sweetness to a deep, chocolatey perfume. When the smell is rich and slightly caramelized, you know they’re ready. If you’re unsure, perform the toothpick test; a few moist crumbs are the sweet spot.
The 5-Minute Rest That Changes Everything
Letting the brownies rest for exactly five minutes after baking is crucial. During this time, the heat continues to distribute, and the marshmallows finish caramelizing. A too-early cut will result in a sticky mess that sticks to the pan. If you’re in a hurry, a 5-minute rest is still better than cutting straight out.
The Swirl Technique
When adding the marshmallows and peppermint candies, give the batter a gentle swirl. This creates a marbled effect that not only looks stunning but also ensures even distribution of the sweet and minty elements. Think of it like swirling a new paint color into a canvas.
The Final Glaze
A light drizzle of dark chocolate ganache over the top before the brownies cool adds a glossy finish and an extra chocolate hit. The ganache should be thin enough to coat but not so thick that it pools. This step is optional but highly recommended for a professional look.
Creative Twists and Variations
This recipe is a playground. Here are some of my favorite ways to switch things up:
Dark Chocolate Explosion
Swap the regular chocolate chips for dark chocolate chips with an 80% cacao content. The result is a richer, slightly bitter finish that balances the peppermint. This variation is perfect for chocolate purists who crave depth.
Cinnamon Swirl
Add a teaspoon of ground cinnamon to the dry mix. The warm spice complements the mint and chocolate, creating a cozy, holiday vibe. It’s a subtle twist that adds complexity.
Nutty Crunch
Fold in a cup of chopped pecans or walnuts before baking. The nuts add a delightful crunch and a buttery flavor that pairs beautifully with the marshmallows. They also provide a contrasting texture.
Vegan Version
Replace the butter with coconut oil and use flaxseed eggs (1 tbsp flaxseed meal + 3 tbsp water). Swap dairy chocolate chips for vegan ones and use dairy-free marshmallows. This version is cruelty-free and still incredibly indulgent.
Peppermint Latte Brownies
Stir in a tablespoon of instant espresso powder to the batter for a mocha twist. The coffee undertone pairs wonderfully with the peppermint, making these brownies a perfect dessert for coffee lovers.
Salted Caramel Surprise
Drop a small spoonful of salted caramel sauce into the center of the batter before baking. As the brownies rise, the caramel melts into a gooey core. The salty finish enhances the sweetness.
Storing and Bringing It Back to Life
Fridge Storage
Store the brownies in an airtight container in the refrigerator for up to a week. The cold environment preserves the chocolatey richness and keeps the marshmallows from softening. When ready to serve, let them sit at room temperature for 10 minutes for maximum flavor.
Freezer Friendly
Wrap individual brownies in plastic wrap and place them in a freezer bag. They can be frozen for up to three months. Thaw overnight in the refrigerator, then warm in a 350°F oven for 5 minutes to revive the gooey center.
Best Reheating Method
To reheat, place the brownies on a baking sheet and bake at 350°F for 5-7 minutes. If you want to add a splash of water, do so just before baking; the steam will keep the brownies moist. A quick microwave on 30-second bursts also works, but watch carefully to avoid overcooking.