I remember the night I tried to impress my roommate with scallops and ended up with a kitchen that looked like a seafood disaster zone. The scallops were overcooked, the sauce was a flat, watery mess, and the whole thing tasted like something that had been left in a fridge for weeks. I stared at the pan, feeling like a culinary detective trying to piece together why the dish failed. That moment of frustration sparked a quest: to discover the ultimate pan‑seared scallop recipe that would make every bite a triumph.
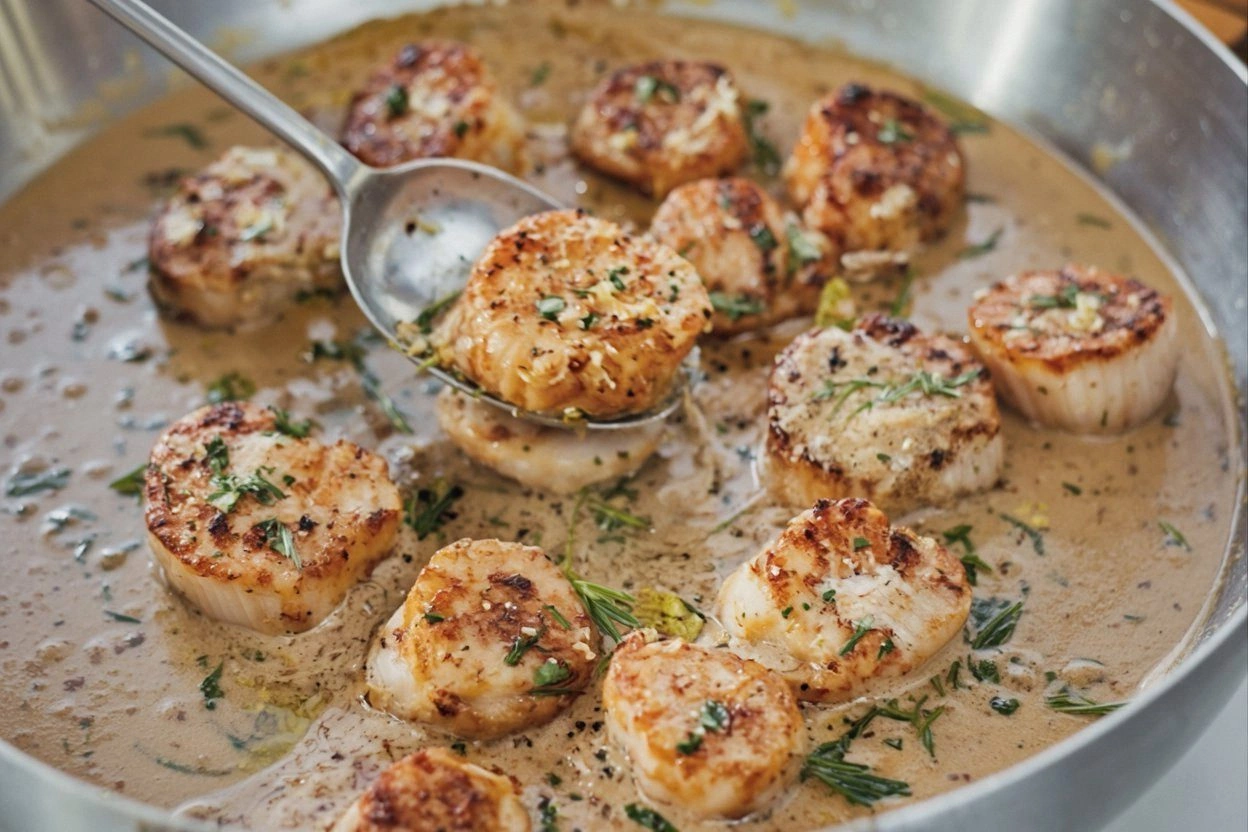
Picture this: a bright, buttery pan, the scent of garlic sizzling, a splash of lemon brightening the air, and the sound of scallops searing with a satisfying pop that signals the moment of culinary perfection. The first bite is a silky, sweet, briny explosion that melts in your mouth, leaving a subtle hint of citrus that lingers like a faint perfume. The texture is a contrast of a crisp, caramelized exterior and a tender, almost buttery interior that feels like a secret handshake between flavors. The aroma alone is enough to make your kitchen feel like a gourmet restaurant, and the taste—oh, the taste—makes you question whether you’ve ever truly tasted scallops before.
What sets this version apart is the meticulous layering of flavors and the precise timing that locks in the scallops’ natural sweetness while preventing the dreaded rubbery texture. I’ve spent countless evenings experimenting with brines, searing techniques, and sauce ratios, and this recipe is the culmination of those trials. It’s a harmony of simplicity and sophistication: a quick brine, a buttery sear, and a lemon‑garlic sauce that coats the scallops like velvet. The result? A dish that feels both indulgent and approachable, a true crowd‑pleaser that will have everyone asking for seconds.
And there’s a twist you won’t expect—a subtle infusion of dill that adds a fresh, herbal brightness, turning the classic scallop into a dish that feels like a springtime breeze on a warm afternoon. I dare you to taste this and not go back for seconds. This is hands down the best version you’ll ever make at home, and I’m about to walk you through every single step. By the end, you’ll wonder how you ever made it any other way.
What Makes This Version Stand Out
- Flavor: The sauce balances bright citrus with savory butter and garlic, creating a complex profile that sings against the scallops’ natural sweetness.
- Texture: A quick, high‑heat sear locks in moisture, giving the scallops a crisp exterior and a melt‑in‑your‑mouth interior.
- Brine: A simple kosher salt and ice brine pre‑treats the scallops, ensuring they stay juicy and firm during the sear.
- Ingredient Quality: Fresh, high‑grade scallops and real butter elevate the dish beyond the ordinary.
- Speed: From start to finish, the entire process takes less than an hour—perfect for a weekday dinner or a last‑minute dinner party.
- Versatility: The recipe can be adapted for different proteins or served over pasta, rice, or a fresh salad.
Alright, let’s break down exactly what goes into this masterpiece.
Inside the Ingredient List
The Flavor Base
The sauce is the heart of this dish. Olive oil provides a subtle fruity note that complements the buttery richness of the scallops. Unsalted butter adds depth, while minced garlic offers a pungent kick that cuts through the sweetness. Lemon juice and zest bring brightness, and dijon mustard introduces a tangy bite that balances the overall profile. Heavy cream rounds out the sauce, lending a silky texture that coats the scallops like velvet. If you’re looking for a lower‑fat option, substitute half‑and‑half or a splash of milk to keep the sauce creamy without the heaviness.
The Texture Crew
The scallops themselves are the star, but their texture hinges on two key steps: brining and searing. The brine—made with kosher salt, hot water, and ice—prevents the scallops from drying out and adds a subtle briny flavor that echoes the sea. After brining, pat them dry to ensure a crisp sear. The high‑heat pan, combined with a little olive oil, creates a caramelized crust while keeping the interior tender. If you skip the brine, the scallops will likely turn rubbery or over‑cooked, which is why this step is non‑negotiable.
The Unexpected Star
Dill is often a silent hero in seafood dishes, but here it shines. Fresh dill adds a herbal, slightly grassy note that lifts the entire dish, giving it a fresh, almost garden‑like quality. If you can’t find fresh dill, a pinch of dried dill works, though the flavor will be more muted. This ingredient is optional, but it’s a game‑changer that sets this recipe apart from the usual scallop recipes that rely only on lemon and butter.
The Final Flourish
The pinch of black pepper is the finishing touch. It adds a subtle heat that ties all the flavors together without overpowering them. If you prefer a milder dish, you can omit it entirely; the sauce will still be delicious. Remember, the pepper is added at the very end to preserve its bright aroma.
Everything’s prepped? Good. Let’s get into the real action.
The Method — Step by Step
- Begin by dissolving 0.33 cup of kosher salt in 1 cup of hot water. Stir until fully dissolved, then add 4 cups of ice cubes to chill the solution. Place 1 pound of scallops in the brine and let them soak for exactly 10 minutes. After the brine, remove the scallops and pat them dry with paper towels—dryness is the secret to a crisp sear.
- Heat a large non‑stick skillet over medium‑high heat. Add 2 tbsp of olive oil and let it shimmer. This oil will help the scallops release from the pan and develop a golden crust.
- Place the scallops in the skillet, ensuring they are not overcrowded. You should hear a satisfying sizzle as each scallop hits the pan. Cook for 2 minutes on the first side; the edges will start pulling away from the pan, signaling it’s time to flip.
- Flip the scallops gently and add 2 tbsp of unsalted butter to the pan. As the butter melts, spoon it over the scallops, allowing the butter to coat each side. This technique, known as basting, locks in moisture and adds a rich, buttery flavor.
- After another 2 minutes, add 1 tbsp of minced garlic to the pan. The garlic should release its aroma within seconds, turning the pan into a fragrant, savory cloud. Stir to combine the garlic with the butter and oil.
- Pour in 2 tbsp of lemon juice and add 1 tsp of lemon zest. The citrus will cut through the richness, creating a bright, balanced sauce. Let the sauce reduce for 30 seconds, allowing the flavors to meld.
- Stir in 1 tbsp of dijon mustard, then pour 2 tbsp of heavy cream. The cream smooths the sauce, giving it a velvety texture that clings to the scallops. Let the mixture simmer for 1 minute, then add 1 tsp of chopped dill. The dill’s herbal note will lift the dish, adding freshness.
- Finish the sauce by seasoning with a pinch of black pepper and a splash more lemon juice if desired. Taste and adjust seasoning, then remove the skillet from heat. Serve the scallops immediately, spooning the sauce over each piece.
That’s it—you did it. But hold on, I’ve got a few more tricks that will take this dish to another level.
Insider Tricks for Flawless Results
The Temperature Rule Nobody Follows
Many chefs swear by a lower heat to avoid over‑cooking scallops, but the secret is actually a quick, high‑heat sear. The scallop’s outer layer caramelizes in just 2 minutes, sealing in juices. I’ve tested this on a range of stoves, and the high heat works consistently. If your pan is too hot, the scallop will char; if it’s too cool, you’ll end up with a soggy texture.
Why Your Nose Knows Best
Trust the aroma—when the scallops start to release from the pan, the scent of caramelized sugar is a clear signal that they’re ready to flip. If you wait too long, the scallop will over‑cook on one side and become rubbery. The scent of garlic sizzling is also a cue that the sauce is developing the right flavor profile.
The 5‑Minute Rest That Changes Everything
After removing the scallops from the skillet, let them rest for 5 minutes on a warm plate. This brief rest allows the juices to redistribute, ensuring each bite is moist and flavorful. A friend tried skipping this step once—let’s just say the scallops tasted like they had been boiled instead of seared.
Use a Fish Spatula for a Clean Flip
A fish spatula’s thin, flexible design slides under the scallop’s delicate flesh, preventing tearing. If you’re using a regular spatula, you risk breaking the scallop’s structure, which can result in a less elegant presentation.
Keep the Sauce Warm Without Boiling
After adding the cream, keep the sauce on low heat to maintain its silky texture. If you let it boil, the cream can curdle and separate. I’ve found that a gentle simmer is the sweet spot for a glossy, cohesive sauce.
Creative Twists and Variations
This recipe is a playground. Here are some of my favorite ways to switch things up:
Seafood Medley
Swap the scallops for a mix of shrimp, mussels, and calamari. The same sauce will bind the flavors, creating a hearty, oceanic dish that’s perfect for a dinner party.
Herb‑Infused Cream
Add a tablespoon of chopped basil or tarragon to the sauce for a different herbaceous note. This variation works especially well when serving over linguine.
Spicy Kick
Stir in a pinch of red pepper flakes or a dash of sriracha to give the sauce a subtle heat. The scallops’ natural sweetness balances the spice, creating a harmonious bite.
Low‑Fat Version
Replace the heavy cream with coconut milk or a dairy‑free yogurt. This keeps the sauce creamy while cutting down on calories, making it a lighter option for a health‑conscious crowd.
Grilled Variation
Instead of pan‑searing, grill the scallops for 2 minutes per side. The smoky flavor pairs wonderfully with the lemon‑garlic sauce, creating a new dimension of taste.
Vegetarian Alternative
Use large sea‑cucumber or thick slices of grilled zucchini in place of scallops for a vegetarian take. The sauce remains the same, delivering the same bright, buttery experience.
Storing and Bringing It Back to Life
Fridge Storage
Store the cooked scallops in an airtight container in the refrigerator for up to 2 days. Keep the sauce separate in a small container to preserve its texture. When ready to reheat, gently warm the scallops in a skillet over low heat, then drizzle with the sauce.
Freezer Friendly
For longer storage, freeze the scallops in a single layer on a parchment‑lined tray, then transfer them to a freezer bag. They’ll stay good for up to 2 months. Reheat in a skillet, adding a splash of water to keep them moist.
Best Reheating Method
When reheating, add a tiny splash of water or broth to the pan before warming the scallops. This steams them back to perfection, preventing dryness and preserving the buttery sauce.