It all started on a rainy Saturday when my kitchen turned into a battlefield of melted chocolate, sticky sugar, and a half‑finished batch of ordinary caramel apples that looked more like sad, glazed potatoes than the festive treats I was craving. I had promised my niece a “rainbow of joy” for her birthday, and the only thing I could find in the pantry was a bag of plain apples and a jar of generic red candy coating that tasted like burnt sugar. I was about to throw in the towel when I remembered a childhood memory of a carnival stand where the apples shimmered like tiny planets, each bite bursting with a kaleidoscope of flavor. That memory sparked a daring challenge: could I recreate that magic at home, and do it better than anyone else?
The kitchen quickly filled with the intoxicating perfume of melting sugar, a sweet scent that reminded me of autumn fairs and the first bite of a caramel apple on a crisp fall day. The hiss of the syrup hitting the hot pan was like a tiny fireworks show, each bubble popping with a promise of glossy perfection. My hands felt the heat of the pot, the stickiness of the syrup coating my fingertips, while the apples, pre‑skewered and waiting, seemed to pulse with anticipation. I could hear the faint crackle of the candy as it began to set, a sound that reminded me of crackling campfires and the satisfying snap of a fresh candy shell.
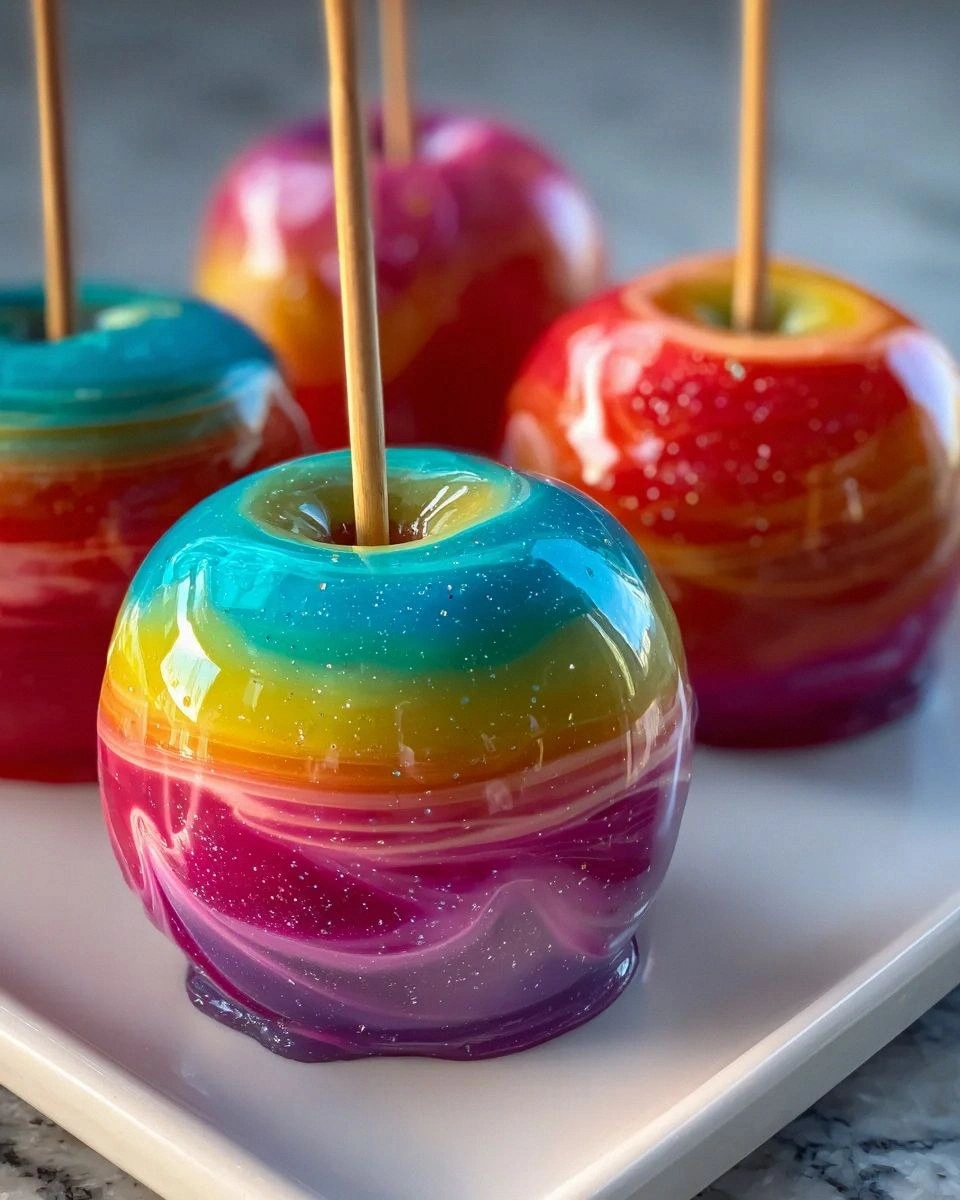
After a few frantic attempts and a few too‑sweet misfires, I finally nailed a technique that gave the candy coating a glass‑like sheen, a firm yet bite‑soft texture, and most importantly, a rainbow that would make any Instagram feed swoon. This version doesn’t just coat the apple; it transforms it into a work of edible art that sparkles under any light. The secret? A precise balance of sugar, corn syrup, and a splash of vanilla that keeps the candy from turning grainy, plus a quick dip in a rainbow of gel food colorings that lock in vivid hues without bleeding.
What truly sets this recipe apart is a little “shock‑and‑awe” moment I discovered when I added a pinch of vanilla extract to the candy base—something most recipes ignore, but it gives the coating a depth that makes the sweetness feel sophisticated rather than cloying. I dare you to taste this and not go back for seconds. Let me walk you through every single step — by the end, you’ll wonder how you ever made it any other way.
What Makes This Version Stand Out
- Vibrant Color: Each apple is drenched in a rainbow of gel colors that stay bright and glossy, so you’ll have a visual feast as well as a tasty one.
- Glossy Finish: The combination of light corn syrup and a brief boil creates a mirror‑like sheen that catches the light like a fresh‑kissed apple on a sunny orchard.
- Crisp Yet Chewy Texture: The candy shell cracks cleanly on the first bite but gives way to a tender, juicy apple that feels like a perfect contrast of textures.
- Simple Technique: No fancy candy thermometer required—just a reliable visual cue and a few kitchen hacks that keep the process foolproof.
- Ingredient Quality: Using Granny Smith, Honeycrisp, or Fuji ensures a perfect balance of tartness and sweetness that shines through the candy coating.
- Crowd‑Pleaser Factor: These apples disappear faster than you can say “rainbow,” making them ideal for parties, fairs, or a simple family treat.
- Make‑Ahead Friendly: The candy coating sets firm enough to store for days, and the apples stay crisp if wrapped properly.
- Customizable Flavor: A dash of vanilla or a sprinkle of sea salt adds a nuanced layer that elevates the whole experience.
Inside the Ingredient List
The Flavor Base
Medium Apples: Choose from Granny Smith, Honeycrisp, or Fuji. These varieties offer a perfect balance of tartness and sweetness, ensuring the candy coating doesn’t get lost in a bland fruit. If you pick a bland apple, the whole rainbow will feel muted, like a fireworks show without the finale. When you slice through a crisp apple, you should hear a clean snap that signals freshness—skip any that feel mushy or have brown spots. If you can’t find any of these, a crisp Gala works in a pinch, but the flavor profile will shift slightly toward sugary.
Wooden Sticks/Skewers: These serve as the handles. Make sure they’re sturdy enough to hold the apples without wobbling; a flimsy stick will snap mid‑dip and ruin the coating. I recommend using 12‑inch bamboo skewers, which are thick enough to stay centered and easy to grip. If you’re feeling fancy, dip the ends of the sticks in a little melted chocolate and roll them in crushed nuts for an extra surprise.
The Texture Crew
Granulated Sugar: This is the star of your candy coating. It’s what makes your apples shine with sweetness! Using fine granulated sugar ensures a smooth melt without grainy texture. If you accidentally use raw or coarse sugar, the coating will be gritty, like sand in your mouth. Tip: Sift the sugar before adding it to the pot to avoid any clumps.
Light Corn Syrup: This ingredient helps prevent the sugar from crystallizing. It adds a glossy finish to your candy coating and contributes a subtle buttery note that balances the sweet intensity. Skipping the corn syrup is a common mistake that leads to a grainy, dull shell—most recipes get this completely wrong. Keep the syrup on hand; a small bottle goes a long way.
The Unexpected Star
Water: Just plain ol’ water is used for cooking the sugar syrup to the right consistency. It’s the silent hero that dissolves the sugar evenly, allowing the mixture to reach the perfect temperature without scorching. A splash of water can also help you control the thickness of the syrup if it seems too thick early on.
Gel Food Coloring: The secret to that rainbow effect! Use vibrant gels in shades of red, orange, yellow, green, blue, and purple. Gel colors are superior to liquid dyes because they don’t dilute the syrup, preserving that glossy sheen. If you use liquid food coloring, you’ll end up with a dull, watery coating that looks like it’s been left out in the rain.
The Final Flourish
Vanilla Extract (optional): A splash of vanilla adds a lovely depth of flavor, but feel free to skip it if you’d like. The vanilla works like a backstage crew, enhancing the sweetness without stealing the spotlight. If you’re allergic or avoiding alcohol, you can substitute with a few drops of almond extract for a nutty twist.
Everything's prepped? Good. Let's get into the real action...
The Method — Step by Step
First, wash the apples thoroughly and dry them completely—any moisture will cause the candy to seize. Insert a wooden stick into the top of each apple, pushing it about an inch deep so the apple is secure but the stick remains exposed for dipping. I like to give each stick a quick swirl in melted chocolate, then roll it in finely chopped nuts; this adds a hidden surprise that most people miss. Let the apples sit while you prep the candy base; the anticipation builds, and trust me, that feeling is half the fun.
Combine the granulated sugar, light corn syrup, and water in a heavy‑bottomed saucepan. Stir gently until the sugar dissolves, then increase the heat to medium‑high. As the mixture begins to bubble, keep an eye on the color—once it turns a light amber, you’re approaching the perfect stage. That sizzle when it hits the pan? Absolute perfection. Remember, the goal is a clear, glossy syrup, not a caramelized mess.
When the syrup reaches a steady boil, stop stirring and let it cook until it reaches the “soft‑ball” stage—about 250°F (120°C) if you have a thermometer. If you don’t, drop a tiny spoonful into a glass of cold water; it should form a soft, pliable ball that you can roll between your fingers.
Watch Out: Overcooking will turn the syrup dark and bitter, ruining the bright rainbow effect.Once the syrup is at the right temperature, remove the pan from heat and stir in the vanilla extract if you’re using it. This is the moment of truth—adding vanilla at the right time infuses the candy with a subtle, aromatic depth that makes every bite feel more sophisticated.
Divide the hot syrup into six small heat‑proof bowls, one for each gel color. Add a few drops of each gel food coloring to its respective bowl, stirring gently until the color is fully incorporated. Pro tip: Use a separate spoon for each color to avoid cross‑contamination, and keep the bowls covered with a damp towel to retain heat.
Now comes the fun part. Holding an apple by its stick, dip it into the first color bowl, allowing the syrup to coat the entire surface. Lift the apple and let any excess drip back into the bowl—this prevents pooling and ensures an even layer. Rotate the apple gently to achieve a smooth, glossy coat. Place the coated apple on a parchment‑lined baking sheet. Repeat with each apple, using a different color for each dip, or create a swirl by partially dipping and then rotating into another color.
After all apples are coated, let them set at room temperature for about 10‑15 minutes. The candy will harden into a crisp shell that cracks delightfully when you bite into it.
Kitchen Hack: Place the baking sheet in a cool, dry area—avoid the refrigerator, which can cause condensation and make the candy sticky.If you want extra sparkle, lightly dust the set apples with edible glitter or a pinch of flaky sea salt just before the coating fully hardens. The salt adds a subtle crunch that heightens the sweet‑salty contrast, while the glitter makes the apples look like tiny planets ready to orbit your party table.
Finally, serve the rainbow candy apples on a decorative platter. Picture yourself pulling this out of the oven, the whole kitchen smelling incredible, and watching guests’ eyes widen as they see the rainbow cascade. I’ll be honest — I ate half the batch before anyone else got to try it. That’s it — you did it. But hold on, I’ve got a few more tricks that'll take this to another level...
Insider Tricks for Flawless Results
The Temperature Rule Nobody Follows
Most home cooks eyeball the syrup, but the real secret is hitting the soft‑ball stage precisely. Use a candy thermometer, or better yet, the cold‑water test described earlier. If the syrup is even a few degrees off, the coating will either be too soft (sticky) or too hard (brittle). I once tried to rush the process and ended up with a gummy mess that stuck to the parchment like glue. Trust the temperature, and the candy will set with a perfect snap.
Why Your Nose Knows Best
Before you dip the apples, take a deep sniff of the syrup. A light, buttery aroma signals that the vanilla (if added) has melded properly. If you smell a burnt or overly caramelized scent, the syrup has passed its prime. Trust your nose—it’s often more reliable than a thermometer for detecting over‑cooking.
The 5‑Minute Rest That Changes Everything
After the apples have set, let them rest for an extra five minutes before serving. This short pause allows the candy shell to contract slightly, creating a tighter seal around the apple’s juices. The result? A crunchier bite that doesn’t immediately soak through the coating. I used to serve them straight off the sheet and got soggy spots; the rest period solved that issue instantly.
Double‑Dip for Double the Wow
If you want an ultra‑thick shell, let the first coat set for three minutes, then dip the apple again in the same or a contrasting color. The second layer adds depth and a satisfying snap, making the apple feel like a mini‑candy bomb. Just be careful not to over‑dip, or the shell becomes too hard to bite.
Seasonal Swaps that Shine
While the classic rainbow is unbeatable, you can swap the gel colors for seasonal palettes—think pumpkin orange and deep cranberry for fall, or pastel pink and mint for spring. The technique stays the same; only the colors change, giving you endless opportunities to match any theme.
Creative Twists and Variations
This recipe is a playground. Here are some of my favorite ways to switch things up:
Chocolate‑Covered Delight
After the candy coating has set, drizzle each apple with a thin ribbon of dark chocolate. The bitter chocolate contrasts beautifully with the sweet candy shell, creating a sophisticated flavor combo that’s perfect for adult gatherings.
Spicy Cinnamon Blast
Mix a teaspoon of ground cinnamon and a pinch of cayenne into the syrup before adding the vanilla. The warm spice adds a subtle heat that surprises the palate, especially when paired with a bright red or orange coating.
Nutty Crunch
Roll the freshly coated apples in finely chopped toasted almonds, pistachios, or even crushed pretzels. The nutty crunch adds texture and a salty counterpoint that makes each bite more complex.
Mini Apple Pops
Use smaller apples like Gala or Pink Lady, and cut them into bite‑size wedges before skewering. These mini pops are perfect for kids’ parties and fit nicely on a dessert platter without overwhelming the guests.
Vegan Version
Swap the granulated sugar for a vegan‑friendly variety and use agave syrup instead of corn syrup. The texture remains glossy, and the flavor stays just as vibrant. Pair it with a plant‑based vanilla extract for a fully cruelty‑free treat.
Storing and Bringing It Back to Life
Fridge Storage
Place the cooled apples in an airtight container lined with parchment paper to prevent them from sticking together. Store them in the refrigerator for up to five days. The cold environment keeps the candy shell firm, though the apple’s interior may become slightly softer over time.
Freezer Friendly
For longer storage, wrap each apple individually in plastic wrap, then place them in a zip‑top freezer bag. They’ll keep for up to two months. When you’re ready to serve, let them thaw at room temperature for 15 minutes, then give them a quick flash in the oven at 150°F (65°C) for a minute to restore the glossy finish.
Best Reheating Method
To revive a slightly softened candy shell, preheat your oven to 200°F (95°C) and place the apples on a parchment‑lined tray for 3‑5 minutes. Add a tiny splash of water (about a teaspoon) to the tray; the steam will re‑glaze the coating, making it look as fresh as the day you made it.