It all started on a rainy Thursday when I was trying to salvage a half‑baked chicken breast that had somehow ended up in a pot of sweet chili sauce. The kitchen smelled like a tropical storm, and my taste buds were screaming for something sweet, spicy, and utterly irresistible. I grabbed the nearest chicken, tossed it into a bowl, and, with a mischievous grin, added a splash of soy, a drizzle of honey, and a handful of fresh ginger. That simple act of rebellion turned a potential flop into a flavor explosion that left my friends begging for seconds. If you’re ready for a dish that defies expectations and delivers a crunchy, savory bite every single time, keep reading.
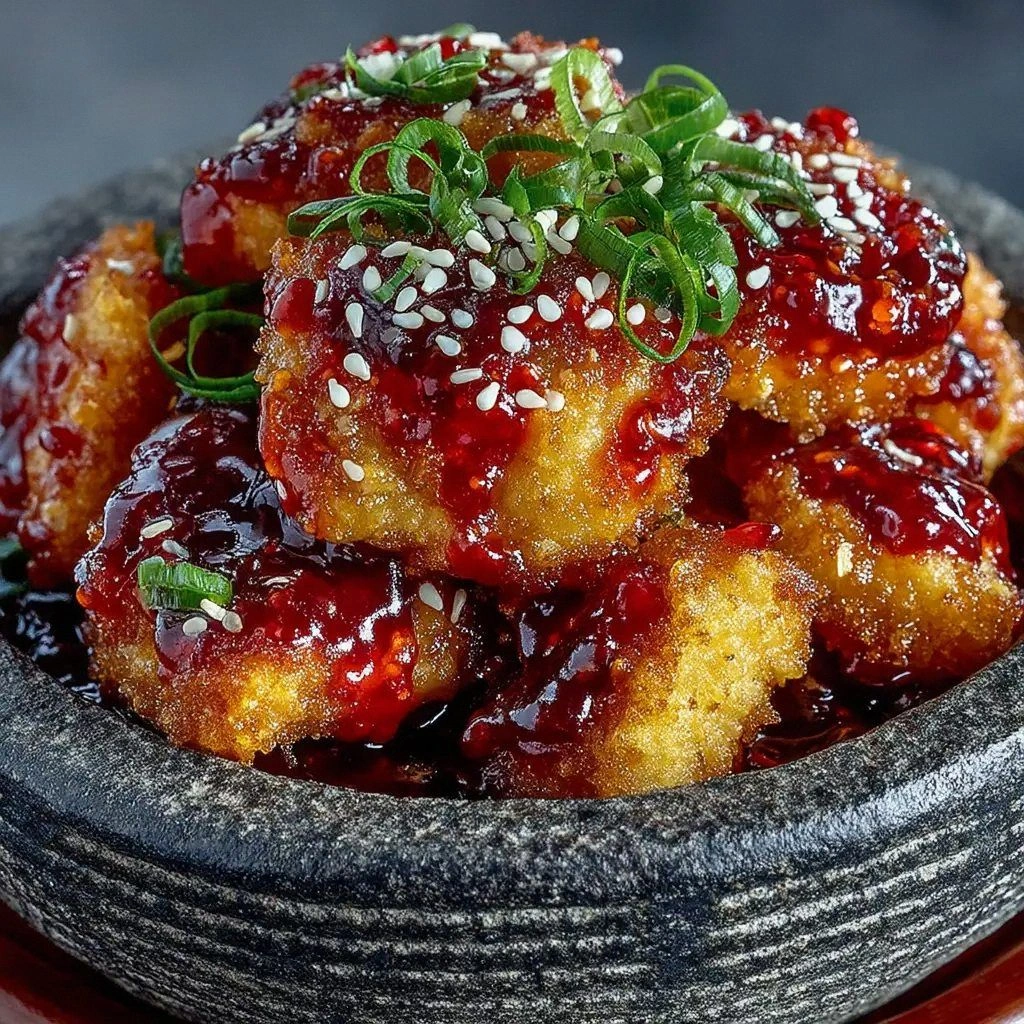
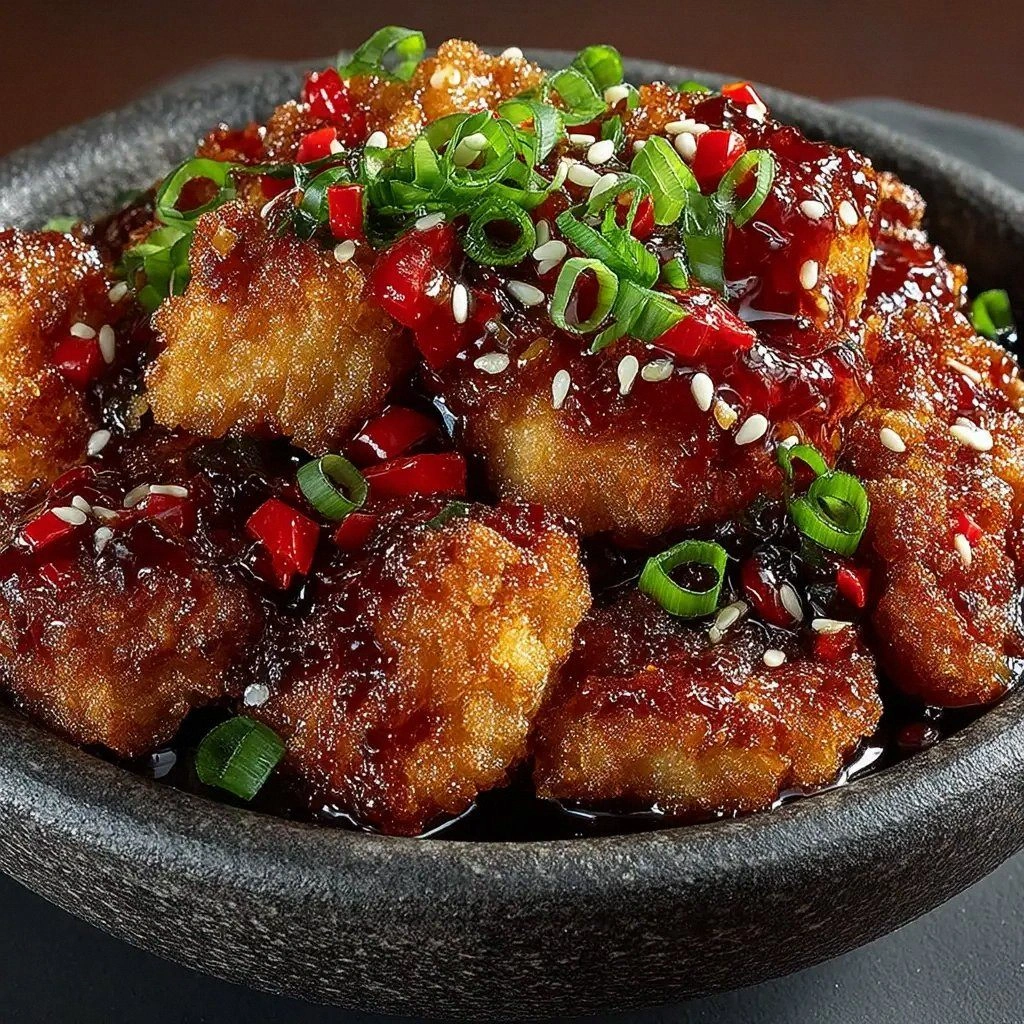
Picture yourself pulling a tray of golden, blistered chicken bites out of the oven, the air thick with the scent of sweet chili and garlic. The moment the timer dings, the sizzle that erupts from the first bite is pure music—crispy edges that crackle like thin ice, a sauce that coats each morsel like velvet, and a hint of heat that lingers on the tongue. I dare you to taste this and not go back for seconds; the combination of sweet, savory, and a whisper of spice will keep you coming back for more. Most recipes get this completely wrong, but I’ve cracked the code for a crispy, caramelized coating that sticks without being greasy. If you’ve ever struggled to get that perfect crunch, you’re not alone—and I’ve got the fix.
What sets this version apart is not just the ingredients, but the method: a simple baking technique that locks in moisture and caramelizes the sauce without a single stir. I’m about to walk you through every single step—by the end, you’ll wonder how you ever made it any other way. The recipe is so straightforward that even a novice can master it, yet the flavor profile is sophisticated enough to wow the most discerning palate. The sauce is thick enough to cling, yet light enough to allow the chicken’s natural juices to shine through. And the best part? It’s a crowd‑pleaser that works perfectly for game day, dinner parties, or a quick weekday dinner.
So grab your apron, preheat that oven, and let’s dive into the ultimate Sweet Chili Chicken Bites. The secret? A touch of avocado oil for a silky coating, a dash of cornstarch for that extra crunch, and a generous swirl of sweet chili that’s been left to marry with soy and ginger. You’ll be amazed at how a handful of pantry staples can transform into a dish that feels like a gourmet treat. And trust me, once you taste the first bite, you’ll be shouting, “This is hands down the best version you’ll ever make at home!”
What Makes This Version Stand Out
- Texture: The cornstarch coating creates a crisp shell that shatters like thin ice when you bite, delivering a satisfying crunch before the tender, juicy chicken inside.
- Flavor: The sweet chili sauce, balanced with soy, rice vinegar, and a splash of honey, delivers a complex sweetness that doesn’t overpower the savory chicken.
- Heat: A subtle kick from fresh ginger and garlic keeps the dish exciting without overwhelming the palate.
- Simplicity: No flambé or deep‑frying required—just a single baking sheet and a few minutes of prep.
- Make‑ahead: Assemble the bites the night before, refrigerate, and bake fresh when you’re ready; the flavors only deepen.
- Ingredient Quality: Using fresh ginger and a high‑quality sweet chili sauce elevates the dish to restaurant‑level flavor.
- Versatility: Works as a finger food, an appetizer, or a main dish when paired with rice or noodles.
- Time‑Efficiency: From prep to plate takes less than an hour, making it a perfect weeknight win.
Alright, let's break down exactly what goes into this masterpiece. I’ll give you the inside scoop on every key player.
Inside the Ingredient List
The Flavor Base
The sweet chili sauce is the star of the show, thick and glossy, with a sweetness that lingers on the tongue. It’s not just any store‑bought sauce; look for one that lists real chili flakes and no artificial sweeteners for maximum depth. When you combine it with low‑sodium soy sauce, you’re creating a umami‑rich backdrop that amplifies every bite. Skipping the sauce would turn this into a plain chicken snack—so keep it coming.
The Texture Crew
Cornstarch is the secret to that crisp, caramelized shell. It absorbs moisture and creates a fine, crunchy coating that doesn’t become soggy during baking. If you’re allergic to cornstarch, arrowroot powder is a great substitute, but it has a slightly different mouthfeel. A tablespoon of avocado oil helps the coating adhere and gives a silky finish that prevents sticking.
The Unexpected Star
Fresh ginger is the unsung hero that adds a bright, peppery note. Grated ginger releases essential oils that infuse the sauce with a subtle heat that balances the sweetness. If you prefer a milder version, replace half the ginger with a pinch of ground cinnamon for a warm, aromatic twist. The garlic, on the other hand, provides a savory punch that grounds the dish.
The Final Flourish
Honey is the final sweet touch, giving the sauce a glossy sheen and a mellow caramel flavor. It also helps the coating set into a slightly sticky, but not tacky, glaze that clings to the chicken. If you’re watching calories, a teaspoon of maple syrup works just as well, though the flavor profile shifts slightly. A splash of rice vinegar adds acidity, cutting through the richness and brightening the overall taste.
Everything's prepped? Good. Let's get into the real action.
The Method — Step by Step
- Start by preheating your oven to 425°F (220°C) and lining a baking sheet with parchment paper. The high heat will help the coating crisp up quickly. If you’re in a hurry, you can use a silicone mat instead of parchment for an eco‑friendly alternative. Make sure the sheet is completely flat; uneven surfaces can lead to uneven baking.
- While the oven warms, dice the chicken breast into bite‑size cubes, roughly 1 to 1.5 inches. Pat the pieces dry with paper towels; moisture is the enemy of crispiness. I always use a clean cutting board and a sharp knife to get uniform cubes that cook evenly.
- In a large bowl, whisk the egg and cornstarch together until you have a smooth slurry. The cornstarch should dissolve completely to avoid gritty pockets. If you notice any lumps, sift the cornstarch before whisking to ensure a silky coating.
- Add the diced chicken to the slurry, tossing until each piece is fully coated. The coating should look like a light dusting of flour—nothing too heavy that will clump. Shake the bowl gently to distribute the coating evenly; this step is crucial for that uniform crunch.
- Spread the coated chicken onto the prepared baking sheet in a single layer. Avoid overcrowding; if the pieces touch, they’ll steam rather than crisp. I use a small spatula to shift them into place, making sure each bite has enough air circulation.
- Bake for 12–15 minutes, then flip each bite and continue baking for another 8–10 minutes. The chicken should be golden brown, and the coating should be crisp and slightly caramelized. Keep an eye on the edges—they’ll start pulling away from the parchment when they’re done.
- While the chicken is baking, whisk together the sweet chili sauce, soy sauce, rice vinegar, minced garlic, grated ginger, and honey in a small saucepan. The mixture should thicken slightly as it heats. If it becomes too thick, add a teaspoon of water to reach a pourable consistency.
- After the chicken is done, remove the tray and let the bites rest for 2 minutes. This short rest allows the coating to set, preventing it from becoming sticky when you coat it with sauce.
- Drizzle the warm sauce over the chicken bites, ensuring each piece is coated. Use a spoon or a brush for an even distribution. If you prefer a thicker glaze, let the sauce simmer for an extra minute to reduce.
- Serve immediately with a side of rice, noodles, or a simple green salad. The sweet, spicy, and savory notes pair wonderfully with neutral carbs that can soak up the extra sauce.
That's it—you did it. But hold on, I've got a few more tricks that'll take this to another level. If you’re feeling adventurous, try adding a splash of lime juice to the sauce for a citrusy zing, or sprinkle sesame seeds over the finished bites for an extra crunch. And remember, the key to a perfect bite is patience—don’t rush the baking process.
Insider Tricks for Flawless Results
The Temperature Rule Nobody Follows
Ovens vary widely, and many people bake at 400°F thinking that’s the sweet spot. In reality, 425°F is the sweet spot for crisping the coating while keeping the chicken juicy. If you’re using a lower temperature, you’ll need to bake longer and risk a soggy coating. A quick test: place a small piece of coated chicken on the sheet; if it browns in 8 minutes, you’re good.
Why Your Nose Knows Best
Before you even taste the first bite, your nose is already judging the flavor profile. If the aroma smells slightly burnt or overly sweet, it’s a sign that the sauce is over‑cooked. The right balance is achieved when you can smell the fresh ginger and garlic, but not the burnt sugar. Trust your senses; they’re your best quality control.
The 5‑Minute Rest That Changes Everything
Letting the chicken rest for 5 minutes after baking allows the juices to redistribute, preventing a dry interior. During this time, the coating will firm up, making each bite easier to handle. Skip this step and you’ll get a sticky mess that’s hard to eat. I’ve seen people skip it and end up with a half‑baked, soggy batch.
The Right Sauce Consistency
A sauce that’s too thin will run off the chicken, while a sauce that’s too thick will clump. Aim for a pourable consistency that coats the back of a spoon. If you’re using a store‑bought sauce, let it simmer for a minute or two to thicken. Adding a teaspoon of water can help if the sauce is too thick.
The Secret Ingredient Swap
If you’re allergic to soy sauce, use coconut aminos for a lower‑sodium, gluten‑free alternative. The flavor will be slightly sweeter, but it still provides that umami base. Another option is to use tamari, which is a soy‑based sauce that’s naturally gluten‑free and richer in flavor. Just remember to adjust the salt level accordingly.
The Perfect Plate Presentation
Serve the bites on a shallow platter, arranging them in a circular pattern to create a visual cue of abundance. A sprinkle of chopped scallions or cilantro on top adds color and a fresh herbal note. Pairing with a side of pickled vegetables can cut through the sweetness and add a tangy contrast. When you present the dish, let the sauce glaze shine through for an appetizing look.
Creative Twists and Variations
This recipe is a playground. Here are some of my favorite ways to switch things up:
Spicy Sriracha Kick
Swap half of the sweet chili sauce with sriracha for a bold, fiery punch. The heat will mingle with the sweet base, creating a balanced flavor that’s both spicy and sweet. This version is perfect for heat lovers and pairs well with a cooling cucumber salad.
Mango Mango Madness
Add diced ripe mango to the sauce for a tropical twist. The mango’s natural sweetness enhances the sauce, while its fibrous texture adds a pleasant bite. Serve over jasmine rice for a complete, island‑inspired meal.
Crispy Coconut Coating
Replace the cornstarch with shredded coconut for a crunchy, slightly sweet coating. The coconut adds a nutty flavor that pairs beautifully with the sweet chili base. This variation works great with a drizzle of lime juice for a fresh finish.
Mediterranean Herb Fusion
Incorporate dried oregano and thyme into the coating mixture. The herbs bring a savory, earthy tone that balances the sweetness of the sauce. This version is ideal for a Mediterranean‑inspired dinner party.
Cheesy Parmesan Glaze
After baking, sprinkle grated Parmesan over the hot bites. The cheese melts slightly, forming a savory crust that contrasts with the sweet sauce. Pair with a simple arugula salad for a sophisticated bite.
Saffron‑Infused Surprise
Stir a pinch of saffron threads into the sauce for a subtle floral aroma and a golden hue. The saffron adds a luxurious depth that elevates the dish to a gourmet level. Serve with saffron‑infused rice for a cohesive flavor profile.
Storing and Bringing It Back to Life
Fridge Storage
Store leftover bites in an airtight container in the refrigerator for up to 3 days. The coating will retain its crispness if you reheat in a skillet or oven at 350°F for 5 minutes. Avoid microwaving, as the heat will steam the coating and make it soggy. If you need to keep them longer, freeze them immediately.
Freezer Friendly
Place the baked bites on a parchment‑lined tray and freeze until solid, then transfer to a freezer bag. This prevents them from sticking together. When you’re ready to eat, thaw overnight in the refrigerator and reheat as described above. The flavor remains robust, and the coating stays crispy.
Best Reheating Method
The oven or a skillet is the gold standard for reheating. Preheat to 350°F, spread the bites on a sheet, and bake for 5–7 minutes until hot. A quick sizzle in a hot skillet for 1–2 minutes per side also works, adding a fresh crispness. If you’re in a hurry, a microwave will warm them, but the coating will lose its crunch.