Picture this: it’s a Friday night, the fridge is a sad, lonely landscape of half-eaten pizza and stale chips, and you’re staring at a stack of tortilla chips that look more like a cautionary tale than a snack. You’ve tried the usual nacho recipes, the ones that come out soggy and bland, and you’re ready to throw in the towel. Then, a friend texts you a photo of a dish that looks like a lovechild of a Chinese takeout bowl and a Mexican fiesta—sweet, spicy, creamy, and utterly addictive. That photo is the spark that lit the fire in my kitchen, and it turned out to be the most delicious disaster I’ve ever survived.
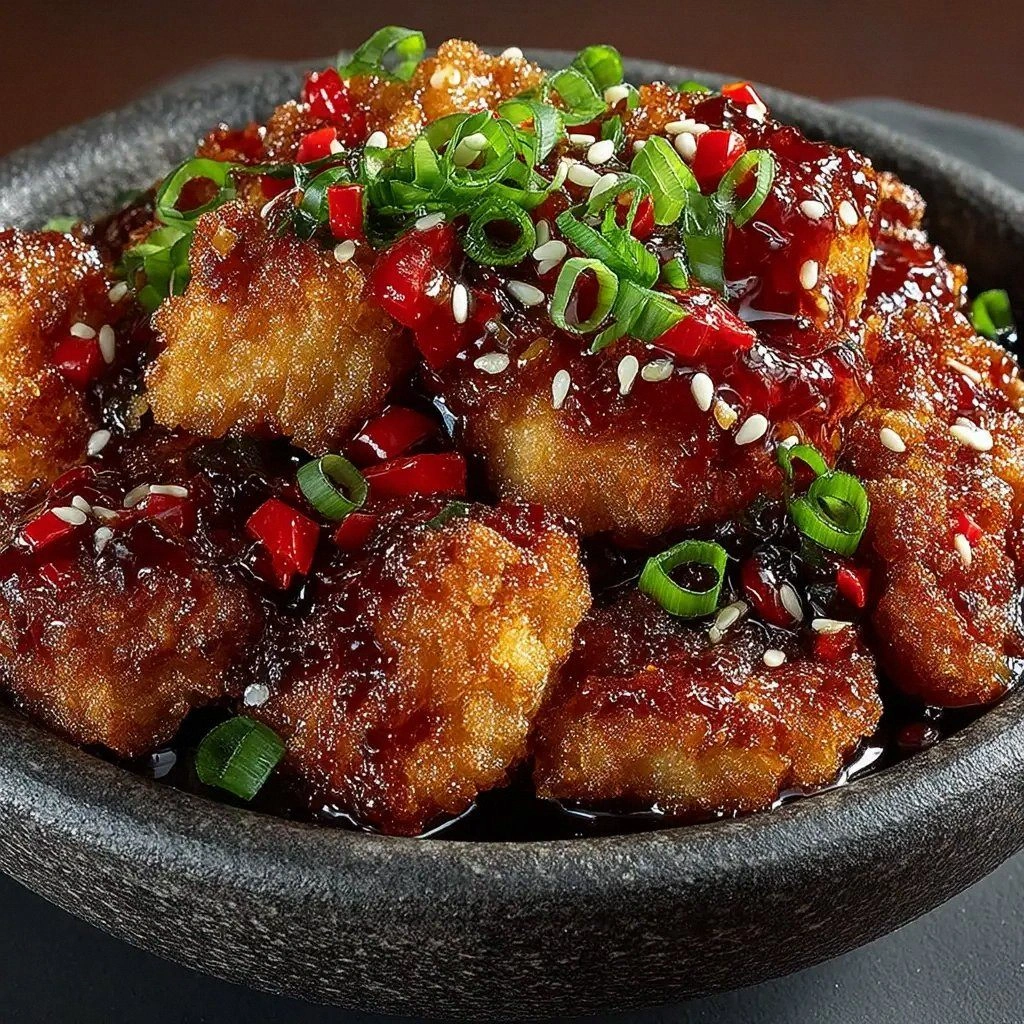
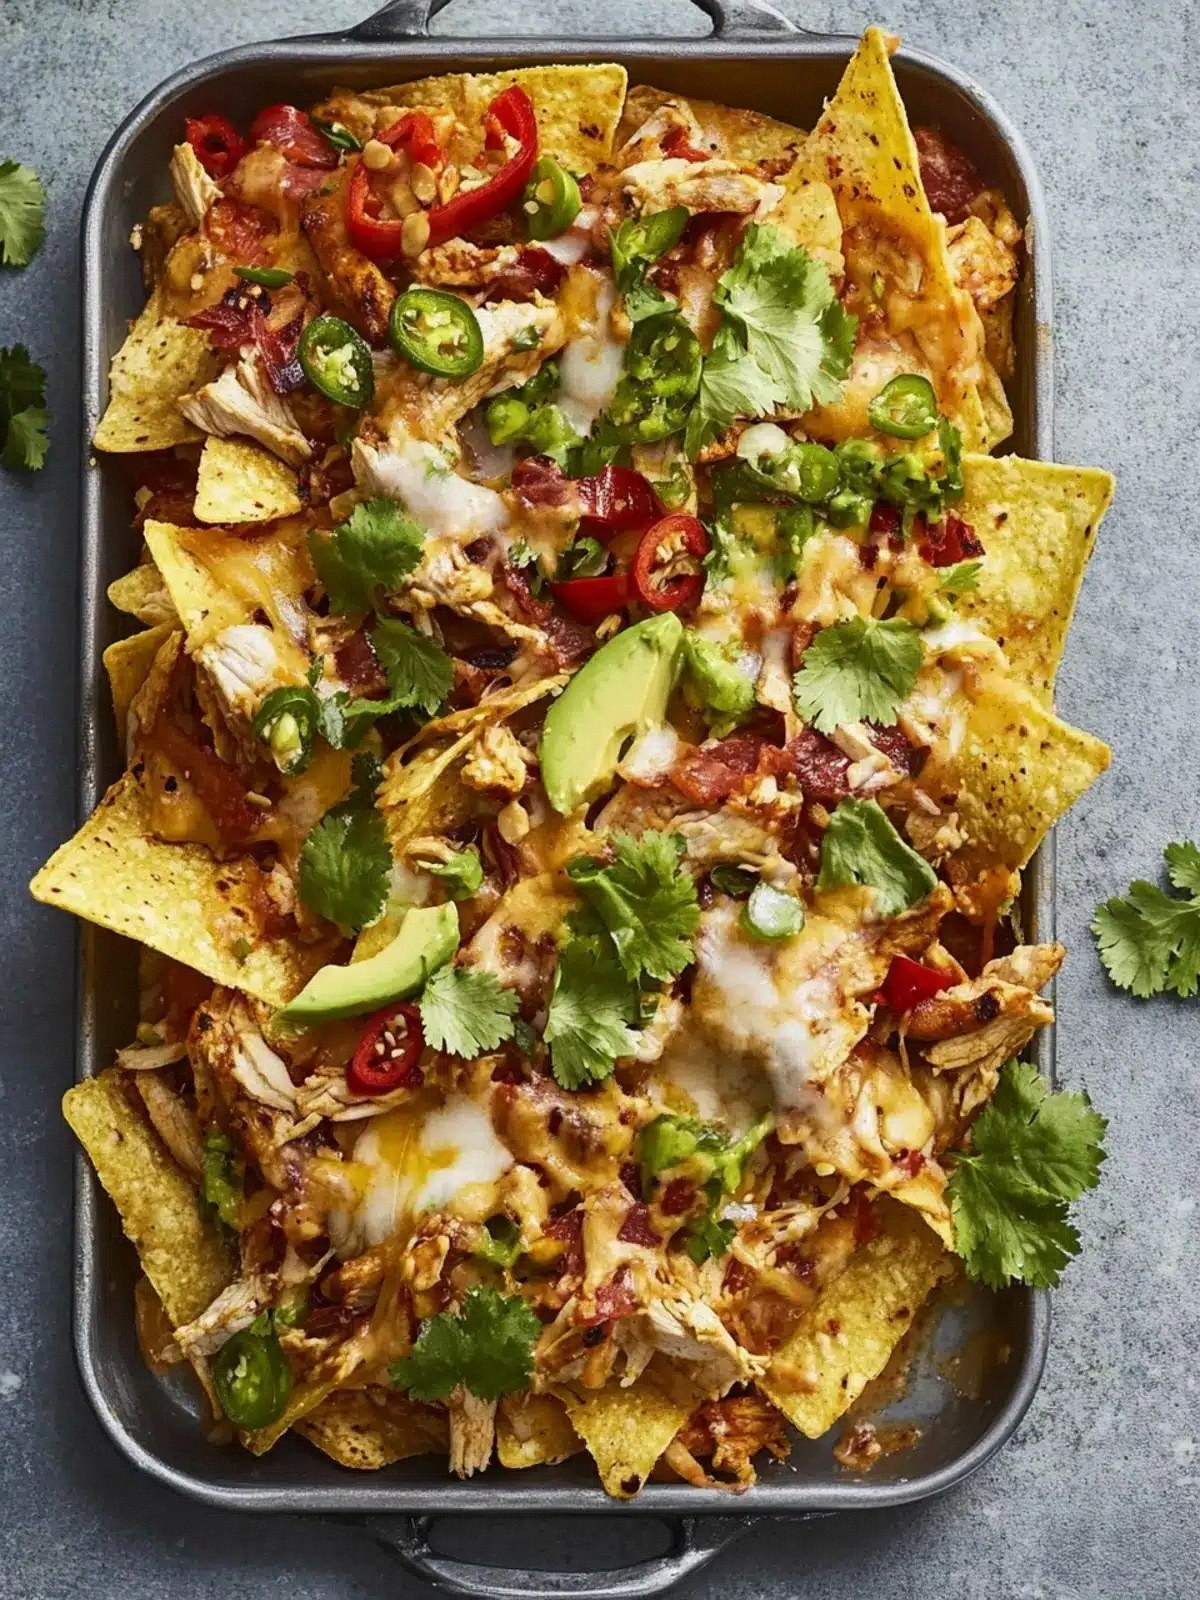
The first bite was an explosion of flavors: the crunch of the tortilla chips, the smoky char from the peppers, the creamy silkiness of peanut butter, and the subtle heat of chili that lingers without burning. The aroma that filled the kitchen—sweet soy, roasted peanuts, and fresh coriander—was a promise of something extraordinary. The texture was a dance: the chips were crisp, the chicken was tender, and the sauce clung to everything like a velvet coat. I swear, that first mouthful made the kitchen feel like a carnival of taste, and I couldn’t stop taking photos.
What makes this version stand out? I’m not just talking about a recipe; I’m talking about a revelation. It’s a dish that takes the humble nacho and turns it into a crowd‑pleasing, Instagram‑worthy masterpiece. The combination of sweet chili, peanut butter, and mozzarella creates a flavor profile that is both comforting and adventurous. It’s the kind of dish that can be served as a party starter or a comforting dinner, and it does both with equal flair. And if you think you’ve had a similar dish before, I dare you to taste this and not go back for seconds.
I’ll be honest—once I had a plate of these, I ate half the batch before anyone else could even touch a chip. The rest of the dish was still hot, still bursting with flavor, and still looking like a work of art. If you’ve ever struggled to find the perfect nacho recipe that doesn’t fall flat, you’re not alone. I’ve spent years experimenting with sauces, textures, and cooking techniques, and this recipe is the culmination of that quest.
Picture yourself pulling this out of the oven, the whole kitchen smelling incredible, and the guests lining up for a taste. That’s the future pacing of this dish. The moment you open the oven door, the air is thick with the scent of toasted peanuts and caramelized onions. The sound of the sizzling sauce is a cue that the magic is happening. And when you plate it, the golden edges of the chips shatter like thin ice under your spoon.
Okay, ready for the game‑changer? Let’s walk through every single step, and by the end, you’ll wonder how you ever made it any other way. I’m going to keep it simple, keep it fun, and keep it real. No fluff, no fancy jargon—just the honest, step‑by‑step guide that will have you cooking like a pro in no time.
What Makes This Version Stand Out
- Bold Flavor: The sweet chili and peanut butter create a depth that’s hard to find in standard nachos. The sauce coats each chip with a silky glaze that melts in your mouth.
- Texture Contrast: Crispy tortilla chips, tender rotisserie chicken, and gooey mozzarella combine for a mouth‑watering experience. Each bite delivers a satisfying crunch followed by a melt‑away.
- Ingredient Simplicity: All the components are pantry staples or quick prep items. You can have this on the table in under an hour.
- Unusual Sweetness: The dark sweet soy sauce adds a caramelized nuance that balances the heat, creating a harmonious sweet‑spicy profile.
- Make‑Ahead Friendly: The assembled dish can be refrigerated or frozen, then baked just before serving. It’s perfect for parties or last‑minute meal prep.
- Visual Appeal: The vibrant colors of bell peppers, the golden melt of cheese, and the glossy sauce make this dish Instagram‑worthy.
- Versatile Use: Serve it as an appetizer, a main course, or a side dish. It pairs well with a cold beer or a sparkling wine.
- Audience Impact: Friends and family will rave about the unexpected combination of flavors. This dish is a conversation starter.
Alright, let's break down exactly what goes into this masterpiece…
Inside the Ingredient List
The Flavor Base
The foundation of this dish is the sauce, a silky blend that marries sweet chili, peanut butter, and soy sauce. The sweet chili brings heat without overwhelming the palate, while the peanut butter adds a nutty richness that balances the spice. Dark sweet soy sauce introduces a caramelized sweetness that deepens the flavor profile, and rice vinegar cuts through the richness with a subtle acidity. Together, they create a sauce that coats the chips like velvet, turning every bite into a flavor revelation.
The Texture Crew
Tortilla chips are the star of the texture game. They provide a satisfying crunch that contrasts beautifully with the creamy sauce and melty mozzarella. Rotisserie chicken, cut into bite‑sized pieces, adds protein and a subtle smokiness that elevates the dish. Roasted peanuts, toasted until golden, sprinkle a crunchy, nutty finish that keeps the dish from becoming too uniform.
The Unexpected Star
Fresh coriander (or scallions) is the final flourish that brings brightness and a herbal note to the dish. It cuts through the richness and adds a layer of freshness that makes each bite feel alive. If you’re not a fan of coriander, a handful of chopped green onions works just as well, offering a milder flavor but still a pleasant crunch.
The Final Flourish
Mozzarella cheese, grated to a fine consistency, melts into a gooey blanket that ties all the flavors together. It adds a mild, milky sweetness that balances the heat from the chili and the saltiness of the soy sauce. The cheese also creates a golden crust on top, giving the dish a satisfying finish.
Everything’s prepped? Good. Let’s get into the real action…
The Method — Step by Step
- Preheat your oven to 200°C (400°F). While the oven warms, toss the tortilla chips in a shallow bowl. Drizzle 2 tablespoons of vegetable oil over them and sprinkle a pinch of sea salt. Toss until each chip is lightly coated. Spread the chips on a baking sheet in a single layer. Bake for 5–7 minutes, until the edges are crisp and golden. The goal is a light toast, not a deep fry, so keep an eye on them.
- Prepare the sauce. In a small saucepan, combine 1/3 cup smooth peanut butter, 1 tablespoon dark sweet soy sauce, 1/2 tablespoon soy sauce, 1 tablespoon rice vinegar, and 1 tablespoon sweet chili sauce. Warm over low heat, stirring constantly until the mixture is smooth and glossy. Add a splash of water if it’s too thick; you want a pourable consistency that coats the chips.
- Cook the vegetables. Heat a skillet over medium heat and add 2 tablespoons of vegetable oil. Toss in the diced onion and sliced bell peppers. Sauté until the onion turns translucent and the peppers soften, about 5 minutes. The vegetables should be slightly caramelized, not raw. Remove from heat and let cool.
- Assemble the dish. In a large mixing bowl, combine the toasted chips, cooked vegetables, and 1/2 rotisserie‑cooked chicken, shredded or chopped. Pour the warm sauce over the mixture and gently toss until everything is evenly coated. The sauce should cling to each chip and chicken piece like a silky glaze.
- Layer the cheese. Transfer the mixture to a baking dish or a cast‑iron skillet. Sprinkle 200 grams of grated mozzarella evenly over the top. The cheese will melt into a golden blanket that ties the flavors together.
- Bake the nachos. Place the dish in the preheated oven and bake for 12–15 minutes, or until the cheese is melted and bubbly, and the edges of the chips start pulling away. The dish should emit a mouth‑watering aroma that makes the kitchen feel like a gourmet kitchen.
- Finish with a sprinkle. Once baked, remove the dish from the oven and immediately sprinkle 1 tablespoon of unsalted roasted peanuts and a handful of fresh coriander leaves or scallions. The peanuts add a crunch that contrasts with the melted cheese, while the coriander adds a fresh, herbal note.
- Serve immediately. Plate the nachos while they’re hot and gooey. Pair them with a chilled drink of your choice. If you’re serving at a party, consider a small bowl of extra sauce on the side for dipping.
- Enjoy the results. The combination of sweet, spicy, nutty, and cheesy flavors creates a dish that’s both comforting and adventurous. This is the moment of truth—taste it and see why I can’t stop raving about it.
That’s it—you did it. But hold on, I've got a few more tricks that'll take this to another level.
Insider Tricks for Flawless Results
The Temperature Rule Nobody Follows
Many people bake nachos at a high temperature, but that can cause the cheese to burn before the chips are fully crisp. I recommend baking at 200°C (400°F) and checking the dish after 10 minutes. The cheese should just start bubbling, and the chips should be golden. This ensures the flavors meld without any burnt undertones.
Why Your Nose Knows Best
Before you toss the sauce into the mixture, give it a quick sniff. If it smells slightly sweet, that’s a good sign. If it smells too sharp or metallic, add a splash of water to mellow it out. Your nose is a reliable indicator of the sauce’s balance, so trust it.
The 5‑Minute Rest That Changes Everything
After baking, let the dish rest for five minutes. This allows the cheese to set slightly, making it easier to cut or scoop. It also gives the sauce time to thicken and coat the chips evenly. Skipping this step can result in a soggy mess.
The Quick Toss Trick
When you’re mixing the sauce with the chips, use a large spoon or your hands to gently toss everything together. This ensures each chip gets a coating of sauce without smashing them. The trick is to be gentle but thorough.
The Secret Salt Boost
Add a pinch of sea salt to the sauce before baking. It enhances the savory notes and balances the sweetness. Remember, a little salt goes a long way, so keep it modest.
Creative Twists and Variations
This recipe is a playground. Here are some of my favorite ways to switch things up:
Veggie‑Loaded Nachos
Swap the rotisserie chicken for sautéed mushrooms and spinach. The earthy flavors of mushrooms pair beautifully with the sweet peanut sauce. Add a sprinkle of feta cheese for a tangy twist.
Spicy Tofu Edition
Use marinated tofu cubes instead of chicken for a vegetarian version. The tofu absorbs the sauce well, and the extra protein makes the dish hearty. Pair with a side of cucumber salad for freshness.
Crispy Shrimp Surprise
Replace the chicken with shrimp that’s been lightly fried until golden. The shrimp adds a briny sweetness that contrasts with the nutty sauce. Finish with a squeeze of lime for brightness.
Mediterranean Twist
Swap mozzarella for crumbled goat cheese. Add kalamata olives and a drizzle of extra‑virgin olive oil. The briny olives and tangy goat cheese create a Mediterranean vibe.
Breakfast Nacho Bowl
Serve the dish over a bed of scrambled eggs and a splash of hot sauce. The creamy eggs balance the spicy sauce, creating a breakfast‑for‑dinner sensation.
Storing and Bringing It Back to Life
Fridge Storage
Store leftovers in an airtight container in the fridge for up to 2 days. The nachos will stay crisp, and the sauce will thicken slightly, which actually improves the flavor.
Freezer Friendly
For longer storage, place the assembled dish in a freezer‑safe container and freeze for up to 1 month. When ready to eat, bake at 200°C (400°F) for 15 minutes, or until the cheese is melted and bubbly.
Best Reheating Method
Add a tiny splash of water to the dish before reheating. This steams the nachos back to perfection, keeping the cheese from drying out and the sauce from becoming too thick.
Now that you’ve mastered the basics, you’re ready to experiment. The beauty of this dish lies in its flexibility—add your favorite protein, tweak the spice level, or play with the cheese. The result will always be a crowd‑pleasing, flavor‑packed masterpiece that you’ll want to serve again and again.