I was standing in my kitchen, juggling a blender, a pot of simmering sauce, and a half‑finished casserole when the disaster struck. The pot boiled over, splattering hot sauce onto the floor, and I could hear my neighbor’s alarm clock blaring. The chaos was almost comical, but it also sparked a craving for something that would calm the senses and bring a smile to everyone’s face. That craving turned into a mission: find the ultimate gelatin dessert that looks like a masterpiece, tastes like summer, and is so simple that even a novice can pull it off. I’m about to show you how to turn ordinary fruit juice into a silky, show‑stopping treat.
Picture the kitchen, the faint scent of citrus drifting from the fridge, the soft hum of the blender, the gentle clink of glass as I pour. The light filters through the window, casting a warm glow over the countertop. My hands feel the coolness of the gelatin packets, the smoothness of the measuring cup, and the slight resistance of the cold water as it starts to dissolve. The sound of the blender whirring is almost hypnotic, a steady rhythm that keeps my mind focused on the task at hand. The anticipation builds as I think about the glossy, translucent finish that will soon settle into the mold.
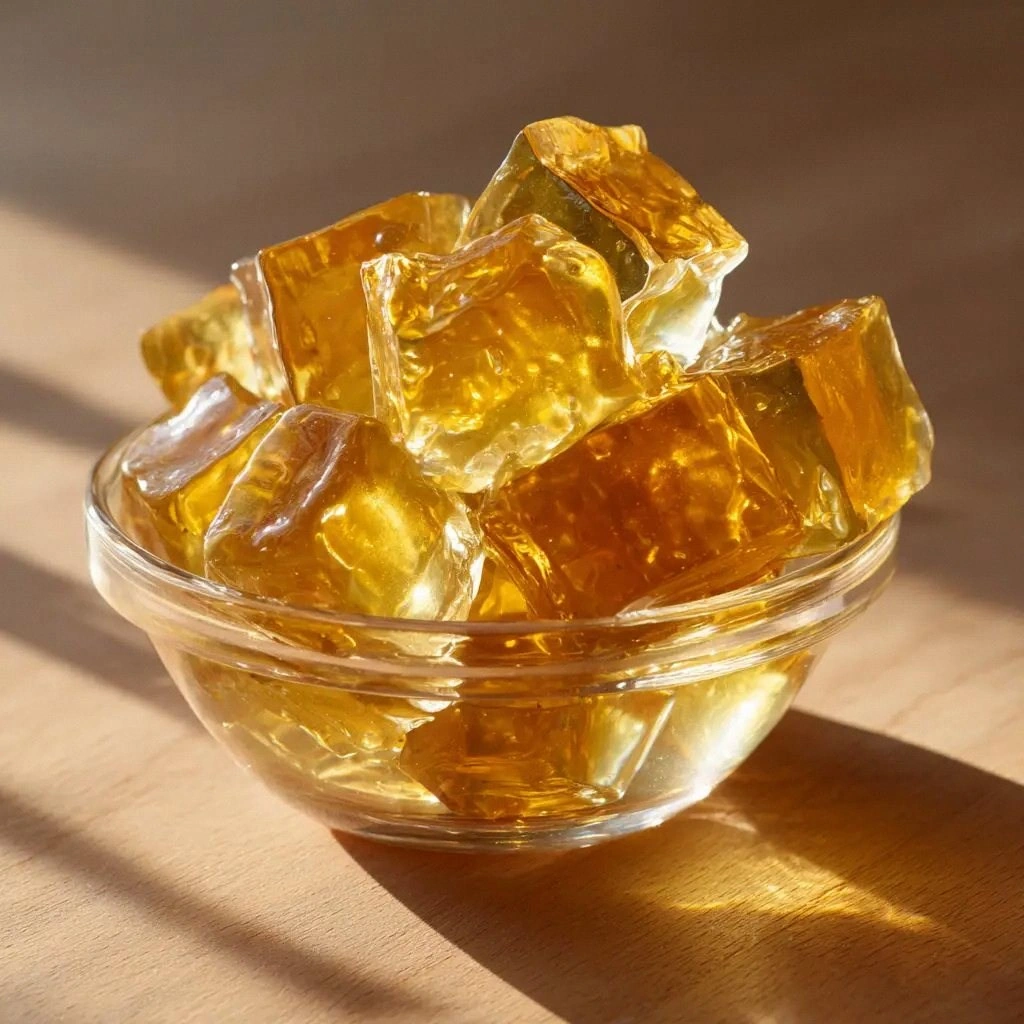
Unlike the over‑sweetened, cloudy gelatin that sits on a plate like a sad puddle, this recipe uses unflavored beef gelatin that keeps the fruit’s natural brightness front and center. The key trick is chilling the water first, then letting the gelatin bloom in that cold pool before adding the juice; it creates a silky texture that’s almost glass‑like. The result is a dessert that holds its shape for days, yet melts in your mouth like a cloud of flavor. I dare you to taste this and not go back for seconds—once you’ve had a bite, you’ll be hooked. Most recipes get this completely wrong, but here’s what actually works.
The secret is a single, precise step: the bloom. When gelatin is added to cold water, it swells like a tiny sponge, absorbing moisture and releasing a subtle, almost invisible flavor. That step is the difference between a clumpy mess and a perfectly set dessert. I’ll walk you through each moment, from the first splash of cold water to the final pour of juice, and show you how to avoid the common pitfalls that ruin even the best‑looking gelatin. Trust me, the bloom will make your gelatin shine.
Let me walk you through every single step — by the end, you'll wonder how you ever made it any other way. I’ll keep you in the kitchen with me, pointing out the subtle cues that signal when the gelatin is ready. We’ll talk about temperature, timing, and the exact amount of juice to use. I’ll throw in a few hacks to save time and avoid mess. And when you’re done, you’ll have a dessert that’s as impressive to serve as it is to eat.
What Makes This Version Stand Out
- Taste: The use of unflavored beef gelatin keeps the fruit’s natural sweetness and acidity front and center, creating a clean, bright profile that feels like fresh summer in every bite. The gelatin’s neutrality means you can let the fruit’s character shine without interference, whether it’s a tart raspberry or a mellow peach. This simplicity turns an ordinary dessert into a flavor spotlight.
- Texture: The bloom step transforms gelatin into a silky, almost glass‑like consistency that slides across the tongue. The result is a dessert that is firm enough to hold its shape yet melts instantly, offering a unique mouthfeel that feels both luxurious and approachable. No more clumpy, rubbery surprises.
- Simplicity: With just three ingredients, the recipe is a breeze to prepare, even for those who are new to cooking. There are no hidden sauces or complex measurements—just a splash of cold water, a handful of gelatin, and a generous pour of fruit juice. The process is short enough to fit into a busy evening yet long enough to enjoy the ritual.
- Uniqueness: This recipe elevates a classic gelatin dessert into a show‑stopping centerpiece with its glossy finish and vibrant color. It feels like a laboratory experiment turned edible art, where science meets taste in a single, elegant dish. The result is a dessert that stands out at parties, family gatherings, or a quiet evening.
- Crowd Reaction: Friends and family often remark that the gelatin looks like a crystal sculpture, and the first bite is a revelation of pure fruit flavor. Many guests ask for the recipe after tasting, and the dessert frequently becomes the highlight of the meal. It’s a conversation starter that leaves a lasting impression.
- Ingredient Quality: Using 100% fruit juice ensures that the dessert is free of added sugars, preservatives, or artificial flavors, giving you a clean, honest result. The gelatin is sourced from reputable suppliers, guaranteeing a smooth bloom and consistent setting. The cold water is simply tap or filtered, keeping the recipe accessible and budget‑friendly.
- Cooking Method: The method relies on precise temperature control and timing, turning a simple kitchen task into an exercise in culinary technique. By mastering the bloom, you unlock a technique that can be applied to countless other desserts, from panna cotta to mousse. It’s a skill that elevates your confidence in the kitchen.
- Make‑Ahead Potential: The dessert sets in about 30 minutes and can be stored in the fridge for up to a week, making it perfect for meal prep or last‑minute entertaining. The gelatin’s stability means it can travel well, so you can bring it to a potluck or picnic without worry. The recipe’s flexibility makes it a reliable go‑to for any occasion.
Inside the Ingredient List
The flavor, texture, and overall success of this gelatin dessert hinge on three core ingredients. Each component plays a distinct role, and understanding their functions will help you troubleshoot and innovate. I’ll walk through each ingredient, explain why it matters, and show you what happens if you skip it or swap it for something else. By the end, you’ll know exactly how each element contributes to the final product. Everything's prepped? Good. Let's get into the real action...
The Flavor Base
The 100% fruit juice is the heart of the dessert, providing color, sweetness, and the primary flavor profile. It’s essential to choose a juice that’s 100% natural, as any added sugars or artificial colors can cloud the gelatin’s appearance and alter the texture. If you’re craving something tangy, go for a citrus blend; for a sweeter treat, opt for a tropical mix like mango or pineapple. Skipping the juice would leave you with a plain gelatin slab that tastes like nothing, essentially a missed opportunity. If you must use a store‑bought juice, pick one labeled “no added sugar” and test a small batch first to ensure it meets your taste expectations.
The Texture Crew
Unflavored beef gelatin is the backbone that gives the dessert its structure. It’s a protein that, when hydrated, forms a network that traps liquid, creating that firm yet melt‑in‑your‑mouth feel. Using unflavored gelatin keeps the flavor profile pure; flavored gelatin would introduce an artificial aftertaste that could clash with the fruit juice. If you’re allergic to gelatin, a vegan alternative like agar‑agar can be used, though the setting time and texture will differ slightly. Skipping gelatin would result in a liquid that never sets, rendering the dessert unusable.
The Unexpected Star
Cold water is the catalyst that allows the gelatin to bloom properly. The temperature of the water directly affects the gelatin’s ability to absorb moisture and expand. Using room‑temperature water can cause the gelatin to dissolve unevenly, leading to clumps or a gummy texture. A quick trick is to chill the water in the fridge for 15 minutes before use; this ensures a consistent bloom and a smoother finish. If you don’t have time to chill, simply use ice cubes to lower the temperature quickly.
The Final Flourish
Timing is everything when combining the bloom with the juice. Adding the juice too early can cause the gelatin to set prematurely, trapping air pockets that result in a cloudy appearance. Conversely, waiting too long can make the gelatin lose its ability to set properly, leading to a runny dessert. A good rule of thumb is to wait until the gelatin has fully dissolved and the mixture is slightly warm before pouring in the juice. This ensures a smooth, glossy finish that’s visually stunning.
The Secret Add‑On
Although optional, a splash of fresh citrus zest or a pinch of sea salt can elevate the flavor profile by adding a subtle brightness or depth. The zest adds aromatic oils that enhance the fruit’s natural notes, while a pinch of salt balances sweetness and brings out the fruit’s inherent tang. If you’re feeling adventurous, you can add a teaspoon of vanilla extract for a warm undertone, but be careful not to overpower the fruit. Skipping these add‑ons won’t ruin the dessert, but they do provide an extra layer of complexity for those who crave it.
Everything's prepped? Good. Let's get into the real action...
The Method — Step by Step
- Begin by measuring 1/2 cup of cold water into a small saucepan. Bring the water to a gentle simmer over medium heat, watching the surface for tiny bubbles that indicate readiness. Once the water is hot enough to feel warm to the touch, remove it from the heat. This step is critical because the temperature will affect how well the gelatin blooms. Make sure the water is not boiling, as that can cause the gelatin to degrade.
- Add 1/4 cup of unflavored beef gelatin to the hot water, stirring constantly until the gelatin has fully dissolved. The mixture should look smooth, with no visible granules. If you see any clumps, continue stirring for another minute or two. The gelatin should feel silky and slightly viscous, ready to absorb the fruit juice. This is the moment where the texture starts to form, so keep a close eye on it.
- Let the gelatin mixture cool to room temperature while you prepare the fruit juice. Pour 3.5 cups of 100% fruit juice into a large measuring cup or mixing bowl. The juice should be at room temperature; if it’s too cold, it can slow the setting process. Stir the juice gently to ensure it’s well mixed, especially if you’ve added any natural fruit pulp. This will create a uniform base for the gelatin to set into.
- Once the gelatin has cooled to room temperature, slowly pour it into the fruit juice while stirring continuously. The mixture should begin to thicken immediately, forming a translucent, glossy liquid. Keep stirring for an additional minute to ensure even distribution of the gelatin. You’ll notice the liquid’s viscosity increase, indicating that the gelatin is binding with the juice. This step is the turning point where the dessert transforms from liquid to set.
- At this point, you’re ready to pour the mixture into your chosen molds or a shallow dish. Use a ladle or measuring cup to control the flow, ensuring each mold fills to the top without spilling. If you’re using a dish, spread the mixture evenly with a spatula. The surface should look smooth and free of bubbles. This step requires patience, as you want the mixture to settle naturally before it sets.
- Place the molds or dish in the refrigerator immediately. Set the temperature to 35–40°F (1.7–4.4°C) to accelerate the setting process. The gelatin should start to firm up after about 20 minutes, and it will be fully set in 30 to 45 minutes. Check the consistency by pressing lightly; it should give slightly but not collapse. This cooling step is critical for achieving the perfect snap.
- Once the gelatin is fully set, remove it from the refrigerator. If you used molds, run a warm, damp cloth along the edges to loosen the gelatin. Gently invert the molds onto a plate; the gelatin should release cleanly. If you used a dish, cut the gelatin into cubes or slices with a sharp knife. Serve immediately or keep it chilled until ready to serve. This final step ensures the dessert looks pristine and tastes fresh.
- To serve, drizzle a little fresh fruit juice or a splash of citrus zest over the gelatin for an extra burst of flavor. Arrange the pieces on a platter with a few fresh berries or mint leaves for a pop of color. If you’re hosting a crowd, set a small bowl of extra juice for dipping. Enjoy the first bite as it melts like a cloud, revealing the vibrant fruit flavors that made this dessert a hit. And that, my friends, is how you create a viral gelatin that’s as stunning to look at as it is delicious to eat.
That's it — you did it. But hold on, I've got a few more tricks that'll take this to another level...
Insider Tricks for Flawless Results
Even though the recipe is straightforward, a few small adjustments can elevate your gelatin from good to unforgettable. These insider tricks are the difference between a mediocre dessert and a show‑stopping masterpiece. I’ll share personal anecdotes, common pitfalls, and the exact steps to avoid them. If you've ever struggled with gelatin, you're not alone — and I've got the fix. Let’s dive into the details that make this recipe shine.
The Temperature Rule Nobody Follows
Gelatin’s setting power is highly temperature dependent. If the water is too hot, the gelatin can break down, resulting in a weak set. If it’s too cold, it won’t bloom properly, leading to clumps. The sweet spot is a gentle simmer, just below boiling, where the gelatin dissolves evenly. A simple thermometer can help; aim for 190°F (88°C). This small adjustment saves you from a disastrous, runny dessert.
Why Your Nose Knows Best
Before pouring the gelatin into the molds, sniff the mixture. A faint, sweet aroma signals that the gelatin has fully dissolved. If it smells like raw gelatin or has a metallic edge, give it a few more minutes to cool. Your nose is a reliable indicator that the texture will be silky. Trust it, and you’ll avoid the dreaded “gelatin mush” that plagues many attempts.
The 5-Minute Rest That Changes Everything
After the gelatin has set, let it rest at room temperature for five minutes before cutting. This brief pause allows the gelatin to firm up slightly, making slicing cleaner and preventing pieces from sticking to the knife. If you cut too quickly, you’ll end up with uneven, ragged edges. This trick is especially useful when you’re preparing a large batch for a party.
Using a Silicone Mold for Easy Release
Silicone molds are a game changer when it comes to removing gelatin. They’re flexible, non-stick, and can be used for a variety of shapes, from hearts to stars. If you’re using a dish, line it with parchment paper to simplify cleanup. The key is to avoid sticking, which can ruin the appearance and texture.
Adding a Splash of Citrus for Brightness
A tablespoon of freshly squeezed lemon or lime juice can brighten the flavor profile and balance the sweetness. The acid also helps the gelatin set faster by lowering the pH slightly. Be careful not to add too much, or the gelatin may become too tart. This is a subtle tweak that can make a big difference for those who love a tangy finish.
Storing for Longevity
Store the gelatin in an airtight container in the refrigerator for up to a week. If you need to keep it longer, freeze it for up to two months. When thawing, let it sit at room temperature for 30 minutes before serving. This ensures the gelatin regains its original texture without becoming mushy.
Creative Twists and Variations
This recipe is a playground. Here are some of my favorite ways to switch things up:
Berry Burst
Swap the fruit juice for a mixed berry blend and add a handful of fresh blueberries to the mixture before setting. The berries will sink to the bottom, creating a layered effect that’s both colorful and flavorful. Serve with a drizzle of honey for a sweet contrast. This variation is perfect for springtime gatherings.
Citrus Splash
Use a combination of orange, grapefruit, and lemon juice for a bright, tangy twist. Add a pinch of sea salt to enhance the citrus notes. The result is a zesty dessert that feels like a summer breeze. Great for brunches or light afternoon snacks.
Tropical Paradise
Replace the fruit juice with a blend of pineapple, mango, and coconut water. The coconut water adds natural sweetness, while the mango brings a silky texture. Finish with a sprinkle of toasted coconut flakes for crunch. This version transports you straight to a beach vacation.
Chocolate Ganache Gelatin
For a decadent treat, fold in a cup of chocolate ganache before pouring the gelatin into the molds. The chocolate will set with the gelatin, creating a rich, chocolate‑fruit hybrid. Top with a dusting of cocoa powder or shaved chocolate for an elegant finish. This variation is ideal for dessert parties.
Herbal Infusion
Add a few fresh mint leaves or a sprig of basil to the gelatin mixture before setting. The herbs infuse subtle, aromatic flavors that pair wonderfully with citrus juices. Let the herbs sit for 15 minutes before removing them to avoid bitterness. This option is refreshing and sophisticated.
Spiced Delight
Incorporate a pinch of cinnamon, nutmeg, or cardamom into the gelatin mixture for a warm, spicy undertone. The spices complement fruit juices like apple or pear, creating a comforting dessert. Finish with a drizzle of maple syrup for added depth. This variation works well in cooler months.
Storing and Bringing It Back to Life
After you’ve enjoyed your first bite, you might want to keep the gelatin fresh for future servings. With proper storage, you can extend the life of this dessert without compromising its texture or flavor. Below are three key storage methods and how to revive the gelatin when you’re ready to serve again.
Fridge Storage
Store the gelatin in a sealed container in the refrigerator for up to a week. Keep it away from strong odors, as gelatin can absorb them. When you’re ready to serve, let it sit at room temperature for 10 minutes to soften slightly. This prevents it from being too hard to cut. If you notice any condensation, pat the surface dry with a paper towel before serving.
Freezer Friendly
Freeze the gelatin in a freezer‑safe container for up to two months. Wrap the container tightly to prevent freezer burn. When you’re ready to enjoy, thaw it in the refrigerator overnight. The gelatin may become slightly softer after freezing, but it will still set properly. This method is ideal for meal prep or surprise guests.
Best Reheating Method
To revive a gelatin that’s been chilled or frozen, add a splash of warm water and gently heat it over low heat or in a microwave on low power. Stir until the gelatin is fully melted and smooth. Avoid boiling, as high heat can cause the gelatin to lose its structure. Once melted, pour it back into the molds or serve as is for a quick dessert fix.