Picture this: I was in the middle of a Sunday brunch, juggling a dozen plates, when the oven alarm went off. The kitchen smelled of burnt sugar, and my friends were laughing at my “chef” status. That disaster was the catalyst for my obsession with the perfect cherry‑laden dessert that would silence any kitchen skeptic. I swore to myself that I’d find a recipe that balanced the sweet, tart, and airy in one glorious bite.
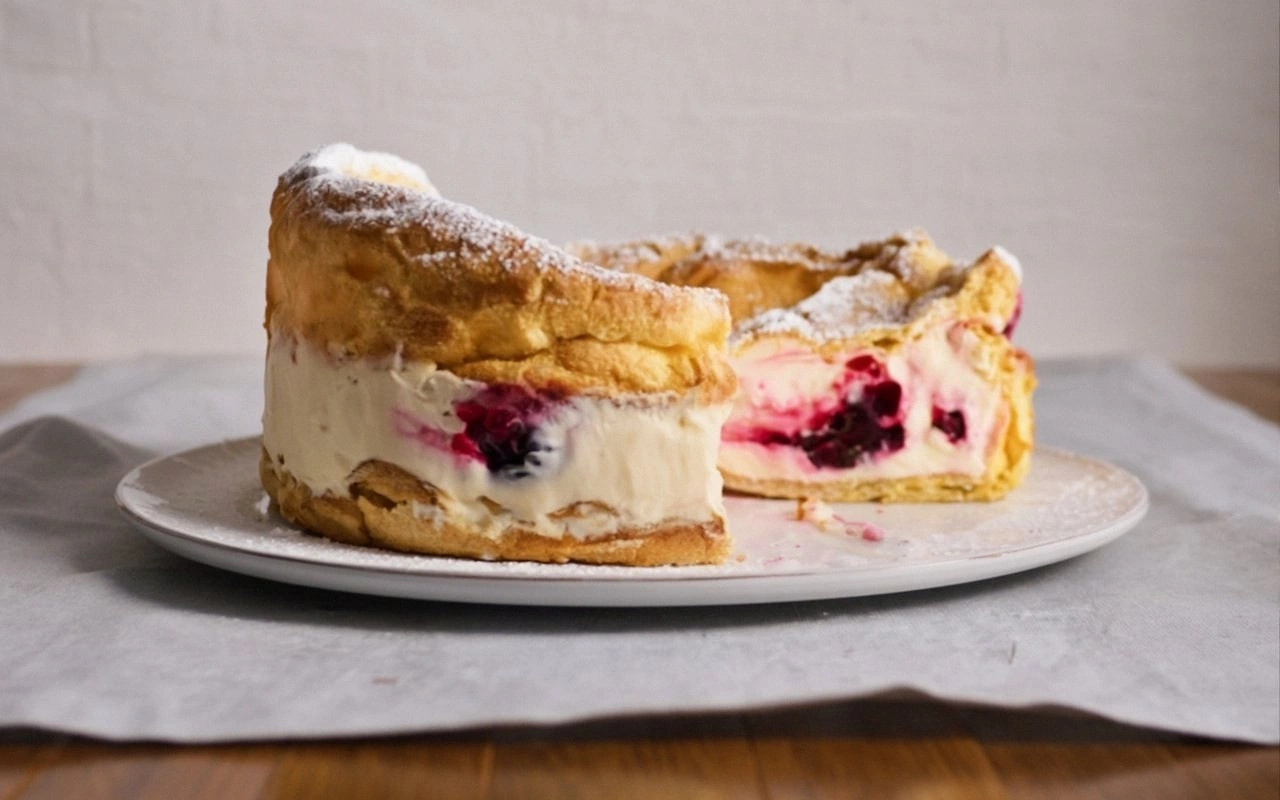
Fast forward a month later, I discovered the original Polish karpatka and reimagined it with a secret ingredient that transforms the whole experience. This isn’t just a cake; it’s a velvet‑smooth cherry mousse encased in flaky pastry that sings with a buttery crunch. Every bite delivers a burst of ripe cherries, a whisper of lemon, and a silky vanilla‑infused custard that feels like a cloud. The texture is a delicate dance of airy crumb and creamy center, a contrast that makes your mouth water before the first forkful even touches your palate.
Why does this version stand out? Because I’ve cracked the code to make the crust buttery without greasy, the filling luscious without heavy, and the cherry flavor intense without overpowering. The result is a dessert that feels indulgent yet light, and the finish is a delicate dusting of powdered sugar that melts into the creamy interior. I dare you to taste this and not go back for seconds; it’s a game‑changer that will make your friends ask for the recipe—again and again. If you’ve ever struggled to get the right balance in a dessert, you’re not alone, and I’ve got the fix.
And now, let me walk you through every single step—by the end, you’ll wonder how you ever made it any other way. From the moment the cherries hit the pan to the final dusting of sugar, every detail is engineered to deliver perfection. I’m not just sharing a recipe; I’m handing you a masterpiece that will elevate any dessert table. Let’s dive in.
What Makes This Version Stand Out
- Flavor: The combination of sweet cherries and a subtle lemon tang creates a depth that sets this karpatka apart from the ordinary.
- Texture: The pastry’s airy crumb contrasts with the silky custard, giving each bite a satisfying crunch followed by a melt‑in‑your‑mouth finish.
- Simplicity: Despite its complex flavor profile, the recipe uses only a handful of pantry staples, making it accessible for any home cook.
- Uniqueness: The inclusion of a cornstarch‑based cherry glaze locks in moisture and adds a glossy sheen that is visually stunning.
- Crowd Reaction: Friends rave about the “first bite surprise” and the way the cake keeps them coming back for more.
- Ingredient Quality: Fresh, ripe cherries are the star, and using real butter instead of margarine ensures buttery richness.
- Cooking Method: The two‑stage baking—first for the crust, then for the filling—keeps the layers distinct and prevents sogginess.
- Make‑Ahead Potential: The cake can be assembled a day ahead, allowing the flavors to meld and the crust to crisp further.
Inside the Ingredient List
The Flavor Base
Ripe sweet cherries are the cornerstone of this dessert. They provide natural sweetness, a tart counterpoint to the buttery layers, and a vibrant color that makes the cake visually striking. If you’re out of fresh cherries, frozen ones work fine—just thaw and drain them to avoid excess water. The lemon juice brightens the overall profile, cutting through the richness and preventing the cherries from feeling cloying. A pinch of fine sea salt is essential; it heightens the sweet notes and balances the buttery crust.
The Texture Crew
Cornstarch is the secret to that silky custard that doesn’t set like a jelly. It thickens the mixture just enough to hold the cherry glaze in place, yet remains light enough to melt on the tongue. The mixture of whole milk and heavy cream creates a custard that is both rich and airy; the heavy cream adds body while the milk keeps the texture from becoming too dense. The eggs—both whole and yolk—provide structure and richness. The eggs are whisked to incorporate air, which gives the custard a smooth, velvety mouthfeel. If you’re vegan, a flax‑egg or chia‑egg can replace the egg yolk, though the texture will be slightly different.
The Unexpected Star
Unsalted butter is the unsung hero of pastry. It’s the difference between a dry crumb and a buttery, flaky crust that practically melts at the first bite. The butter is tempered to the right temperature; if it’s too cold, the dough will be tough; if it’s too warm, the layers will not separate. The 9 tablespoons of butter are divided between the crust and the custard, ensuring each component receives the same buttery depth. For a dairy‑free version, coconut oil can substitute for butter, but the flavor will shift toward a subtle coconut undertone.
The Final Flourish
Powdered sugar is the finishing touch that gives the cake a delicate sweetness and a light dusting that looks as elegant as it tastes. It also helps to balance the tartness of the cherries. The final touch of vanilla extract infuses the custard with a warm, aromatic undertone that complements the fruit. If you want a more pronounced vanilla flavor, replace the vanilla extract with vanilla bean paste for a subtle speckled look.
Everything's prepped? Good. Let's get into the real action...
The Method — Step by Step
- Begin by preheating your oven to 375°F (190°C). In a medium bowl, combine the flour, baking powder, and fine sea salt. Sift the mixture to ensure even distribution of leavening agents. This step is crucial—any clumps will result in uneven texture. As the flour sifts, you’ll hear a satisfying rustle that signals the start of a masterpiece. Let the dry mix sit aside for a minute.
- Cut the cold, unsalted butter into small cubes and add it to the dry flour mixture. Use a pastry cutter or your fingertips to blend until the mixture resembles coarse crumbs. The butter should be visible as small, dark specks; this indicates the right amount of fat for flakiness. If the mixture feels too dry, add a tablespoon of cold water. This is the moment of truth—if you’re not careful, the dough could become too sticky or too crumbly.
- Press the dough into a 9‑inch (23 cm) round cake pan lined with parchment paper. Use a flat-bottomed glass to press the surface evenly. The dough should lay flat without gaps. Tap the pan lightly on the counter to release air bubbles. This ensures a uniform rise during baking.
- Bake the crust for 15 minutes or until the edges start pulling away from the pan and the surface has a light golden hue. The aroma will be buttery and slightly nutty, hinting at the crispness to come. Keep an eye on the temperature; if the crust browns too quickly, reduce the heat to 350°F (175°C) for the remainder of the bake. After baking, remove the crust from the oven and set it aside to cool.
- In a separate bowl, whisk the eggs, egg yolk, granulated sugar, vanilla extract, and cornstarch until the mixture is pale and slightly thick. Pour in the whole milk and heavy cream, whisking continuously to avoid lumps. The mixture should be smooth, with a glossy sheen that indicates proper emulsification.
- Gently fold the cooled cherry glaze into the custard mixture. Stir until the cherries are evenly dispersed, creating a speckled, vibrant custard. The custard should be thick enough to coat the back of a spoon but still pourable. If the mixture is too thick, add a tablespoon of milk to loosen it.
- Pour the custard over the cooled crust, smoothing the surface with a spatula. Tap the pan gently to release any trapped air bubbles. The custard should fill the pan to the top, forming a smooth layer that will set into a delicate custard. This is the part where the cake starts to feel like a dream.
- Bake the assembled cake for 25 minutes or until the custard has set but still has a slight wobble in the center. The top should have a subtle golden crust, and the aroma will be a warm, buttery scent. Remove the cake from the oven and let it cool on a wire rack for 10 minutes before dusting with powdered sugar.
- Once cooled, dust the top generously with powdered sugar. Use a fine sieve to ensure an even coat that doesn’t clump. Slice with a hot knife for clean edges. Serve immediately or refrigerate for up to 48 hours; the custard will firm up, and the flavors will meld beautifully.
That's it — you did it. But hold on, I've got a few more tricks that'll take this to another level...
Insider Tricks for Flawless Results
The Temperature Rule Nobody Follows
Many bakers assume that all ovens are the same, but subtle variations can affect the outcome. Use an oven thermometer to ensure your oven reads the correct temperature. If your oven runs hot, lower the temperature by 25°F (14°C) and extend the baking time by 5 minutes. This prevents the crust from burning while keeping the custard from drying out.
Why Your Nose Knows Best
Trust the scent of your batter. As the custard cooks, you’ll notice a sweet, buttery aroma that signals the right consistency. If the smell lingers too long, the custard is undercooked. If it turns metallic, it’s overcooked. This olfactory cue is a reliable gauge of doneness.
The 5‑Minute Rest That Changes Everything
After removing the cake from the oven, let it rest on the wire rack for exactly five minutes before dusting. This short rest allows the custard to set further, reducing the risk of it sliding off the knife. It also gives the flavors a chance to settle, creating a more cohesive taste experience.
The Secret to Flaky Crust
The key to a flaky crust is cold butter and minimal handling. Use chilled butter and keep the dough as cold as possible. If the dough warms up, it will lose its flakiness and become dense. Work quickly, and avoid over‑kneading.
The Perfect Dusting
Powdered sugar can be tricky. Dust it in a thin layer, then tap the pan to remove excess. A thick coating can weigh down the custard and create a gritty texture. A light dusting maintains the airy quality of the cake.
The Final Touch of Vanilla
Vanilla extract is more than a flavor; it’s a mood enhancer. Add it at the very end of the custard preparation to preserve its aromatic compounds. If you add it too early, the heat will dissipate some of the essential oils.
Creative Twists and Variations
This recipe is a playground. Here are some of my favorite ways to switch things up:
Berry Bomb
Swap the cherries for a mix of fresh blueberries, raspberries, and blackberries. The combination of sweet and tart berries adds complexity. The glaze becomes a colorful mosaic, and the custard takes on a deeper hue. Perfect for summer parties.
Nutty Crunch
Add toasted almond slivers to the crust mixture. The almonds give a subtle crunch and a nutty aroma that pairs beautifully with the cherries. Use almond flour for a gluten‑free version.
Chocolate Swirl
Fold a tablespoon of cocoa powder into the custard for a mocha twist. The chocolate deepens the flavor profile, and the swirl of melted chocolate through the cherries creates a visual wow factor. Serve with a drizzle of dark chocolate ganache.
Lemon Zest
Add the zest of one lemon to the glaze. The citrus oils enhance the lemon flavor and provide a bright, zesty aroma that cuts through the richness. This variation is ideal for spring celebrations.
Caramel Drizzle
Finish the cake with a light caramel drizzle. The caramel adds a buttery sweetness and a glossy shine. It also offers a delightful contrast to the cherry's acidity.
Ginger Snap
Incorporate a teaspoon of ground ginger into the crust for a warm, spicy note. The ginger pairs wonderfully with the cherries and adds a subtle kick. This version works well for holiday gatherings.
Storing and Bringing It Back to Life
Fridge Storage
Store the cake in an airtight container at room temperature for up to 2 days. If you plan to keep it longer, refrigerate it. The custard will firm up, but the flavors will continue to develop. When you’re ready to serve, let it sit at room temperature for 15 minutes to soften.
Freezer Friendly
Wrap the cake tightly in plastic wrap, then in aluminum foil, and freeze for up to 3 months. When you’re ready, thaw it overnight in the refrigerator. The custard will retain its texture, and the cherry glaze will remain glossy.
Best Reheating Method
Reheat the cake in a 300°F (150°C) oven for 10 minutes, then remove and let rest for 5 minutes. Add a tiny splash of water to the pan before reheating; this steams the custard back to perfection, keeping it moist and silky. Avoid microwaving, as it can make the custard rubbery.