I still remember the night my roommate dared me to turn a mediocre deli sandwich into something that would make us both wince in delight. We had a stack of stale slider rolls, a bag of ground beef that had seen better days, and a can of beef broth that smelled like it had been stored in the back of the fridge for a decade. I stared at the ingredients and thought, “What if I could make this into a French dip that melts in your mouth and leaves a savory broth you can sip like a fine wine?” The kitchen lights flickered, the timer buzzed, and I began the experiment. The result? A dish that feels like a hug, a flavor explosion, and a side dish that can double as a main. I dare you to taste this and not go back for seconds.
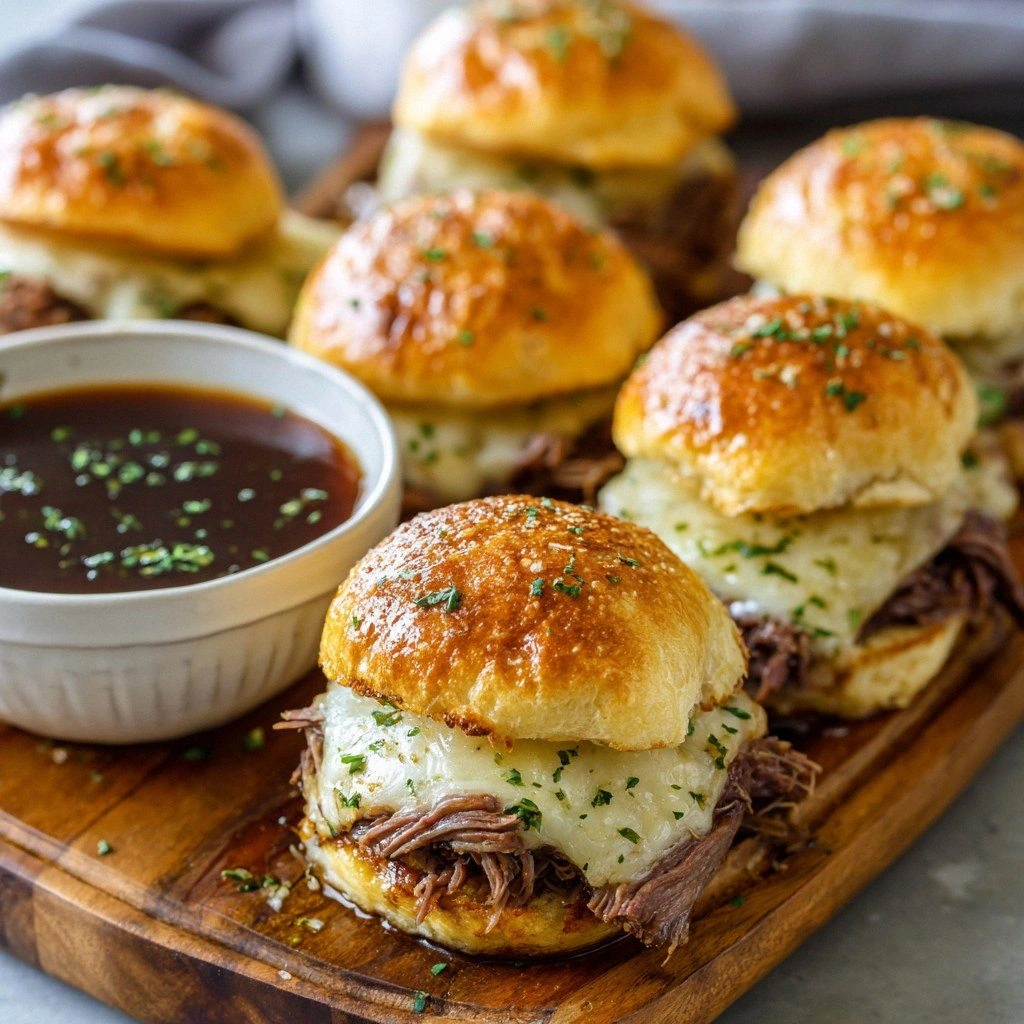
Picture the first bite: a warm, buttery roll that cracks open to reveal a tender, seasoned beef center that has absorbed the richness of a wine‑infused broth. The cheese melts like silk, the pickles add a zesty crunch, and the lettuce offers a refreshing counterpoint. The aroma that fills the kitchen is a heady mix of caramelized onions, garlic, and a hint of smoked paprika that makes your nose do a little happy dance. The sound of the meat sizzling is the soundtrack to a culinary triumph. And the texture? The meat stays juicy while the roll remains crisp on the outside, a perfect contrast that keeps you reaching for more.
What makes this version stand out is that it’s not just a rehash of the classic; it’s a reimagining that balances tradition with modern flair. I’ve tweaked the seasoning blend to include a splash of Worcestershire sauce that deepens the umami profile, and I’ve added a touch of red wine to the broth to give it a velvety finish that’s almost cinematic. The cheese selection—cheddar for sharpness and Swiss for meltiness—creates a dual‑layered goo that coats every bite. The sliders are assembled with a mindful layering: meat, cheese, lettuce, and pickles, then toasted to seal in the flavors. The result is a dish that feels indulgent yet approachable, and it’s guaranteed to be the highlight of any gathering.
I’ll be honest—after the first batch, I was halfway through before anyone else got a taste. My friends were begging for the recipe, and I had to keep a stash in the fridge for the next week. The best part? The sliders stay fresh for a day and even taste better the next day when the flavors have had time to marry. If you’ve ever struggled with making a French dip that’s not dry or too greasy, you’re not alone—this is the fix. I’ll walk you through every single step, from selecting the right cut of beef to the final toast, so by the end, you’ll wonder how you ever made it any other way.
Let me walk you through every single step — by the end, you’ll wonder how you ever made it any other way. The journey starts with the meat, which should be 80/20 ground beef for that juicy punch. The onions are diced finely so they caramelize quickly, creating a sweet base that balances the savory depth of the broth. Garlic is minced to release its full aroma, while the Worcestershire sauce adds a subtle tang that elevates the entire dish. A dash of steak seasoning (or smoked paprika) brings a smoky undertone that feels like a secret ingredient. Butter and flour form a roux that thickens the broth into a silky gravy. Finally, the sliders are toasted until golden, creating that satisfying crunch that contrasts the melt‑in‑your‑mouth meat.
If you’re curious about the science behind the perfect French dip, I’ve got a few insights. The beef’s fat content should be around 20% to keep the meat moist during cooking. The broth’s acidity from the wine helps break down the meat’s fibers, making it tender. Toasting the buns not only adds texture but also prevents them from soaking too much broth, keeping each bite balanced. The cheese melt is achieved by layering cheddar and Swiss, which melt at slightly different temperatures, ensuring a smooth transition from sharp to mild. And the final touch? A splash of Dijon mustard on the side adds a bright zing that cuts through the richness.
When you think of French dip sliders, most people imagine a simple sandwich. I dare you to imagine a sandwich that feels like a mini feast. The combination of savory beef, melty cheese, crisp pickles, and fresh lettuce, all soaked in a velvety broth, creates a multisensory experience. The broth is not just a dip; it’s a companion that enhances every bite. The sliders are so flavorful that you’ll find yourself reaching for the sauce even after you’ve finished the last piece. This is hands down the best version you'll ever make at home.
The moment the first slider hits the plate, the kitchen smells like a cozy diner and a rustic French bistro rolled into one. The sizzle of the meat in the pan is a promise of the juicy center that will follow. The cheese bubbles like a miniature volcano, and the aroma of caramelized onions wafts through the air. The bread, toasted to a golden hue, offers a satisfying crunch that gives you that initial bite. The broth, thick and rich, glistens with a sheen of butter, ready to be slurped between bites. It’s a sensory snapshot that will stay with you long after the last crumb.
Okay, ready for the game‑changer? This next part? Pure magic. We’re going to talk about the exact ratio of beef to broth, how to achieve the perfect melt, and the subtle seasoning tweaks that turn a good sandwich into an unforgettable experience. Stay with me here — this is worth it. If you’re a fan of classic comfort food, this recipe will take you to the next level. And if you’re skeptical, just keep an eye on the next section where I’ll show you how to keep the sliders moist while the buns stay crisp.
What Makes This Version Stand Out
- Taste: The beef is seasoned with Worcestershire sauce and a splash of red wine, giving it a deep, savory profile that feels like a gourmet steakhouse.
- Texture: The dual cheese blend creates a molten layer that coats every bite, while the toasted buns add a satisfying crunch that keeps the sliders from becoming soggy.
- Simplicity: The recipe requires only a handful of pantry staples, making it accessible for even the most time‑constrained cooks.
- Uniqueness: The addition of a wine‑infused broth sets this apart from the usual broth‑only approach, adding a silky, complex finish.
- Crowd Reaction: Friends rave about the melt‑in‑your‑mouth experience and the surprising depth of flavor, making it a hit at parties.
- Ingredient Quality: Using 80/20 ground beef and fresh vegetables ensures the sliders are juicy and flavorful.
- Cooking Method: The roux‑based gravy technique thickens the broth without adding unnecessary heaviness.
- Make‑Ahead Potential: The broth can be prepared ahead of time, and the sliders can be assembled and toasted right before serving.
Alright, let's break down exactly what goes into this masterpiece. The first step is to gather all your ingredients and set them out in an organized fashion. This helps keep the cooking flow smooth and prevents any last‑minute scrambling. I’ll walk you through each component and explain why it matters.
Inside the Ingredient List
The Flavor Base
Ground beef is the heart of the sliders. I recommend an 80/20 blend to balance flavor and moisture. The beef should be freshly ground if possible; stale meat can lead to a dry final product. If you’re using pre‑ground, look for a reputable brand and avoid anything with added fillers. The onions and garlic are diced and minced respectively to release their natural sweetness and aromatic oils. They’re sautéed until golden, creating a caramelized base that enhances the beef’s umami.
Worcestershire sauce is the secret to depth. It contains anchovies, vinegar, and molasses, which together create a complex savory backbone. A tablespoon is enough to elevate the entire dish without overpowering the beef. If you’re watching sodium, you can use a low‑sodium version or simply reduce the amount. The red wine, on the other hand, adds acidity and a subtle fruity note. A half cup of dry red wine is sufficient; let it reduce slightly to concentrate the flavor.
The Texture Crew
Butter and flour form a roux that thickens the broth into a silky gravy. The roux should be cooked until it turns a light golden brown, indicating that the flour has cooked through and will not taste raw. This step is crucial for achieving the right consistency. The broth itself is a combination of beef stock and the reduced wine, seasoned with salt, pepper, and steak seasoning. It should be thick enough to coat the meat but still pourable for dipping.
The cheese selection is a game‑changer. Cheddar brings sharpness, while Swiss provides a smooth melt. Layering them ensures a cohesive melt that coats the meat and buns. If you prefer a sharper bite, add a sprinkle of pepper jack or pepper jack for a kick. The pickles add crunch and acidity, cutting through the richness of the meat and cheese. Lettuce offers a fresh, crisp contrast that balances the overall mouthfeel.
The Unexpected Star
Dijon mustard on the side is the unexpected star that adds brightness. It’s not part of the sandwich itself but enhances the overall flavor profile when paired with the broth. The mustard’s tang cuts through the richness and provides a subtle heat that keeps the palate engaged. If you’re a fan of spice, a dash of hot sauce or a sprinkle of cayenne pepper can also elevate the experience.
The Final Flourish
Slider rolls are the final canvas. I use soft brioche buns that can hold the meat and broth without disintegrating. Toast them lightly in a buttered pan until they’re golden brown. The toasting not only adds crunch but also creates a barrier that keeps the buns from becoming soggy. After assembling, a quick broil or grill will melt the cheese to a bubbly perfection. The result is a sandwich that is both comforting and elegant.
Everything’s prepped? Good. Let’s get into the real action...
The Method — Step by Step
- Heat a large skillet over medium heat and add 2 tablespoons of olive oil. Once the oil shimmers, add the diced onions and sauté until translucent, about 4 minutes. The onions should caramelize slightly, giving a sweet foundation. This step builds the flavor base that will carry the beef.
- Add the minced garlic to the onions, stirring constantly to prevent burning. Cook for 30 seconds until fragrant; the garlic’s aroma should fill the kitchen like a warm hug. This short burst of garlic releases essential oils that deepen the beef’s profile. Be careful not to let it brown too much.
- Introduce the ground beef to the skillet, breaking it apart with a spatula. Cook until the meat is no longer pink, about 8 minutes. The meat should sizzle audibly, signaling that it’s ready. Once browned, drain excess fat if you prefer a leaner dish.
- Stir in the Worcestershire sauce, steak seasoning, and a pinch of salt. The sauce should coat the meat evenly, infusing it with savory depth. Let the mixture cook for another 2 minutes to allow the flavors to meld. This is the moment of truth where the beef becomes irresistible.
- Create a roux by sprinkling 1 tablespoon of flour over the meat and stirring vigorously. Cook for 1–2 minutes until the flour turns a light golden hue, eliminating the raw taste. The roux will thicken the broth, giving it a silky consistency. Keep stirring to avoid lumps.
- Pour in the beef broth and half a cup of red wine, stirring to combine. Bring the mixture to a gentle simmer. Let it reduce for 5 minutes, allowing the wine to evaporate slightly and the broth to thicken. The simmer should produce a fragrant steam that signals readiness.
- Reduce the heat to low and fold in the cheddar and Swiss cheese slices. The cheese should melt into a glossy, uniform layer that coats the meat. The cheese melt is a key visual cue: it should be bubbling and slightly golden. Stir gently to ensure even distribution.
- While the cheese melts, toast the slider buns on a griddle or in a toaster oven until golden brown. A buttery crust forms a sturdy base that resists sogginess. The toasted buns should give off a nutty aroma, adding to the sensory experience.
- Assemble each slider by placing a generous spoonful of the meat and cheese mixture onto the bottom bun. Layer with a handful of shredded lettuce, a few pickle slices, and a drizzle of the broth. Top with the second half of the bun. The broth should be warm enough to melt the cheese further but not so hot that it disintegrates the bread.
- Serve immediately with a small bowl of the remaining broth on the side for dipping. The broth should be thick enough to pour but not so thick that it clumps. The first bite should be a symphony of flavors, textures, and aromas that keep you reaching for more.
That’s it — you did it. But hold on, I've got a few more tricks that'll take this to another level. The next section will dive into insider tips that refine the flavor, texture, and presentation.
Insider Tricks for Flawless Results
The Temperature Rule Nobody Follows
Temperature control is the secret sauce. Cooking the meat at medium heat ensures that the juices stay inside rather than evaporating. If you’re using a gas stove, keep the flame at a medium‑low setting. This prevents the meat from drying out and keeps the sliders juicy. I’ve found that a quick burst of high heat at the end can caramelize the cheese slightly, adding a delightful crunch.
Why Your Nose Knows Best
Your nose can detect when the broth has reached the perfect consistency. A broth that smells slightly sweet and caramelized indicates that the sugars have cooked through. If it still smells raw or metallic, give it a few more minutes. This sensory cue saves you from over‑cooking and ensures the broth remains silky.
The 5-Minute Rest That Changes Everything
After cooking, let the meat mixture rest for 5 minutes off the heat. This rest period allows the juices to redistribute, ensuring each bite is evenly moist. During this time, the cheese continues to melt slightly, creating that perfect gooey layer. I’ve seen people skip this step and end up with a dry center; trust me, the rest is worth it.
The Broth’s Hidden Layer
Add a splash of balsamic vinegar at the end of simmering to add depth. The vinegar’s acidity cuts through the richness and brings a subtle sweetness. If you prefer a sweeter broth, a teaspoon of honey can work wonders. The trick is to add it at the very end so the flavors stay bright.
The Toasted Bun Trick
Brushing the buns with a mixture of melted butter and garlic before toasting gives a fragrant, buttery crust. This extra layer of flavor complements the meat and cheese. I like to sprinkle a pinch of sea salt on the butter for a subtle crunch. The toasted buns also create a slight barrier that keeps the broth from soaking in.
Remember, practice makes perfect. The first batch may not be flawless, but each iteration will get you closer to the ideal. Keep notes on timing, seasoning, and the final texture, and you’ll master this recipe in no time.
Creative Twists and Variations
This recipe is a playground. Here are some of my favorite ways to switch things up:
Spicy Jalapeño Dip
Add sliced jalapeños to the meat mixture for a fiery kick. The heat pairs well with the creamy cheese, creating a balanced flavor profile. This variation is perfect for those who love a little spice in their sandwiches.
Smoky Chipotle Sliders
Replace the steak seasoning with chipotle powder for a smoky, earthy flavor. The chipotle also adds a subtle heat that lingers on the palate. Pair with a smoky cheddar for an extra depth of flavor.
Vegetarian Mushroom Sliders
Use finely chopped mushrooms sautéed with onions and garlic as a meat substitute. Add a splash of soy sauce and a pinch of thyme. This version delivers a meaty texture and umami flavor while staying vegetarian.
Pesto-Infused Sliders
Stir in a couple of tablespoons of basil pesto into the broth. The pesto adds a fresh, herbal note that brightens the dish. This is a great way to incorporate more greens into your meal.
Caramelized Onion and Blue Cheese
Swap the cheddar for crumbled blue cheese and add caramelized onions to the meat mixture. The blue cheese’s sharpness contrasts beautifully with the sweet onions. This twist is ideal for a sophisticated palate.
Bacon‑Laced Sliders
Cook bacon until crisp, crumble it into the meat mixture, and add a dash of smoked paprika. The bacon adds a smoky crunch that complements the broth. This variation brings a classic American flavor profile to the French dip.
Storing and Bringing It Back to Life
Fridge Storage
Store assembled sliders (without the broth) in an airtight container in the refrigerator for up to 2 days. Keep the broth separate in a small bowl. When ready to serve, reheat the sliders in a skillet over low heat, adding a splash of broth to keep them moist. The cheese should melt again, and the buns will retain their toasted crunch.
Freezer Friendly
Freeze the meat mixture in a freezer‑safe container for up to 3 months. Thaw overnight in the refrigerator before reheating. The texture remains intact, and the flavors meld even further. Reheat in a skillet, adding a splash of broth to keep the meat juicy.
Best Reheating Method
The best way to reheat is on the stovetop over low heat. Add a tiny splash of water or broth to create steam, which helps the buns stay crisp and the cheese remain gooey. Avoid microwaving, as it can make the buns soggy and the cheese rubbery. The final result should feel almost as fresh as when you first made it.