Picture this: it’s a rainy Thursday afternoon, the kind of day that makes you want to stay in your pajamas and binge-watch your favorite series. I’m standing in my kitchen, staring at a pile of chicken thighs that have been sitting in the fridge since last Sunday, feeling a pang of culinary guilt. The thought of tossing them into the freezer or letting them rot in the back of the fridge is a disaster waiting to happen. I know I could throw them in a quick stir‑fry, a sloppy mess of onions and sauce, but I’m craving something that feels like a hug in a pot.
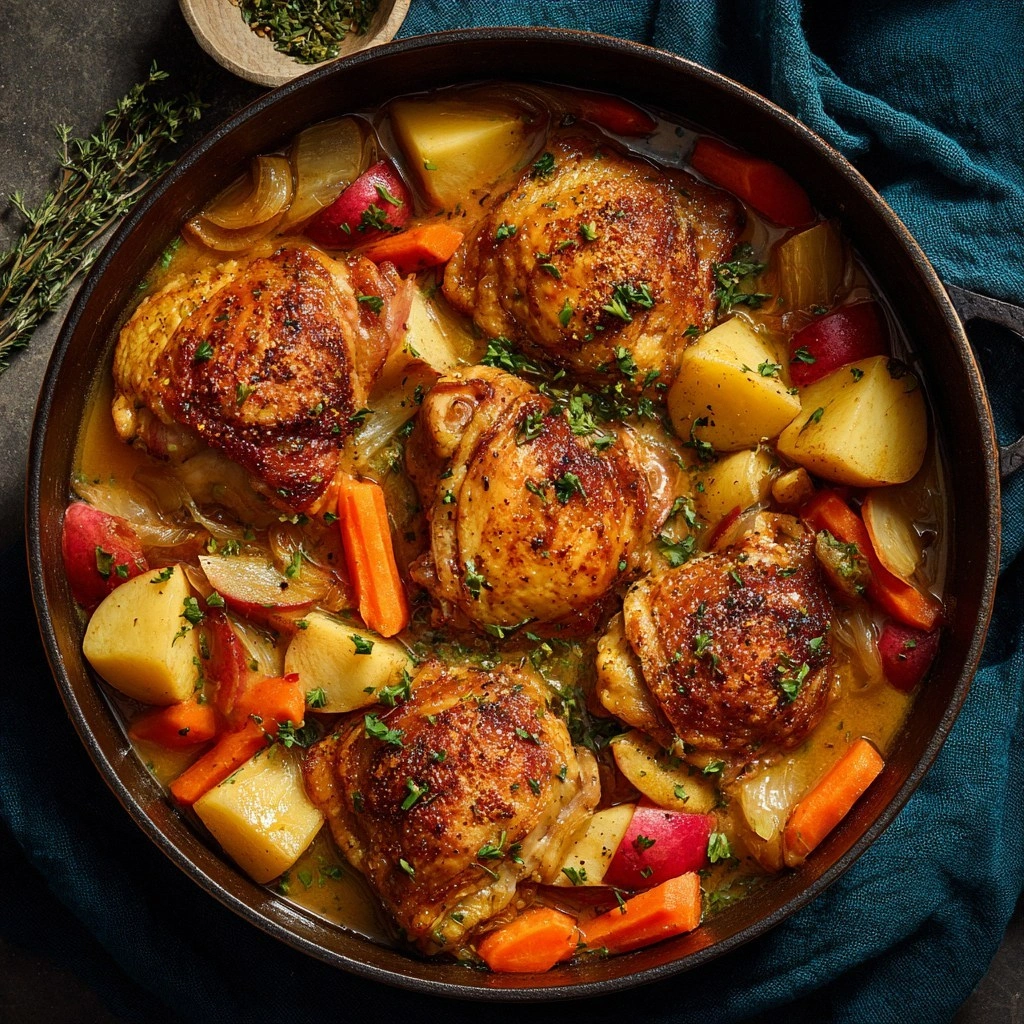
Enter the One‑Pot Braised Chicken Thighs, a dish that turns the humble chicken thigh into a silky, caramelized masterpiece that smells like autumn in the making. The moment the thick brown crust forms, the kitchen fills with a nutty, roasted aroma that makes the air feel thicker, like a cozy blanket. The sound of the sizzling oil is a soundtrack of comfort, the hiss of garlic and onions releasing their sweet perfume, and the visual of golden brown skin glistening under the stove’s glow. The first bite is a symphony of textures: the skin crackles like crisped bread, the meat melts like butter, and the root veggies provide a subtle earthiness that ties everything together. I dare you to taste this and not go back for seconds.
What makes this version stand out is the careful layering of flavors and the use of a single pot to capture every nuance. I’ve spent countless evenings experimenting with different braising liquids and seasoning blends, and this recipe is the culmination of those trials. It’s hands down the best version you’ll ever make at home because it balances savory, sweet, and a hint of acidity without overwhelming the palate. The secret? A splash of apple cider that gives the sauce a gentle tartness, and a pinch of fresh thyme that lingers like a whispered promise. Picture yourself pulling this out of the oven, the whole kitchen smelling incredible, and knowing you’ve just created something that will impress even the most skeptical of diners.
Let me walk you through every single step — by the end, you’ll wonder how you ever made it any other way. I’ll share the micro‑challenges that will test your culinary mettle, the bold claims that might sound like hyperbole, and the little confessions that prove I’m just as human as you are. If you’ve ever struggled with this, you’re not alone — and I’ve got the fix. And now the fun part, because this next part? Pure magic.
What Makes This Version Stand Out
- Flavor Depth: The combination of browned chicken, caramelized onions, and apple creates a complex profile that feels both comforting and adventurous. The subtle sweetness of the apple balances the savory broth, while the thyme adds a fragrant lift. Skipping the apple would leave the dish feeling flat and one‑dimensional.
- Texture Contrast: The skin turns a crispy, golden brown that contrasts beautifully with the tender, fall‑apart meat. The root vegetables maintain a slight bite, preventing the dish from becoming mushy. Removing the potatoes would compromise the heartiness of the meal.
- One‑Pot Simplicity: With a single pan, you reduce cleanup time dramatically. The technique of browning the thighs first locks in juices, creating a richer sauce. If you skip the browning step, the meat will release too much moisture, diluting the flavor.
- Time Efficiency: The braising process takes less than an hour, making it ideal for busy weeknights. The oven’s gentle heat ensures even cooking without constant monitoring. Cooking on the stovetop alone would require more frequent stirring.
- Make‑Ahead Potential: The dish can be prepared in advance and reheated without losing quality. The flavors actually deepen overnight, making leftovers even more delicious. Forgetting to refrigerate the leftovers can lead to bacterial growth.
- Crowd‑Pleaser Factor: The dish is hearty enough for a family dinner yet elegant enough for guests. The caramelized skin adds a touch of sophistication that elevates a simple meal. Skipping the final garnish of fresh herbs will make the presentation look bland.
- Ingredient Quality: Using bone‑in, skin‑on thighs ensures maximum flavor extraction during braising. Opting for organic or pasture‑raised options can elevate the taste further. Low‑sodium broth is recommended to control salt levels.
- Seasonal Flexibility: While apples bring a fall vibe, you can swap in pears or stone fruits for a different twist. Root vegetables like parsnips or sweet potatoes add depth. Avoid using too many delicate greens that could wilt prematurely.
Alright, let's break down exactly what goes into this masterpiece…
Inside the Ingredient List
The Flavor Base
At the heart of this dish lies a simple yet potent combination: olive oil, garlic, and onions. Olive oil provides a smooth canvas that prevents sticking and enhances browning. Garlic infuses a sharp, aromatic note that permeates the entire pot. Onions, when sautéed until translucent, release their natural sugars, creating a sweet undertone that balances the savory broth. If you skip the onions, you’ll miss that caramelized depth that makes the dish feel complete.
The Texture Crew
Root vegetables like carrots, celery, and potatoes are the unsung heroes that add body and chew. Carrots bring a subtle sweetness and vibrant color, while celery contributes a mild crunch and herbal nuance. Potatoes absorb the braising liquid, becoming tender yet holding shape, making each spoonful a harmonious mix of textures. Swapping potatoes for sweet potatoes adds a hint of maple‑like sweetness; just be aware they cook faster.
The Unexpected Star
Apples are the secret weapon that elevates this dish from ordinary to unforgettable. When sliced and added early, they soften and infuse the broth with a gentle tartness that cuts through the richness of the chicken. The natural sugars in the apple caramelize, forming a glossy glaze that clings to the meat. If you’re allergic to apples or simply don’t have any on hand, pears or quince can serve as viable substitutes, offering a similar sweet‑tart profile.
The Final Flourish
Thyme, bay leaves, and a splash of white wine finish the flavor profile, adding layers of herbal brightness and acidity. Thyme’s earthy aroma complements the chicken, while bay leaves lend a subtle, aromatic depth that permeates the broth. White wine adds acidity and a faint fruitiness that brightens the sauce. If you’re avoiding alcohol, replace the wine with an equal amount of chicken broth mixed with a teaspoon of apple cider vinegar for a similar tang.
Everything's prepped? Good. Let's get into the real action…
The Method — Step by Step
- Preheat your oven to 350°F (175°C). While the oven warms, set a large Dutch oven or heavy‑bottomed pot on the stovetop. This pre‑heat ensures the pot’s surface is ready for the searing process. The aroma of the oven starts to mingle with the kitchen, signaling that cooking is about to begin.
- Season the chicken thighs with salt, pepper, and a light dusting of flour. The flour creates a delicate crust that locks in juices and thickens the sauce later. Use a pinch of smoked paprika for a subtle smoky undertone if you’re feeling adventurous. Skipping the flour will result in a thinner sauce that lacks body.
- Heat olive oil in the pot over medium‑high heat. Once shimmering, add the chicken thighs skin‑side down. Allow them to sear for 5–7 minutes until the skin turns a deep amber and releases a satisfying crackle. Flip the thighs and sear the other side for another 3–4 minutes, ensuring even browning.
- Remove the thighs and set them aside on a plate. This step frees up space for the aromatics. If you’re short on time, you can keep the thighs in the pot, but the sauce will be diluted. The seared surface is crucial for flavor retention.
- Reduce the heat to medium and add diced onion. Stir until the onion softens and begins to caramelize, about 4–5 minutes. The onion’s natural sugars bloom, creating a sweet base for the broth. If you’re using a non‑stick pot, a splash of water can prevent sticking.
- Add minced garlic, sliced carrots, celery, and potatoes. Toss everything together, letting the vegetables mingle with the onion for 3–4 minutes. The garlic releases its pungent aroma, while the vegetables start to soften. This is the moment when the dish begins to smell like a comforting stew.
- Deglaze the pot with white wine. Pour in the wine, swirling to lift the browned bits from the bottom. These “fond” pieces carry intense flavor. If you’re avoiding alcohol, substitute with chicken broth and a splash of apple cider vinegar.
- Return the chicken thighs to the pot. Nestle them back in, skin‑side up, ensuring they sit snugly against the vegetables. Add the chicken broth, thyme sprigs, and bay leaves. Bring the mixture to a gentle simmer.
- Cover the pot and transfer it to the preheated oven. Bake for 30–35 minutes, or until the chicken reaches an internal temperature of 165°F (75°C) and the vegetables are tender. The slow, moist heat allows the flavors to meld beautifully.
- Remove from oven and let rest. Allow the dish to sit covered for 5 minutes before serving. This resting period lets the juices redistribute, ensuring each bite is juicy. Garnish with fresh thyme or parsley for a burst of color.
That's it — you did it. But hold on, I've got a few more tricks that'll take this to another level…
Insider Tricks for Flawless Results
The Temperature Rule Nobody Follows
Many chefs believe that a high heat is essential for browning, but a moderate heat actually yields a more even crust. By keeping the skillet at medium‑high, you avoid scorching while still achieving a golden finish. If you’re using a cast iron pan, pre‑heat it for a few minutes to ensure uniform heat distribution.
Why Your Nose Knows Best
The first scent that wafts from the pot is a reliable indicator of doneness. When the broth smells slightly caramelized and the vegetables emit a sweet, earthy aroma, you’re in the right place. Trust your nose; it’s a seasoned judge of flavor.
The 5‑Minute Rest That Changes Everything
Resting the dish after cooking allows the juices to redistribute, preventing a dry bite. The flavors also mellow, creating a more harmonious taste profile. Skipping this step will leave the chicken slightly uneven in moisture.
Use Fresh Herbs at the End
Adding fresh thyme or parsley right before serving gives the dish a fresh, vibrant finish. The heat from the pot will wilt the herbs slightly, releasing their essential oils. This final touch elevates the dish from good to unforgettable.
Don’t Over‑Season the Broth
Since the chicken thighs are seasoned, the broth should remain light. Adding too much salt can make the dish taste flat. Taste the broth before adding the thighs; adjust seasoning only if necessary.
Creative Twists and Variations
This recipe is a playground. Here are some of my favorite ways to switch things up:
Smoky Chipotle Version
Add a tablespoon of chipotle in adobo sauce during the deglazing step. The smoky heat pairs beautifully with the sweet apple, creating a bold flavor profile that’s perfect for a weekend dinner.
Herb‑Infused Mediterranean
Replace thyme with oregano and add a handful of sun‑dried tomatoes. The Mediterranean herbs give the dish a bright, aromatic character that feels like a sunny day.
Spicy Sriracha Kick
Stir in a teaspoon of sriracha during the final simmer. The heat balances the sweetness and adds a punch that will keep your taste buds dancing.
Butternut Squash Variation
Swap potatoes for cubed butternut squash for a slightly sweet, nutty flavor. The squash absorbs the broth beautifully, creating a silky texture.
Vegetarian Swap
Replace chicken with thick slices of seared tofu or tempeh. The braising liquid will still infuse them with the same depth of flavor, making it a hearty plant‑based option.
Asian‑Inspired Twist
Add a splash of soy sauce and a pinch of five‑spice powder during the simmer. The umami and aromatic spices give the dish an unexpected depth that feels both familiar and novel.
Storing and Bringing It Back to Life
Fridge Storage
Store leftovers in an airtight container for up to 4 days. The dish will stay moist and flavorful because the braising liquid has already infused the meat and vegetables. Refrigerate promptly to maintain safety.
Freezer Friendly
Place the cooled dish in a freezer‑safe container and freeze for up to 3 months. When reheating, thaw overnight in the refrigerator. The flavors remain intact, and the texture stays tender.
Best Reheating Method
Reheat in a covered pot over low heat, adding a splash of water or broth to keep the sauce from drying out. Stir occasionally until heated through. This gentle method preserves the dish’s silky sauce and prevents the vegetables from becoming mushy.