Picture this: it's a rainy Sunday afternoon, and I'm staring at a half-eaten apple pie and a jar of salted caramel sauce, wondering how I managed to have leftovers of either. My kitchen smells like autumn exploded — cinnamon, butter, and that rich, toasty scent of caramelized sugar hanging in the air like a warm blanket. I was supposed to be making something respectable for the office potluck tomorrow, but instead, I found myself on a mission to create the most outrageously delicious cookie that ever graced a lunchbox. Twenty minutes later, I'm pulling a tray of what can only be described as apple pie's cooler, more portable cousin from the oven, and my neighbors are knocking on the door asking if I'm running a secret bakery. These salted caramel apple pie cookies are the result of that beautiful accident — a happy collision between two desserts that were never meant to meet, but thank goodness they did.
Now, I've made my fair share of apple desserts over the years, from fancy tarts that took six hours to rustic galettes that looked like they'd been through a windstorm. But nothing — and I mean nothing — has ever disappeared faster than these cookies. The first time I brought them to my book club, they were gone before we even cracked open our copies of whatever we were supposed to be reading. My friend Sarah actually hid three in her purse "for the road" and then came back twenty minutes later asking if there were more. This is the kind of recipe that makes you the legend of every potluck, the hero of every bake sale, the person who gets invited to parties specifically because of what you might bring.
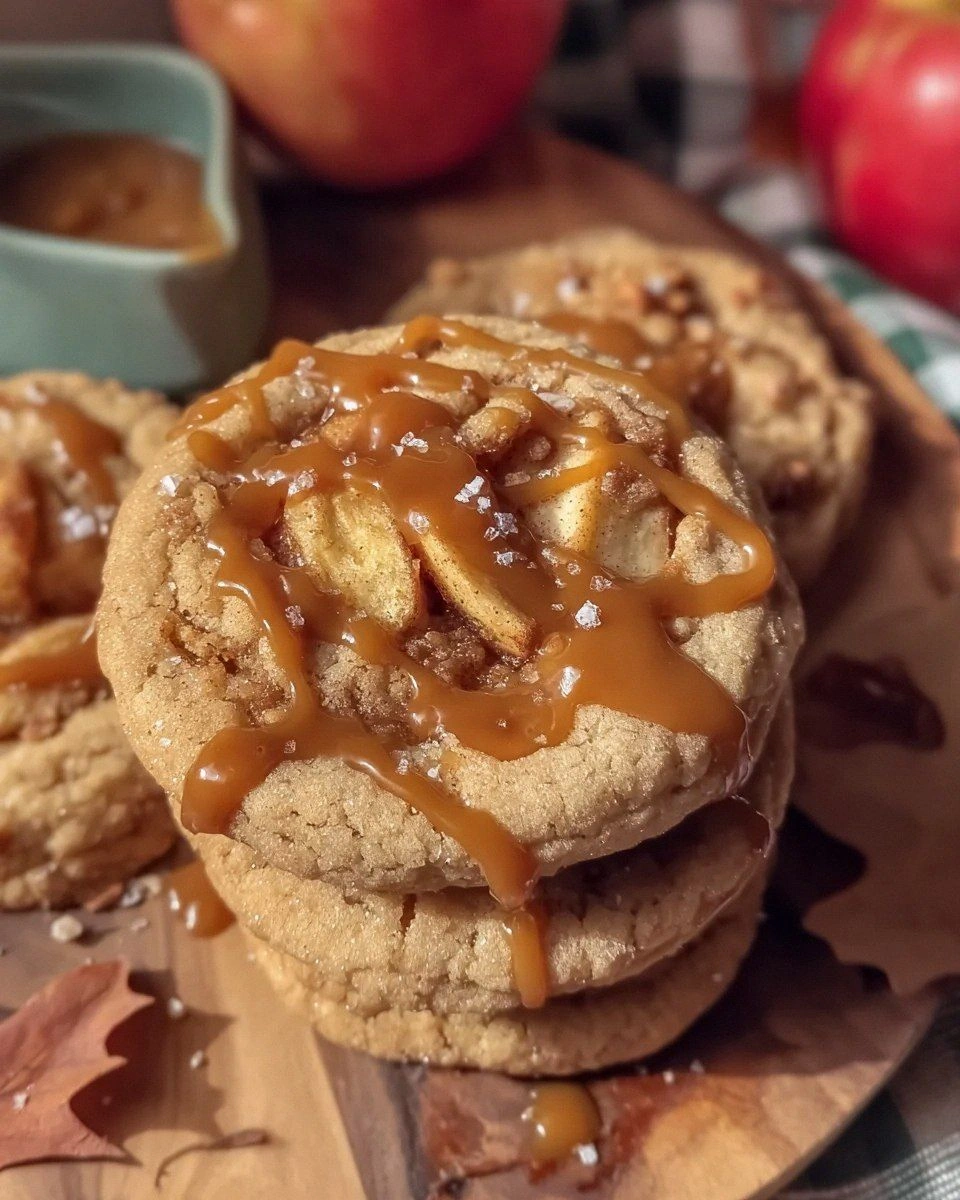
What makes these cookies absolutely irresistible is how they manage to capture everything you love about apple pie — the tender fruit, the warm spices, that buttery crust — and package it into a handheld treat that doesn't require a fork or a plate or any of that civilized nonsense. We're talking about cookies with real apple chunks that stay soft and juicy, swirled with ribbons of salted caramel that create these gorgeous amber pockets of gooey goodness. The edges get caramelized and slightly crisp, while the centers stay chewy and packed with fruit. It's like someone took autumn, wrapped it in butter, and sprinkled it with just enough salt to make you wonder why every dessert doesn't have this magical sweet-salty thing going on.
I'm going to let you in on a secret that most recipes get completely wrong: they treat the caramel like an afterthought, drizzling it on top like some sad decorative element. That's amateur hour, my friends. We're folding that liquid gold right into the dough, creating rivers of caramel that burst with every bite. And here's the game-changer — we're using a technique that keeps those apple pieces from turning into sad, mushy bits that taste like cafeteria fruit cup. Instead, they stay bright and flavorful, like little gems of concentrated apple essence. Picture yourself pulling these out of the oven, the whole kitchen smelling like you've been baking for hours, even though these come together faster than a frozen pizza. Let me walk you through every single step — by the end, you'll wonder how you ever made it any other way.
What Makes This Version Stand Out
Apple Integrity: Most apple cookies turn into fruit leather by the time they cool, but we're using a quick pre-cook method that locks in flavor while keeping those chunks perfectly tender. The result is actual pieces of apple in every bite, not some sad apple-scented mush that makes you question your life choices.
Caramel Distribution: Instead of the usual blob-on-top situation, we're creating a marble effect that ensures every cookie has those gorgeous amber ribbons running through it. No more playing caramel roulette where some cookies are loaded and others are sad, dry disappointments.
Salt Balance: We're not just sprinkling salt on top like some kind of primitive seasoning ritual. The salt is worked into the caramel at three different stages, creating this complex flavor profile that makes people close their eyes when they take the first bite.
Texture Magic: These cookies achieve what I call the holy trinity of texture — crispy caramelized edges, chewy centers, and soft apple chunks all in one bite. It's like a textural symphony that keeps you coming back for "just one more" until you realize you've eaten half the batch.
Make-Ahead Champion: The dough can be prepped up to five days ahead and kept in the fridge, or frozen for up to three months. Slice and bake whenever the craving hits, which, let's be honest, will be approximately every three hours once you've tasted these.
Fail-Proof Technique: I've tested this recipe on my most kitchen-challenged friends (you know who you are), and even they produced bakery-worthy results. If you can operate a spoon and an oven, you can make these cookies.
Crowd Psychology: Something about the combination of familiar apple pie flavors in cookie form makes people lose their minds. I've seen grown adults elbow each other out of the way at bake sales, and teenagers actually look up from their phones to grab seconds.
Alright, let's break down exactly what goes into this masterpiece...
Inside the Ingredient List
The Flavor Foundation
The apples are obviously the star here, but not just any apples will do. You want varieties that hold their shape and bring both sweetness and acidity — think Honeycrisp, Pink Lady, or a mix of tart Granny Smith with a sweeter option. Skip those mealy Red Delicious that taste like disappointment and sadness. We're looking for apples that still have some snap when you bite into them, because nobody wants to eat cookies that remind them of baby food. Cut them into small dice, about the size of chocolate chips, so they distribute evenly and cook through without turning to mush. The key is sautéing them briefly with butter, brown sugar, and a splash of lemon juice — this concentrates their flavor and creates a sort of apple compote that will make your kitchen smell like you've been hired by a candle company.
Butter is your best friend here, and I mean the real stuff — no margarine imposters allowed. We're using European-style butter with higher fat content because it creates those impossibly tender cookies that practically melt on your tongue. Room temperature butter is crucial; too cold and you'll be mixing until your arm falls off, too warm and your cookies will spread like they've got somewhere better to be. The butter gets creamed with both white and brown sugar, creating this fluffy base that's going to trap air and give us that perfect chewy texture. Don't even think about substituting oil here — we're building flavor, not conducting a science experiment gone wrong.
The Texture Crew
Brown sugar isn't just here for sweetness — it's bringing moisture and that deep, caramel flavor that makes people ask "what's your secret?" Dark brown sugar has more molasses, which means more flavor, but light brown works if that's what you've got. The molasses in the brown sugar also helps keep our cookies chewy for days, not that they'll last that long. We're using a higher ratio of brown to white sugar because we're building complexity, not just sweetness. This isn't the time for artificial sweeteners or sugar substitutes — we're making real cookies here, not diet food that tastes like sadness.
Eggs do more than just bind everything together — they're creating structure and adding richness that makes these cookies taste like they came from a fancy bakery. One whole egg plus an extra yolk gives us the perfect balance of structure and tenderness. The yolk adds fat for richness and helps emulsify the caramel into the dough. Room temperature eggs mix in more easily and create a smoother dough — cold eggs can cause your butter to seize up, creating little butter lumps that melt into greasy pockets. If you forgot to take your eggs out ahead of time (we've all been there), just pop them in warm water for five minutes.
The Spice Architects
Cinnamon is just the beginning — we're building a spice blend that makes these cookies taste like they contain an entire autumn orchard. A mix of cinnamon, nutmeg, and a whisper of cardamom creates this warm, complex flavor that makes people close their eyes when they bite in. The cardamom is optional but trust me here — it's like adding a secret ingredient that nobody can identify but everyone loves. Freshly ground spices make a world of difference; that jar of cinnamon that's been in your cabinet since 2019 isn't doing you any favors. We're also adding a touch of vanilla extract, but the real magic comes from vanilla bean paste if you can find it — those little black specks are like flavor bombs throughout the cookies.
All-purpose flour gives us the structure we need without making the cookies tough or cakey. We're using just enough to hold everything together — too much flour and you'll have hockey pucks, too little and your cookies will spread into one giant sheet. The trick is to measure by weight if you have a scale, or use the spoon-and-level method if you're using cups. Never pack your flour like you're trying to win a compression contest — your cookies will thank you. A touch of baking soda helps with browning and gives us those slightly crisp edges that contrast beautifully with the soft centers.
The Caramel Component
Now, let's talk about that salted caramel — and yes, we're making it from scratch because the store-bought stuff tastes like corn syrup had an identity crisis. Heavy cream, butter, sugar, and salt transform into liquid gold that's going to make these cookies legendary. The key is cooking the sugar until it's a deep amber color — too light and it's just sweet, too dark and it tastes burnt. We're adding salt at three different stages: in the caramel itself, a touch in the cookie dough, and a final sprinkle on top. This creates layers of flavor that make people wonder why they ever ate desserts that didn't have this sweet-salty magic happening.
Everything's prepped? Good. Let's get into the real action...

The Method — Step by Step
- Start by making your caramel because it needs time to cool and thicken slightly. In a heavy-bottomed saucepan, spread 1 cup of granulated sugar in an even layer and cook over medium heat without stirring — just swirl the pan occasionally. Watch closely as the sugar melts and turns from clear to pale gold to deep amber. This transformation happens faster than you think, so don't walk away to check Instagram. When it reaches that perfect amber color (think the color of an old penny), immediately whisk in 6 tablespoons of butter — it will bubble violently, so stand back. Once the butter is melted, slowly drizzle in 1/2 cup of heavy cream while whisking constantly. Remove from heat and stir in 1 teaspoon of flaky sea salt. Let this cool while you prep everything else — it should be pourable but not hot enough to melt your dough.
- Now for those apples — peel, core, and dice them into small pieces, about 1/4-inch cubes. You want them small enough to distribute through the cookies but not so tiny they disappear. In a skillet over medium heat, melt 2 tablespoons of butter and add your diced apples, 2 tablespoons of brown sugar, and a squeeze of lemon juice. Cook for about 5 minutes, just until the apples are slightly softened but still hold their shape. They should smell like apple pie filling and your kitchen should smell like you've been hired by a candle company. Remove from heat and let cool completely — warm apples will melt your butter and give you greasy cookies that spread like they've got somewhere better to be.
- In a large bowl, cream together 1 cup of softened butter with 3/4 cup each of white and brown sugar until light and fluffy — this should take about 3-4 minutes with an electric mixer. You're looking for a pale, airy mixture that looks like coffee shop frosting. Beat in one whole egg plus an extra yolk, along with 2 teaspoons of vanilla extract. The mixture might look slightly curdled at this point, but don't panic — that's just the butter and eggs having a little disagreement about temperature. It will come together beautifully once you add the flour.
- In a separate bowl, whisk together 2 1/4 cups of all-purpose flour, 1 teaspoon of baking soda, 1/2 teaspoon of salt, 1 teaspoon of cinnamon, 1/4 teaspoon of nutmeg, and a pinch of cardamom. Add this to your butter mixture and mix just until combined — overmixing develops gluten and gives you tough cookies that could double as hockey pucks. The dough should be soft but not sticky, like play-doh that's been left out for an hour. If it's too soft to scoop, refrigerate for 30 minutes, but don't chill it solid or you'll never get the caramel swirled in properly.
- Here's where the magic happens — gently fold in your cooled apple pieces, being careful not to crush them into apple sauce. Now for the caramel: drizzle about 3/4 cup of your cooled caramel over the dough and use a rubber spatula to create ribbons throughout. Don't overmix — you want distinct streaks of caramel, not uniformly beige dough. Think marble cake, not chocolate milk. Reserve the remaining caramel for drizzling over the baked cookies because we're fancy like that.
- Using a medium cookie scoop or two spoons, drop mounds of dough onto parchment-lined baking sheets, leaving about 2 inches between each cookie. They need room to spread without becoming one giant cookie sheet (though honestly, that doesn't sound terrible either). Slightly flatten the tops with your fingers — these cookies don't spread much on their own, so help them out a little. If your kitchen is warm and the dough seems soft, pop the trays in the fridge for 15 minutes while your oven preheats to 350°F.
- Bake for 12-14 minutes, until the edges are golden brown and the centers are just set. They might look slightly underbaked, but trust me — they continue cooking on the hot pan after you take them out. Overbaking is the enemy of chewy cookies, and we're not about to let that happen on our watch. The caramel will be bubbling and the apples should look like little jewels scattered throughout. Your kitchen will smell like you've been hired by a candle company that specializes in making people happy.
- Let the cookies cool on the baking sheet for 10 minutes before transferring to a wire rack — they're fragile when hot and will fall apart if you rush this step. While they're still warm, drizzle with the reserved caramel and sprinkle with a touch more flaky sea salt. The salt should be just enough to make people wonder why these taste so much better than regular cookies, not so much that they taste like a margarita rim. Let cool completely if you have more willpower than I do, which is unlikely since I'm usually eating the third cookie while the first batch is still cooling.
- Repeat with remaining dough, or better yet, freeze some dough balls for later. Frozen dough balls can go straight from freezer to oven — just add 2-3 minutes to the baking time. This way you can have fresh, warm cookies whenever the craving strikes, which, once you've tasted these, will be approximately every waking moment. Store baked cookies in an airtight container for up to 5 days, though honestly, they've never lasted more than 24 hours in my house. The caramel might soften over time, but a quick 5-second zap in the microwave brings back that fresh-from-the-oven magic.
That's it — you did it. But hold on, I've got a few more tricks that'll take this to another level...
Insider Tricks for Flawless Results
The Temperature Rule Nobody Follows
Room temperature ingredients aren't just a suggestion — they're the difference between cookies that look like they came from a bakery versus ones that look like a baking fail compilation video. Your butter should be soft enough to leave an indentation when you press it, but not so soft it's melting into a puddle. Eggs should lose their refrigerator chill, and even your flour benefits from not being ice-cold. If you're the type who never plans ahead (hi, welcome to my world), you can speed this up: cut butter into small cubes and let it sit for 15 minutes, place eggs in warm water for 5 minutes, and microwave your flour for 30 seconds. These little temperature adjustments make your dough come together smoothly instead of fighting you every step of the way.
Why Your Nose Knows Best
When baking these cookies, your nose is actually a better timer than your kitchen timer. Start checking for doneness when you smell that incredible caramel-apple aroma wafting from your oven — usually around the 10-minute mark. The edges should be golden brown and the caramel should be bubbling like a tiny, delicious lava flow. If you wait until they look fully done in the oven, they'll be overbaked and disappointed by the time they cool. Remember, cookies continue cooking on the hot pan for several minutes after you remove them from the oven. Trust your senses: when your kitchen smells like you've been hired by a candle company and the edges are just turning that perfect amber color, pull them out.
The 5-Minute Rest That Changes Everything
After you mix your dough, let it rest for 5 minutes before adding the apples and caramel. This brief pause allows the flour to fully hydrate and the butter to firm up slightly, making the dough easier to work with. Your future self will thank you when you're not wrestling with sticky dough that clings to everything like it's got abandonment issues. This rest also prevents the cookies from spreading too much during baking — nobody wants one giant cookie sheet that you have to break apart like brittle. Five minutes is all it takes to go from frustrating to manageable, and you can use that time to prep your baking sheets or clean up the flour explosion you created while measuring.
The Salt Timing Secret
Adding salt at three different stages creates layers of flavor that make people wonder why these taste so much better than regular cookies. Salt in the caramel enhances the butterscotch notes, salt in the dough balances the sweetness, and salt on top provides those little pops of contrast that make the sweet flavors sing. Use flaky sea salt for the final sprinkle — the larger crystals provide texture and bursts of saltiness that dissolve on your tongue. Regular table salt just disappears into the cookie, but those flaky crystals sit on top like tiny flavor diamonds, waiting to surprise and delight. A friend tried skipping the final salt sprinkle once, claiming it was "too fussy" — let's just say it didn't end well for her cookie reputation.
The Storage Game-Changer
Store these cookies with a piece of bread in the container — the bread will dry out while the cookies stay perfectly chewy. It's like having a personal moisture manager working 24/7 to keep your cookies in peak condition. Replace the bread every day or two, or when it becomes a crispy cracker that could break teeth. Whatever you do, don't store them in the fridge — cold temperatures will turn your caramel into cement and make the cookies taste like they've been in a cryogenic chamber. Room temperature in an airtight container is their happy place, though honestly, they've never lasted more than 24 hours in my house. If you need to refresh them after a day or two, a quick 5-second zap in the microwave brings back that fresh-from-the-oven magic.
Creative Twists and Variations
This recipe is a playground. Here are some of my favorite ways to switch things up:
The Bourbon Apple Edition
Add 2 tablespoons of good bourbon to your caramel for a grown-up version that tastes like autumn in a glass. The alcohol cooks off, leaving behind this incredible depth that makes people ask if you went to pastry school. Use a bourbon you'd actually drink — if it tastes like gasoline, your cookies will too. This version is perfect for holiday parties where you want to impress your friends who think they're too sophisticated for cookies. They'll be sneaking extras into their coat pockets before the night ends.
The Cheddar Apple Situation
Sounds weird, tastes incredible — fold in 1/2 cup of sharp white cheddar cubes along with the apples. The salty, tangy cheese creates this mind-blowing contrast with the sweet caramel and apples. It's like apple pie with cheese, but in cookie form, and somehow it works better than it has any right to. This is the version that converts skeptics into believers and makes people question everything they thought they knew about dessert. Serve these at your next dinner party and watch your guests try to figure out your secret ingredient.
The Spiced Rum Adventure
Replace the vanilla extract with spiced rum and add 1/4 teaspoon of allspice to the dough. The rum adds this incredible warmth that makes the cookies taste like they've been aging in oak barrels instead of your oven. Add some crystallized ginger pieces along with the apples for little pops of spicy-sweet flavor that wake up your taste buds. This version is like taking a bite of the Caribbean, if the Caribbean had apple orchards and caramel waterfalls.
The Chocolate Lover's Dream
Fold in 1 cup of dark chocolate chunks along with the apples, because chocolate makes everything better and anyone who disagrees is living life wrong. Use good quality chocolate that actually tastes like chocolate, not those waxy chips that taste like brown crayons. The chocolate creates these lava-like pockets that burst when you bite into them, mixing with the caramel in ways that should probably be illegal. This is the version that makes chocoholics weep with joy and dietitians weep for different reasons.
The Nuts About You Version
Toasted pecans or walnuts add incredible texture and flavor that takes these from great to legendary. Toast them first in a dry pan until they smell nutty and delicious — about 5 minutes, stirring constantly so they don't burn. Chop them roughly so you get nice big pieces that provide crunch against the soft apples and chewy cookie. A friend who claimed to hate nuts in cookies tried these and actually asked for the recipe, which is basically the highest compliment a cookie can receive.
The Breakfast Cookie Lie
Add 1/2 cup of rolled oats and replace 1/4 cup of the flour with whole wheat flour, then tell yourself these are breakfast cookies and therefore healthy. The oats add great texture and make you feel slightly less guilty about eating cookies before noon. Throw in some dried cranberries along with the apples for a tart contrast that makes you feel like you're being virtuous. This version is perfect for convincing yourself that cookies are an acceptable breakfast food, which they absolutely are on weekends or particularly rough Mondays.
Storing and Bringing It Back to Life
Fridge Storage
Whatever you do, resist the urge to refrigerate these beauties — cold temperatures will turn your caramel into a substance that could probably be used to repair driveways. The fridge also dries out cookies faster than a desert wind, leaving you with sad, stale discs that taste like they've been in storage since the last century. Room temperature in an airtight container is their natural habitat, where they'll stay fresh and chewy for up to 5 days. If your kitchen runs warm and you're worried about the caramel, store them in the coolest room of your house, but never in the fridge unless you enjoy disappointment and broken teeth.
Freezer Friendly
Both the dough and baked cookies freeze beautifully, making this the perfect recipe for emergency dessert situations. For dough, scoop it into balls and freeze them on a baking sheet, then transfer to a freezer bag once solid — this way they won't stick together like cookie dough clumps having a party. Frozen dough balls can go straight from freezer to oven, just add 2-3 minutes to the baking time. Baked cookies can be frozen for up to 3 months, though honestly, they've never lasted more than a week in my freezer. Wrap them individually in plastic wrap, then store in a freezer bag — this prevents freezer burn and allows you to defrost exactly as many as you need for your midnight cookie emergencies.
Best Reheating Method
The microwave is your friend here, but use it wisely — 5-7 seconds is all it takes to transform a day-old cookie back into warm, gooey perfection. Any longer and you'll have lava-hot caramel that could melt steel beams. If you've got more time, a 300°F oven for 5 minutes works wonders and restores that fresh-baked magic without turning your caramel into napalm. Add a tiny splash of water to the container before reheating — it creates steam that helps rehydrate the cookies and brings back that fresh-baked texture. Whatever you do, don't reheat them more than once unless you enjoy cookies that taste like they've been through a dehydration experiment.