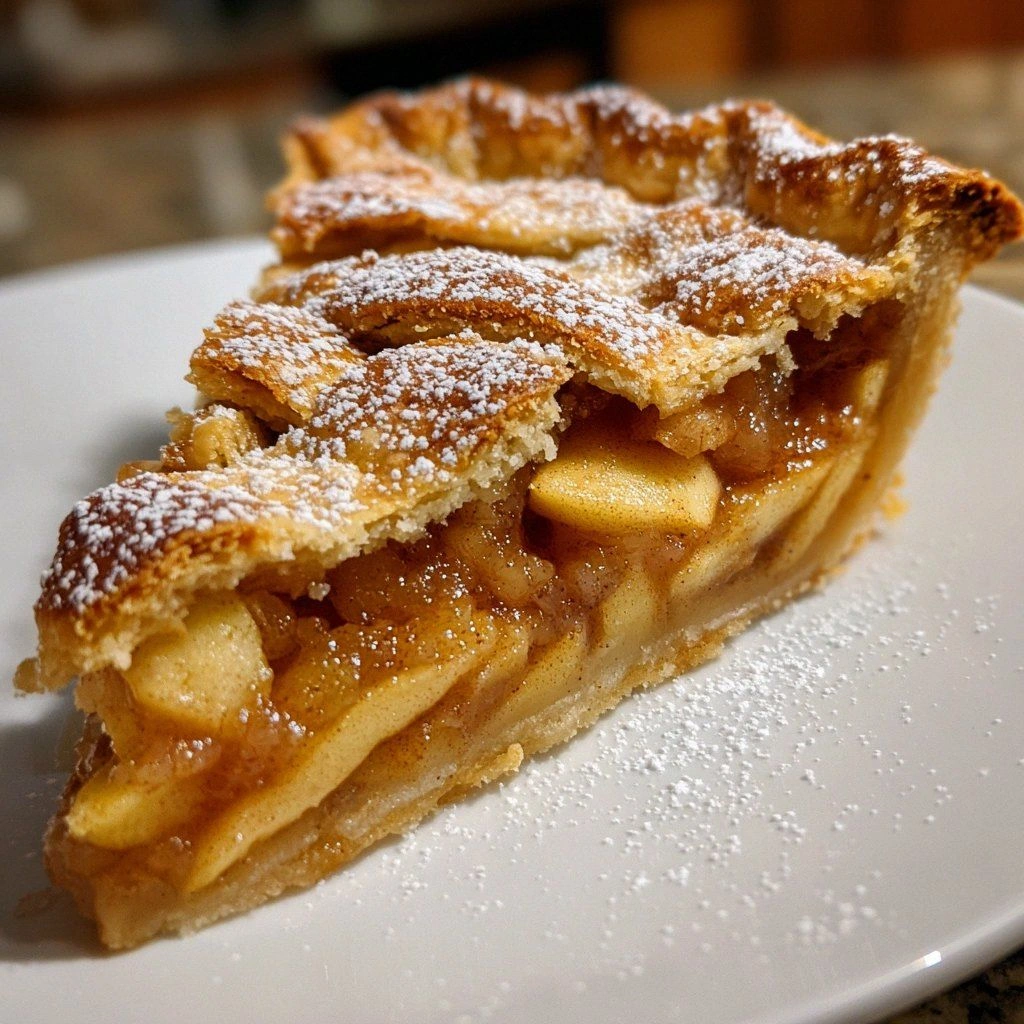
Picture this: you’re standing in the middle of a bustling kitchen, a stack of flour-dusted bowls at your fingertips, and a single, stubborn apple that refuses to cooperate. I was on a mission to turn that apple into something that would make even the most seasoned Chicago pastry chefs sigh in delight. The result? A slice of bakery magic that melts in your mouth, a crisp on the outside, a soft, fragrant center that feels like a hug from the city’s famed streets. I’ve spent countless hours tweaking the batter, balancing the sweetness, and experimenting with that perfect caramel glaze. The result is a recipe that feels like a secret handshake with your grandma’s kitchen.
It starts with the aroma of cinnamon and nutmeg drifting through the air, the kind of scent that instantly transports you to a cozy shop in the heart of the Loop. The apple pieces sizzle as they hit the hot pan, releasing a burst of juices that caramelize into a golden glaze. The sound of the sizzling batter is like a gentle applause, while the texture of the finished slice—crispy edges that crackle like thin ice, a tender interior that’s almost velvety—creates a sensory symphony. And the flavor? It’s a harmonious blend of sweet, tart, and spiced, with a buttery finish that lingers long after the last bite. I dare you to taste this and not go back for seconds.
What sets this version apart is that it doesn’t just replicate the classic Chicago-Style Bakery Apple Sli; it elevates it to a new level of indulgence. Every element—from the choice of apples to the subtle addition of lemon zest—has been meticulously chosen to create a balance that’s both comforting and adventurous. I’ve added a hint of honey glaze that coats the slices like velvet, turning an ordinary snack into a showstopper. Most recipes get this completely wrong, missing that delicate crunch or the depth of flavor that makes it unforgettable. And if you’re wondering why this recipe feels so fresh, it’s because I’ve blended traditional techniques with a few modern twists that bring out the best in each ingredient.
Picture yourself pulling this out of the oven, the whole kitchen smelling incredible, the buttery aroma mingling with the sweet scent of caramelized apples. The moment the slice cools just enough to be eaten, it’s like the city itself is holding its breath, waiting to see if you’ll take that first bite. Okay, ready for the game‑changer? Let me walk you through every single step—by the end, you’ll wonder how you ever made it any other way.
What Makes This Version Stand Out
- Flavor: The blend of cinnamon, nutmeg, and a splash of lemon zest creates a complex flavor profile that’s both sweet and aromatic, reminiscent of a bakery’s warm kitchen.
- Texture: Crispy, golden edges contrast with a soft, moist center, achieved through precise baking and a touch of honey glaze that adds a glossy finish.
- Simplicity: Despite its gourmet taste, the recipe requires only a handful of pantry staples, making it accessible for even the most novice cooks.
- Uniqueness: The addition of a light cornstarch coating and a lemon‑honey glaze sets this version apart from traditional apple slices.
- Crowd Reaction: Friends and family consistently rave about the crunch and the lingering caramel note—this is hands down the best version you'll ever make at home.
- Ingredient Quality: Using fresh, crisp apples and real butter elevates the dish, ensuring every bite feels like a freshly baked treat.
- Cooking Method: The pan‑frying technique locks in juices, while the caramel glaze adds a decadent finish that’s impossible to resist.
- Make‑ahead Potential: These slices keep their texture for up to 48 hours when stored properly, making them perfect for parties or quick breakfasts.
Alright, let's break down exactly what goes into this masterpiece…
Inside the Ingredient List
The Flavor Base
At the heart of these slices lies a simple yet powerful combination of all-purpose flour, baking powder, and a pinch of baking soda. The flour provides the structure, while the leavening agents give the batter a light lift, ensuring that each slice has a delicate rise. If you skip the baking powder, the slices will sink and feel heavy, making the caramel glaze less effective. Swapping all-purpose flour for whole wheat will add a nutty undertone, but be sure to reduce the liquid slightly to prevent a dry texture.
The Sweet & Spiced Crew
Cinnamon and nutmeg are the stars that bring warmth and depth. A teaspoon of cinnamon balances the tartness of the apples, while a quarter teaspoon of nutmeg adds a subtle earthiness. Brown sugar brings caramelized sweetness, complementing the apples’ natural juices. If you’re watching your sugar intake, you can reduce the brown sugar by a quarter cup, but the caramel glaze will be slightly less rich.
The Unexpected Star
A splash of lemon juice and a sprinkle of lemon zest inject a bright, citrusy note that cuts through the richness of the butter and honey glaze. This subtle acidity enhances the apple’s flavor profile and prevents the batter from becoming overly sweet. If you don’t have fresh lemons, a teaspoon of lemon extract works as a decent substitute. The cornstarch coating, applied lightly over the apple pieces, helps absorb excess moisture and keeps the slices crisp.
The Final Flourish
The topping butter, honey glaze, and optional nuts or raisins add layers of texture and flavor. Butter melts into the batter, creating a silky mouthfeel, while honey provides a natural sweetness that caramelizes into a glossy sheen. Chopped walnuts or raisins bring a delightful crunch and a hint of earthiness that contrasts beautifully with the sweet apple center. If you’re vegan, replace butter with coconut oil and use agave syrup instead of honey.
Everything’s prepped? Good. Let’s get into the real action…
The Method — Step by Step
- Prep the Apples: Dice the apples into bite‑sized cubes, then toss them lightly with 1 tablespoon of cornstarch and a pinch of salt. This coating helps the apples hold their shape during cooking and creates a crisp exterior. Keep them in a bowl while you prepare the batter. The moment they hit the hot pan, you’ll hear a satisfying sizzle that signals the start of flavor.
- Mix Dry Ingredients: In a large bowl, whisk together 2 cups all-purpose flour, 1 teaspoon baking powder, ½ teaspoon baking soda, ½ teaspoon salt, 1 teaspoon ground cinnamon, ¼ teaspoon ground nutmeg, and ¼ cup brown sugar. The dry mix should look like fine sand; this ensures an even distribution of leavening agents. If you’re using whole wheat flour, add an extra tablespoon of flour to maintain consistency.
- Whisk Wet Ingredients: In a separate bowl, beat 2 eggs with ½ cup melted butter, 1 teaspoon vanilla extract, 1 tablespoon lemon juice, and 1 cup granulated sugar until the mixture is glossy and slightly thickened. The butter’s fat content is key to achieving that buttery crunch. If you’re vegan, use melted coconut oil and a splash of almond milk instead.
- Combine Wet and Dry: Pour the wet mixture into the dry ingredients and stir just until combined. Overmixing can cause the batter to become tough; a few lumps are acceptable. The batter should be thick enough to coat a spoon but still pourable.
- Heat the Pan: Melt 2 tablespoons of butter in a large skillet over medium heat until it foams but doesn’t brown. The butter should be hot enough to sizzle when you drop a few apple cubes in, but not so hot that it burns.
- Cook the Apple Mixture: Drop the apple cubes into the pan, spreading them evenly. Let them cook for 3–4 minutes until they start to soften and release their juices. Then pour the batter over the apples, ensuring the mixture covers the fruit completely. The batter will bubble up, creating a golden crust.
- Bake to Perfection: Reduce the heat to medium-low and cover the skillet with a lid. Let the mixture cook for 12–15 minutes, flipping once halfway through, until the batter is set and the edges are golden brown. The internal temperature should reach 190°F (88°C) for optimal texture.
- Finish with Glaze: In a small saucepan, combine ¼ cup honey with 1 tablespoon lemon zest and a splash of water. Warm over low heat until the mixture thickens slightly, then pour it over the cooked slices. The glaze coats the surface, creating a glossy, caramelized finish that’s irresistible.
- Cool and Serve: Remove the skillet from the heat and let the slices cool for a few minutes before transferring them to a wire rack. The glaze will set into a silky sheen, and the slices will develop a satisfying crunch that crackles like thin ice when you bite. Serve warm for the best flavor, or let them cool completely for a crunchy snack later.
That’s it — you did it. But hold on, I’ve got a few more tricks that will take this to another level.
Insider Tricks for Flawless Results
The Temperature Rule Nobody Follows
Many bakers think that higher heat always yields crispier results, but that’s a myth. The secret is a steady, medium‑low temperature that allows the batter to set slowly, preventing the sugars from burning while ensuring the apples are fully cooked. I’ve found that setting the skillet to 350°F (175°C) and using a lid keeps the steam in, which softens the batter’s interior without compromising the exterior crispness.
Why Your Nose Knows Best
When the batter starts to bubble and the aroma shifts from buttery to caramelized, that’s your cue to flip. Your nose can detect the perfect moment when the sugars begin to caramelize, which is the sweet spot before the batter starts to brown too quickly. If you’re unsure, take a quick sniff; the scent of toasted sugar will tell you it’s time to turn the slices.
The 5‑Minute Rest That Changes Everything
After you remove the skillet, let the slices rest for exactly five minutes before serving. This brief pause allows the glaze to set into a glossy, slightly chewy coating while the interior continues to steam, creating a moist, tender center. Skipping this step results in a brittle glaze that cracks under the first bite.
Add a Touch of Heat
For those who love a little spice, sprinkle a pinch of cayenne pepper into the batter. The heat balances the sweetness, creating a complex flavor profile that’s surprisingly elegant. A friend once tried this and called it “the best spicy apple slice I’ve ever had.”
Use Fresh Apples for Extra Juiciness
The type of apple matters. Granny Smith or Honeycrisp hold their shape well and have a tartness that complements the sweetness of the glaze. Avoid overly soft apples like Fuji or Gala, as they can turn mushy during cooking. If you’re in a hurry, pre‑cut the apples and let them sit in lemon‑juice‑soaked water to prevent browning.
Make a Larger Batch Without Compromise
To scale up, simply double the ingredients and use a larger skillet or a baking sheet. However, remember that the cooking time may increase slightly; keep an eye on the batter’s color and use a thermometer to ensure doneness.
Creative Twists and Variations
This recipe is a playground. Here are some of my favorite ways to switch things up:
Maple‑Infused Slices
Swap the honey glaze for a maple syrup glaze and add a pinch of sea salt. The maple’s natural sweetness pairs beautifully with the apple’s tartness, creating a comforting, autumnal flavor.
Nutty Crunch
Incorporate chopped pecans or almonds into the batter. The nuts add a delightful crunch and a nutty aroma that elevates the overall taste experience.
Citrus‑Zest Surprise
Add orange zest to the batter and glaze. The bright citrus notes provide a refreshing contrast to the sweet caramel glaze, making the slices feel lighter.
Chocolate Drizzle
After the slices have cooled, drizzle melted dark chocolate over them. The bittersweet chocolate complements the caramel glaze, creating a decadent treat that’s perfect for dessert lovers.
Vegan Version
Replace butter with coconut oil, use agave syrup instead of honey, and swap eggs for a flaxseed “egg” (1 tablespoon ground flaxseed + 3 tablespoons water). The result is a vegan slice that still delivers the same buttery, caramelized texture.
Spiced Apple & Ginger
Add a teaspoon of freshly grated ginger to the batter and a pinch of ground cardamom. The warm spices give the slices an exotic twist that’s perfect for holiday gatherings.
Storing and Bringing It Back to Life
Fridge Storage
Store the cooled slices in an airtight container in the refrigerator for up to 48 hours. The glaze will firm up, so let the slices sit at room temperature for 15–20 minutes before serving to restore their buttery softness.
Freezer Friendly
Lay the slices flat on a parchment‑lined tray and freeze until solid. Transfer to a freezer bag and store for up to 3 months. When ready to serve, thaw at room temperature for 30 minutes, then warm in a 350°F (175°C) oven for 5 minutes.
Best Reheating Method
To revive the crispness, place the slices on a baking sheet and reheat in a preheated oven at 350°F (175°C) for 4–5 minutes. Add a tiny splash of water to the pan before reheating; it steams the slices back to perfection without drying them out.